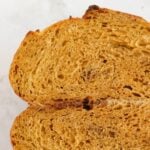
Artisan Pumpkin Sourdough Bread
This sweet pumpkin spice loaf uses pumpkin puree in place of some of the water and is spiced with pumpkin pie seasoning which includes cinnamon, nutmeg, cloves, and ginger.
Servings: 12 servings
Equipment
Ingredients
- 200 grams water ¾ cup + 1 Tablespoon
- 150 grams active sourdough starter scant ⅔ cup
- 50 grams brown sugar ¼ cup
- 200 grams pumpkin puree heaping ¾ cup
- 500 grams bread flour 3½ cup
- 10 grams salt 1½ teaspoon
- 3 grams pumpkin pie seasoning 2 teaspoons
Instructions
- Mix the dough: Mix together the water, sourdough starter, and pumpkin puree. Add in the dry ingredients: bread flour, brown sugar, salt, and pumpkin pie seasoning until the dough becomes a shaggy dough and the flour is incorporated. 200 grams water, 150 grams active sourdough starter, 200 grams pumpkin puree500 grams bread flour, 50 grams brown sugar, 10 grams salt, 3 grams pumpkin pie seasoning
- Stretch and folds: Perform a set of stretch and folds (pull dough out and then fold over itself, turn bowl and perform on other 3 sides) every 30 minutes. Perform 3 sets. If you would like to add mix-ins like chocolate chips or nuts you can add them during the first set of stretch and folds.
- First Rise: Let the dough rest on the counter in a warm spot to finish bulk fermentation. Bulk fermentation is done when the dough is jiggly, domed on top, bubbly on the sides, and risen 50%. If it does not show these signs, continue to let the dough rise. At a dough temperature of 75°F my dough is ready in 4-5 hours from the time it is mixed.
- Shape: Turn the dough onto the counter. To shape it fold the top edge of the dough down toward the center of the dough, pulling gently to create tension. Then, lift the top two corners and fold them toward the center, slightly overlapping. Repeat with the bottom two corners. Finally, roll the dough up like a log. Use your hands to gently pull the dough towards you to create a smooth, taut surface. For a round shape instead of rolling it like a log, roll it once on top of itself and then take your hands in cupping shape and rotate the dough counter-clockwise towards you to get a smooth surface on top of the dough.
- Add to proofing basket: Using a bench scraper or your hands, flip the dough upside down, with the seam side up, into an oval or round proofing basket lightly floured with rice flour or well-floured with all-purpose flour. If you do not have a banneton or proofing basket, line a 8-10″ bowl with a floured tea towel and use that instead.
- Final Rise:Counter Method (opt 1)- Leave the dough on the counter covered for 1-3 hours (this will vary depending on temperature of kitchen and strength of starter). Once it passes the "poke" test, meaning when you poke the dough with a lightly floured finger the dough will slowly fill in. If the dough springs back immediately it needs more time and if it does not fill back in at all it is overproofed and needs baked immediately. Place the dough in the freezer while your oven preheats. Refrigerator Method (opt 2)- Place the dough in the fridge overnight for 8-12 hours. Bake the dough directly from the fridge.
- Preheat the dutch oven in the oven at 450℉. To prevent the bottom of the loaf from burning, place a heavy-duty baking sheet on the rack below.
- Flip dough onto parchment paper and score the bread with a bread lame or sharp knife.
- Bake bread for 25 minutes with the lid on then take the lid off and bake for another 10-15 minutes. To check for doneness, remove the loaf from the pan and tap the bottom of the loaf—it should sound hollow, indicating it’s fully baked. Or check that the internal temperature reaches 205°F.
- Let the bread cool on a cooling rack. To ensure the loaf is fully baked through wait at least 2 hours before cutting. Or if you are like me slice it warm and enjoy warm bread!
Notes
- For best results I recommend using the gram measurements instead of cups, as it will be much more accurate.
- Timing will depend on the temperature of your dough and the activity level of your starter. Watch your dough versus the clock.
- This is delicious topped with cream cheese and a little bit of cinnamon. Or pumpkin butter is also yummy.
Nutrition
Serving: 1slice | Calories: 184kcal | Carbohydrates: 38g | Protein: 6g | Fat: 1g | Saturated Fat: 0.1g | Polyunsaturated Fat: 0.3g | Monounsaturated Fat: 0.1g | Sodium: 327mg | Potassium: 83mg | Fiber: 2g | Sugar: 5g | Vitamin A: 2595IU | Vitamin C: 1mg | Calcium: 16mg | Iron: 1mg
