This post may contain affiliate links . Read my full Disclosure Policy.


I’ve helped hundreds of beginner bakers create their own sourdough starters from scratch, and I know firsthand how confusing the process can feel in the beginning. In fact, I threw away my very first starter because it smelled strange and I didn’t know what was normal. Looking back, it was probably completely fine, but I didn’t have the guidance I needed.

Save & Summarize
That experience is exactly why I created this sourdough starter recipe to be simple, clear, and beginner-friendly. Over the years, I’ve started new sourdough starters several times while teaching others, and this method has worked again and again. Many of the bakers I’ve helped are now making sourdough regularly, and this post will walk you through the full process with a simple feeding schedule, troubleshooting tips, and frequently asked questions so you can feel confident every step of the way.
Table of Contents
- What is sourdough starter?
- How to Make a Sourdough Starter: Tools Needed
- Sourdough Starter Recipe Ingredients
- How to Make Sourdough Starter
- Why do I have to discard some of the sourdough starter each time?
- How temperature impacts sourdough starter
- Sourdough Bread Starter Recipe FAQs
- How to know when sourdough starter is ready:
- What do I do with my sourdough starter once it’s ready?
- What To Make with This Sourdough Bread Starter Recipe
- Sourdough Bread Starter Recipe
What is sourdough starter?
To put it simply sourdough starter is a wild yeast that replaces commercial yeast in a recipe. It is a live fermented culture of flour and water. To keep sourdough starter alive it needs to be fed flour and water. When the starter is fed it activates the good bacteria and wild yeast. The microorganisms in the starter eat the flour and release carbon dioxide which produces bubbles. When the starter has doubled in size and is bubbly it is considered active and can be used to leaven a recipe.
How to Make a Sourdough Starter: Tools Needed
- Kitchen Scale– While you can use cups if you really have to, I highly recommend a kitchen scale to ensure accurate measurements. If you use cups you need to use half the amount of water as flour to compensate for the differences in weight.
- Glass Jar– I prefer wide mouth jars. A pint or quart size will work.
- Jar Cover- I like to use these silicone lids (you can get them at Ikea too) but you can also use the canning jar lid, plastic wrap, foil, or something else that keeps the moisture in. Avoid using paper towels or cloth as that can dry out the top of the starter. Just make sure whatever you use is not airtight.
Sourdough Starter Recipe Ingredients
- Unbleached All-Purpose Flour or Bread Flour– I’ve never been brand specific here, anything works.
- Rye Flour or Whole Wheat Flour– While you can make a starter without one of these I highly recommend it as it does help speed up process.
- Water- Tap water works just fine in most areas. If you know your water has a lot of chlorine it may be best to use filtered but I’ve fed my starter in several states with no issues.
How to Make Sourdough Starter
- Day 1– Weigh the bottom of a clean jar and write the weight in marker on the bottom of the jar. Add 10 grams of all purpose or bread flour and 10 grams of whole wheat or rye flour to a jar and 20 grams of water. Mix it up until the flour is fully incorporated and use a spatula to clean the sides of the jar. Cover loosely with something that holds the moisture in like the jar lid, silicone lid, or foil. Let it sit on the counter for 24 hours. Try to keep the temperature around 77-85℉.
- Day 2- Day 4– Each day trash the majority of the sourdough starter leaving about 10 grams of starter left in the jar. Add 10 grams of all purpose or bread flour and 10 grams of whole wheat or rye to the jar and 20 grams of water. Mix it up and cover loosely. Let it sit on the counter for 24 hours. Your starter may be bubbly or double on day 2 or 3 but then stop doubling for a few days. Don’t panic that’s normal. Swap to a clean jar every 3 or 4 days.
- Day 5-Day 14 (or until starter is active)- By the 24 hour mark, if your starter is smelling strongly of acetone, foaming, and/or has a clear/black or gray liquid on the top, it is getting hungry in between feedings and it’s ready to go to feeding twice a day. The reason we bump up feedings is to ensure the starter doesn’t get too hungry that it becomes susceptible to mold. If it only has a couple bubbles, continue feeding at the 24 hour mark like on days 3 and 4. When feeding twice a day, continue to remove all but 10 grams of starter from the jar. Feed 10 grams of all purpose or bread flour, 10 grams of whole wheat or rye flour and 20 grams of water. Mix and cover. Repeat the same thing 12 hours later. Continue to swap out the jar every couple of days or as needed when the jar gets crusty or dirty.
How to Feed Sourdough Starter
- Once your sourdough starter is active and established, regular feedings will keep it healthy and ready to use. Before making sourdough bread, you will need to feed your starter so it becomes bubbly, active, and strong enough to leaven your dough.
To feed your starter, add flour and water in equal amounts by weight. You will need to feed it at least a ratio of 1:1:1, which means equal parts starter, flour, and water. For example: 10 grams starter, 10 grams flour, and 10 grams water. Learn all of the details about how to feed and maintain your sourdough starter.
Why do I have to discard some of the sourdough starter each time?
When you are first making a sourdough starter I recommend throwing away a little more than half the starter that is in the jar before feeding again. If you do not throw any of it away you will have to feed the starter more flour and water the next time. After several feedings you will be left with a plethora of sourdough starter which is unnecessary and wastes a lot of flour. You only need a tiny amount to keep a sourdough starter going, so more isn’t necessarily better.
Once you have an established starter you can start saving discard for other recipes like these chocolate chip cookies or banana muffins, but while you are establishing it you will want to just throw the discard into the trash. It’s not ready to be used in discard recipes.
How temperature impacts sourdough starter
Sourdough starter is happiest around 77-85F.
If your house runs cooler you will want to try and find a warmer spot. The cooler your house is the longer it will take to double and vice versa, so keep that in mind.
I wrapped my sourdough starter in a seedling heat mat. I wrapped the mat loosely around the jar, not actually touching it, and it kept my starter warm without cooking it. However since these are not temperature regulated keep an eye on it the first day or two to ensure it’s not getting too warm.
Another option is to use a proofing mat (use code country10 for 10% off) . This can be used for the starter and dough. Keep the temperature between 75-85F and place the starter jar directly onto the mat with a towel overtop.
You can always try to warm up your starter by using warmer (not hot) water and putting the starter in the oven with the light on for an hour or two. Don’t leave it in the oven for too long with the light on though as it can cook your starter if it gets too warm. You can also try placing the jar in a bowl of warm water or microwaving a cup of water and then place the starter into the microwave.
If your house is too warm that can also impact fermentation. When your house is warmer fermentation speeds up so you may need to start feeding your starter 2x day sooner. If it is really hot in your house use cool water to feed the starter and put it in a cooler part of the house.
Sourdough Bread Starter Recipe FAQs
It’s hard to say how long it will take to start doubling consistently. It is a living culture and timing will vary house to house. In most instances it should be ready within two weeks. If it is not keep going and be sure the starter is warm enough. Temperature is key!
Nothing! It’s common for the starter to have a false start. So just keep going it will come back!
If your starter is only a couple days old it is most likely just water separation. Whereas a bubbly starter that is growing with each feeding is most likely hooch. Hooch is a natural byproduct and fermentation and is an indicator your starter is hungry. If your starter develops hooch bump up to feeding twice a day.
Yes feeding your starter too often can dilute the good bacteria in the starter. So if your starter does not have many bubbles and is not growing in size within 12 hours I would continue to let your starter sit for the full 24 hours.
Unfortunately yes. Any type of fuzz, pink or blue/green colors are a good indicator of mold. There is sadly nothing you can do once the starter molds. You need to toss the starter and begin again.
To be sure a starter does not mold in the first 24 hours make sure the temperature is in the 77-85F range and that the flour you are using is fresh.
To avoid mold, be sure to keep an eye on your starter. If your starter gets too hungry it is more susceptible to mold. For that reason, if you are seeing these signs at the 24 hour mark bump up to feeding 2x a day.
Here’s a few signs your starter is starving:
– acetone smell
– no bubbles left by next feeding (completely flat)
– develops liquid on the surface (hooch)
It can take time. Continue to feed your starter and have patience. It will get there. If it has been at least 2 weeks with little to no activity double check your starter is warm enough. That is typically the biggest issue. You can also switch to filtered water and see if that helps.
How to know when sourdough starter is ready:


Once active, within 4-12 hours of feeding the starter you should be seeing these signs:
- Sweet, yeast smell- A healthy sourdough starter will have a pleasant yeast smell. Whereas, acetone or vinegar smells are sign the starter is not fully developed or is hungry and needs fed.
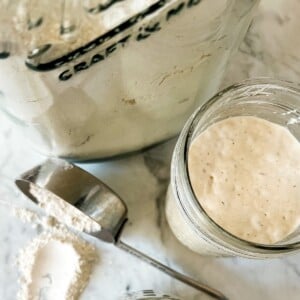
- Bubbly on side and top- Sourdough starter should have visible bubbles all over the sides and a mix of large and small bubbles on the surface.
- Doubles- The starter should be doubling in size or more. Placing a rubber band around the jar, marking where it is at after feeding it, can help you visually see when it doubles.
- Clings to jar- When tilted on the side the starter should cling to the side of the jar instead of immediately moving away from the side. See picture above for an example.
- Thick- Consistency should be thick not runny. If it is dripping out when poured, it’s too runny.
- Float test- One last check to ensure your starter is ready to use is to see if the starter floats in water. When poured into water it should float to the surface.
What do I do with my sourdough starter once it’s ready?
Take My Online Class
Ready to start making sourdough bread? My online class will teach you everything you need to know to make delicious artisan bread from home on any schedule and at any skill level. Set yourself up for success with clear, concise explanations, easy to follow recipes, and a few extra bonuses. Plus, get access to my private mentoring group, my eBook All Roads Lead to Sourdough, and some of my 100+ year old dehydrated sourdough starter (if you live in the USA).
Congratulations you have successfully made a sourdough starter! Now what?
Once your sourdough starter is successfully activated you can wean the starter off the whole wheat or rye flour. To do this replace 5 grams of the whole wheat or rye with your regular flour the first time. Then the next time replace 10 grams and so on. If the starter gets sluggish you can continue to add in 5 grams of whole wheat or so.
What To Make with This Sourdough Bread Starter Recipe
Now your sourdough starter is ready to make bread. Now that it’s ready you need to bulk up your starter. To do this you can begin to feed it more flour and water to get the desired amount for a loaf. Be sure to save some so you can continue to keep it going. Find my sourdough starter feeding schedule here.
Now you’re ready to start making bread! A few of my beginner-friendly sourdough recipes include Overnight sourdough bread, Same Day Sourdough Bread, Sourdough Sandwich Bread, and Sourdough Focaccia. You can even convert your favorite recipes to sourdough, too!
Sourdough Bread Starter Recipe
Equipment
Ingredients
- 1 5 lb bag of unbleached all-purpose flour or bread flour
- 1 5 lb bag of whole wheat flour or rye flour
- Water – tap or filtered
Instructions
- Day 1– Weigh the bottom of a clean jar and write the weight in marker on the bottom of the jar. Add 10 grams of all purpose or bread flour and 10 grams of whole wheat or rye flour to a jar and 20 grams of water. Mix it up until the flour is fully incorporated and use a spatula to clean the sides of the jar. Cover loosely with something that holds the moisture in like the jar lid, silicone lid, or foil. Let it sit on the counter for 24 hours. Try to keep the temperature around 77-85℉.
- Day 2- Day 4– Each day trash the majority of the sourdough starter leaving about 10 grams of starter left in the jar. Add 10 grams of all purpose or bread flour and 10 grams of whole wheat or rye to the jar and 20 grams of water. Mix it up and cover loosely. Let it sit on the counter for 24 hours. Your starter may be bubbly or double on day 2 or 3 but then stop doubling for a few days. Don’t panic that’s normal. Swap to a clean jar every 3 or 4 days.
- Day 5-Day 14 (or until starter is active)- By the 24 hour mark, if your starter is smelling strongly of acetone, foaming, and/or has a clear/black or gray liquid on the top, it is getting hungry in between feedings and it’s ready to go to feeding twice a day. The reason we bump up feedings is to ensure the starter doesn’t get too hungry that it becomes susceptible to mold. If it only has a couple bubbles, continue feeding at the 24 hour mark like on days 3 and 4. When feeding twice a day, continue to remove all but 10 grams of starter from the jar. Feed 10 grams of all purpose or bread flour, 10 grams of whole wheat or rye flour and 20 grams of water. Mix and cover. Repeat the same thing 12 hours later. Continue to swap out the jar every couple of days or as needed when the jar gets crusty or dirty.
Notes
- The starter will typically be ready within 10-14 days. The starter is ready when it doubles or more in size with each feeding of flour and water. It also will try to cling to the sides of the jar and will be bubbly on the sides and top.
- Once the starter is consistently doubling, you can wean the starter off of whole wheat or rye flour. To do this, bump down the whole wheat or rye flour by 5 grams each feeding and replace it with more all purpose or bread flour. Once completely removed, if the starter is sluggish, give it a couple days of feedings. If it does not perk up, add in 5-10 grams of whole wheat or rye for a few more days to continue strengthening it. Once weaned, you can give the starter a large feeding to have enough to make a loaf of bread.
- I recommend continuing to feed the starter daily for at least one more week after to ensure the starter is strong and healthy before placing in the fridge if desired.


have had some issues so I’m going to try your method and do it closely and then try your same day sourdough bread wish me luck
You got this!
Can I make a starter using flour I mill? If so, I have hard red and soft white wheat berries. Which would work the best? My plan is to keep using the milled flour to make sourdough once the starter is mature. If this is a bad idea, please advise!
Yes that should be just fine! I would recommend hard red.
Could this be made with Gluten Free Flours?
I would recommend finding a gluten free specific recipe like this one: https://www.letthemeatgfcake.com/gluten-free-sourdough-starter/ as there may be specific tips for gluten free flours.
I am so confused. I am not seeing it double. I’m on day 4 right now it does bubble. Just little bubbles but nothing crazy and it’s not rising or doubling down I continue on ? Or should I start over. It’s so little in the jar I’m wondering if I am doing it wrong.
Continue on it will get there!