This post may contain affiliate links . Read my full Disclosure Policy.


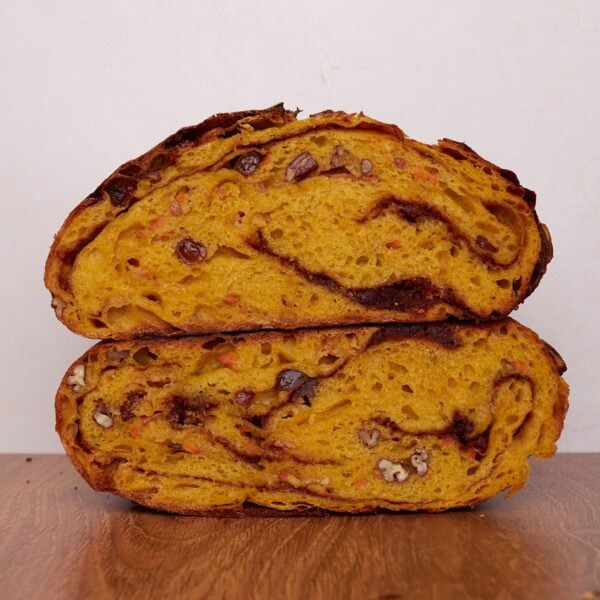
This Chocolate Sourdough Bread is a chocolate lover’s dream, boasting a rich, chocolatey flavor with a sweet taste and a crisp crust. It’s delicious on it’s own or paired with butter or cream cheese. A perfect treat to share this holiday season.

Save & Summarize
I love adding different flavors and mix-ins to sourdough bread, especially sweet flavors such as Pumpkin, S’mores, White Chocolate Almond, or Cinnamon Honey Butter. This sourdough chocolate bread is no exception and will satisfy any sweet tooth! It has a rich chocolatey flavor in every bite and has the option to add chocolate chunks for a burst of ooey gooey chocolate.
This is a beginner-friendly recipe that can be made in one day or can be fermented overnight in the fridge. If you are craving something sweet now and don’t want to wait for the long fermentation, try my Sourdough Chocolate Banana Quick Bread, Baked Sourdough Chocolate Donuts, or Sourdough Chocolate Cake made with sourdough discard.
Tips for Success
- Ensure the dough has risen before shaping it. It will be too dense and potentially raw in the middle if it does not have time to ferment before baking. Look for bubbles throughout and a strong yet airy dough.
- All the extra sugar in this dough can slow down fermentation, so finding a warm spot for it to rise is important for success. If your house runs cool, use a bread mat (use code country10 for 10%) or proofing box to keep the dough warm. You can also try placing the dough in the oven with the light on, on top of the fridge, near a heating vent, or in the microwave with a boiling glass of water.
- Shape the dough so it has a taut, smooth surface. This will result in a crisp crust that is easier to score.

Sample baking schedule
This schedule is based on estimates with a dough at 78 degrees Farenheit. The temperature of your dough, kitchen, humidity, and strength of starter will all impact the times. While this will give you a good estimate it is best to look at the signs the dough is ready to move forward instead of the clock. If your dough is at a cooler temperature please expect longer rise times.
Overnight Schedule
| Steps | Time |
| Feed sourdough starter 1:1:1 ratio (i.e. 50 g starter: 50 g flour: 50 g water) *If you do not have extra starter be sure to feed your starter a little more so you have leftover | Day One: 1 pm |
| Mix dough & Bulk ferment | 5:00 pm |
| Stretch & folds | 5:30 pm-6:30 pm |
| Shape | 9 pm |
| Cold ferment in the fridge | 9 pm- 8 am |
| Bake | Day Two: 8 am |
Same day schedule
Alternatively, you can also bake the loaf in the same day by fermenting the dough on the counter instead of in the fridge for the second proof. This is assuming dough is at 78 degrees Farenheit.
| Steps | Time |
| Feed sourdough starter 1:4:4 ratio (i.e. 10 g starter: 40 g flour: 40 g water) | 10 pm (the night before) |
| Mix dough & Bulk ferment | 8 am |
| Stretch & folds | 8:30 am-9:30 am |
| Shape | 12 pm |
| Second proof on counter | 12 pm- 2 pm |
| Bake | 2 pm |

Ingredients for Chocolate Sourdough Bread
- Active sourdough starter – An active starter is one that has been recently fed, has doubled in size, and is bubbly. To learn more or make your own sourdough starter, check out my Easy Sourdough Starter recipe.
- Sugars – This bread has a mixture of granulated white sugar and brown sugar to add sweetness to the dough giving it a sweet chocolatey flavor. The extra sugar in the dough will slow down fermentation, so it is important to allow it to rise in a warm spot.
- Cocoa powder – Using cocoa powder adds the rich chocolate flavor throughout the dough.
- Salt – You can use any type of salt you have on hand.
- Bread flour – Sourdough bread is a higher hydration dough, so using flour that is efficient at absorbing water is ideal. Bread flour has a high protein content and works well for that purpose. You can use all-purpose flour, but I recommend reducing the water by 25 grams.
- Water – Despite what some people say, I’ve always used tap water without any issues, but you can use filtered water if you prefer.
- Optional mix-ins: 1 cup chocolate chips or Heath® bits – You can use milk chocolate, or dark chocolate chips – whichever you prefer.
Shop all my favorites in one place
Check out all my favorite sourdough tools and exclusive discount codes just for you!

How to Make Double Chocolate Sourdough Bread
Feed sourdough starter
The first step to making bread is to feed your sourdough starter. The temperature of your house, activity level of your starter, and how much you feed the starter will all impact how quickly your starter rises. A 1:1:1 ratio meaning 1 part starter: 1 part flour: 1 part water will rise in about 4-6 hours. Whereas a 1:5:5 ratio meaning 1 part starter: 5 part flour: 5 part water will rise in about 12 hours. Feed based on the timing you want to make bread. Once the starter doubles or exceeds its size and becomes bubbly, it is ready for use. If you can’t use the starter while it is at peak place it in the fridge until you are ready.
Mix ingredients
Mix Dough: To a large bowl, add all the dough ingredients except the mix-ins. Mix together with a danish dough whisk (10% off with link), spoon or hands until completely combined. I recommend using a container with straight sides instead of a large mixing bowl so it is easier to see how much the dough has risen. Cover bowl with a lid or dinner plate and begin bulk fermentation, resting the dough for 30 minutes and keeping the dough at 78-80ºF.
Stretch and folds
After 30 minutes, perform a set of stretch and folds. Wet your hand and reach down to the bottom of the dough. Pull the dough up and over the top of the dough. Turn the bowl and repeat again – 4-6 times until the dough won’t stretch anymore. Cover the dough and let rest for 30 minutes. After 30 minutes, add the chocolate chips if you would like. Perform a second set of stretch and folds. Cover and wait 30 minutes. Perform a 3rd set of stretch and folds. Add a 4th set of folds if the dough feels weak.
Bulk Fermentation:
After the last stretch and fold, cover the dough and let rest for the remainder of the bulk fermentation. From mixing the ingredients to shaping it can take about 4-5 hours, or longer if your dough is cooler. Watch for the dough to have risen about 50%, appear domed in the middle, pulling away from the edges and have a few scattered bubbles before shaping.
If the dough is very pillowy, sticky, and deflates when working with it, it is overproofed. At this point you can try to bake it if it will hold some shape. Personally, my favorite thing to do with overproofed dough is to make focaccia. Put it in an oiled 9×13 pan with more butter on top and add seasoning and cheese. Dimple the dough and bake at 425F for 25-30 minutes.
Shape and Cold Ferment
Dump the dough on the counter. Use a bench scraper and a wet hand on each side of the dough, going around in a circle and tucking the dough under itself forming a ball. Let the dough rest for 30 minutes. After 30 minutes, flip the dough over. Going around in a circle, pull the dough towards the center and then flip the dough so the seam side is on the bottom. Using cupping hands, rotate the dough towards you, creating a taut surface. Place upside down in a basket and cover. Refrigerate for 8-12 hours for the cold fermentation. The fridge slows down fermentation which allows your dough to sit for longer periods of time. To avoid overproofing, I recommend baking within 8-12 hours of being in the fridge.
Alternatively, you can bake this loaf in one day by keeping the dough in a warm spot for 1-3 hours. To determine when the dough is ready to bake you will perform the poke test. The poke test is administered by lightly pressing a floured finger into the dough. If the dough springs back immediately it needs more time and if the dough does not spring back at all it is overproofed. If it slowly fills back in (it may not even completely fill back in) it is ready to bake. While you preheat the Dutch oven, I recommend placing the dough in the freezer to cool. This will make it a little easier to score. This route will give you a much milder flavor and is not recommended for those with gluten sensitivities. While the oven is preheating place the loaf in the freezer to cool. This will help with scoring the dough.
Bake
Preheat a Dutch oven at 450ºF. Pull the loaf out of the refrigerator. Remove the cover and flip the dough onto a piece of parchment paper. Use a bread lame or very sharp knife to score the dough. Place the scored dough into the Dutch oven with the lid on. Bake at 450ºF for 30 minutes covered and then an extra 5 minutes uncovered. If you find your loaf is getting burned on the top you can bake for 25 minutes covered and then turn the temperature down to 425F and bake for an additional 15 minutes uncovered. The loaf should sound hollow if you knock on the bottom and register 205ºF. If it doesn’t, bake a few extra minutes with the lid on. Once done baking, remove from the dutch oven and place onto a wire rack to cool. Be sure to allow it to cool before slicing.

Ways to use chocolate bread
This bread is delicious on its own, topped with butter or cream cheese, or you can make the ultimate chocolate French toast! Just dip it in a mixture of eggs, milk, and vanilla extract for a decadent breakfast that would be perfect for the holidays. You could also use it to make it into a delicious bread pudding. This bread would also make an amazing gift for loved ones over the holiday season! You can easily take this recipe and make mini bread loaves (find the instructions here) and gift them to friends and family.
Storing Sourdough Bread
Store a whole loaf, or a side that can be placed cut side down with only the crust exposed, on the counter up to 2 days with just a tea towel over it. If the inside of the loaf is exposed I store it in a bread box or in a ziplock back.
Sourdough will not hold its crunch for extended periods of time but can be revived in the oven or toaster. To refresh a loaf preheat the oven to 400F. Run the loaf quickly under water and then place in the oven for 10-15 minutes until the crust is crispy again.
Sourdough bread also freezes really well. To freeze a loaf, either place the whole or half a loaf into a freezer safe bag. Alternatively, preslice the loaf and place parchment paper in between each slice before placing in a freezer bag.
To thaw, place the loaf on the counter at room temperature for several hours in the ziplock bag. If you are in a time crunch I’ve used the defrost feature in the microwave to thaw my loaf. Once thawed, use the same refresh instructions as listed above. For individual slices, pulled from the freezer, pop it in the toaster.
Frequently Asked Questions
If your loaf won’t hold its shape, flattening out during the bake, it is most likely a sign of overproofing. In this case shorten the rise time or keep it at a cooler temperature.
However, if the dough did not rise and felt dense during shaping then it is most likely flat because it is significantly underproofed.
All the extra sugar can cause your loaf to burn if your oven runs hot or it is too close to the heating element. If your loaf is burning with the recommended bake times you can bake it for 25 minutes covered and then remove the lid and turn down the oven to 425F for 15 minutes.
If your loaf is not rising as expected use a meat thermometer to check the temperature of the dough. If it is in the 60’s or low 70’s you need to find a warmer spot. The extra sugar in the loaf slows down fermentation so having it in a warm spot really helps it to rise in a timely fashion. Do not shape the dough until it has risen.
If your house runs cool, use a bread mat (use code country10 for 10%) or proofing box to keep the dough warm. You can also try placing the dough in the oven with the light on, on top of the fridge, near a heating vent, or in the microwave with a boiling glass of water.
While this bread is typically a little more dense than regular sourdough bread it shouldn’t be doughy or overly dense. Ensure proper fermentation by using a straight edge container to track the rise of the dough. This will really help.

Chocolate Sourdough Bread
Equipment
Ingredients
- 150 grams sourdough starter, ⅔ cup
- 65 grams granulated sugar, ⅓ cup
- 55 grams brown sugar, ¼ cup
- 30 grams cocoa powder, ¼ cup + 2 Tablespoons
- 10 grams salt, 1 ½ teaspoons
- 500 grams bread flour, 3 ½ cup
- 350 grams water, 1 ½ cup
- Optional mix-ins: 1 cup chocolate chips or Heath® bits
Instructions
- To a large bowl, add all the dough ingredients except the mix-ins. Mix together until completely combined. Cover and begin bulk fermentation, resting the dough for 30 minutes and keeping the dough at 78-80ºF.150 grams sourdough starter, 65 grams granulated sugar, 55 grams brown sugar, 30 grams cocoa powder, 10 grams salt, 500 grams bread flour, 350 grams water
- After 30 minutes, perform a set of stretch and folds. Wet your hand and reach down to the bottom of the dough. Pull the dough up and over the top of the dough. Turn the bowl and repeat again – 4-6 times until the dough won’t stretch anymore. Cover the dough and let rest for 30 minutes. After 30 minutes, add the chocolate chips if you would like. Perform a second set of stretch and folds. Cover and wait 30 minutes. Perform a 3rd set of stretch and folds. Add a 4th set of folds if the dough feels weak.Optional mix-ins: 1 cup chocolate chips or Heath® bits
- Cover the dough and let rest for the remainder of the bulk fermentation. From the time you mix your dough to the end of bulk fermentation it will be about 4 hours, or longer if the temperature is cooler. However it is best to watch for the following signs the dough is ready to move on: risen about 50%, pulling away from the sides of the bowl with a dome shape in the middle, and scattered bubbles around the sides of the bowl.
- Dump the dough on the counter. Use a bench scraper and a wet hand on each side of the dough, going around in a circle and tucking the dough under itself forming a ball. Let the dough rest for 30 minutes.
- After 30 minutes, flip the dough over. Going around in a circle, pull the dough towards the center and then flip the dough so the seam is on the bottom. Using cupping hands, rotate the dough towards you, creating a taut surface. Place upside down in a basket and cover. Refrigerate for 8-12 hours.
- Preheat a Dutch oven at 450ºF. Pull the loaf out of the refrigerator. Remove the cover and flip the dough onto a piece of parchment paper. Use a bread lame or very sharp knife to score the dough. Place the scored dough into the Dutch oven with the lid on. Bake for 30 minutes with the lid on followed by 5 minutes with the lid off. The loaf should sound hollow if you knock on the bottom and register at 205ºF. If it doesn’t, bake a few extra minutes with the lid on. Cool before slicing.
Notes
Nutrition
Nutrition information is automatically calculated, so should only be used as an approximation.
Made this with the heath bits and it was a total fail. It was wet mess so I put it in a loaf pan. It did not bake well and into the trash it went. I wonder if I should have sifted out the heath bits from the all the sugary powder in the bag. What are your thoughts on that? Or should I have broken up a heath bar to add to it?
No worries, I tried again with chocolate chips and my husband turned his nose up at the thought of the chocolate bread as a whole. Then he tasted it, loved it, and got upset when I took it all to work! LOL My co-workers loved it!
Oh no sorry about the first loaf. I’ve added heath bits before and it worked for me. It’s hard to say without knowing all the factors but it sounds more like it was an issue with proofing especially since it wasn’t baking. It may have been overproofed or depending on your starters activity level it could have been your starter was either weak or past peak when using which can lead to premature overproofing (like stickiness).
Could I bulk ferment in the fridge overnight? And then shorten the time it rests in the baskets the next day?
Have I read somewhere that people sub black coffee for the water or they add coffee grounds? Could you do either of those two options?
I added a few chocolate chips with every stretch and fold (16 times). Followed everything else to the letter. PERFECTION!!! Thank you Emily!
So glad you like it! It’s one of my favorites.
Hi,
Thanks for the recipe. one small question, I always use cold unfed starter from fridge and the ratio is 4% of flour weight.
in your chocolate sourdough recipe, what should be my sugar percentage in that scenario?
I don’t want it to be come out too sweet.
any info will be really helpful.
kind regards.
I tweaked your recipe slightly by substituting in 50g of chocolate milk, blooming my cocoa powder in the water/milk with the sugars, and I added 200g of mixed chocolate chips, MnM’s and broken up Twix during all 3 stretch and folds I did. Rose beautifully, BF 11 hours because it’s cold, and baked 40 minutes covered, 10 uncovered. It is perfectly chocolatey and delicious all by itself! 10/10
Sounds delicious!