This post may contain affiliate links . Read my full Disclosure Policy.


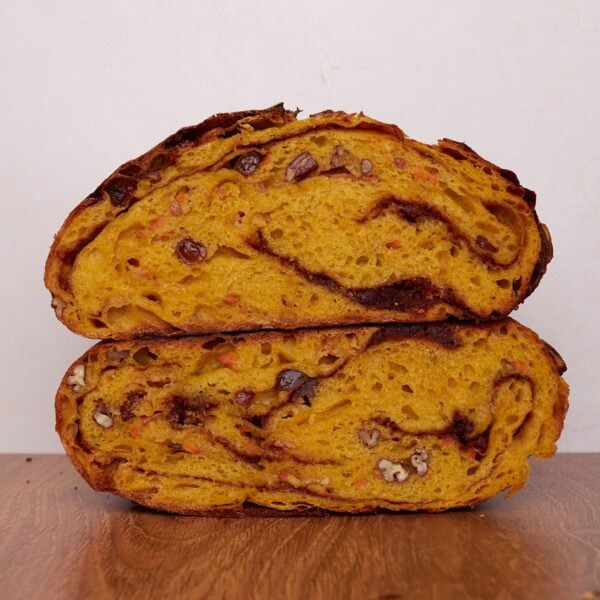
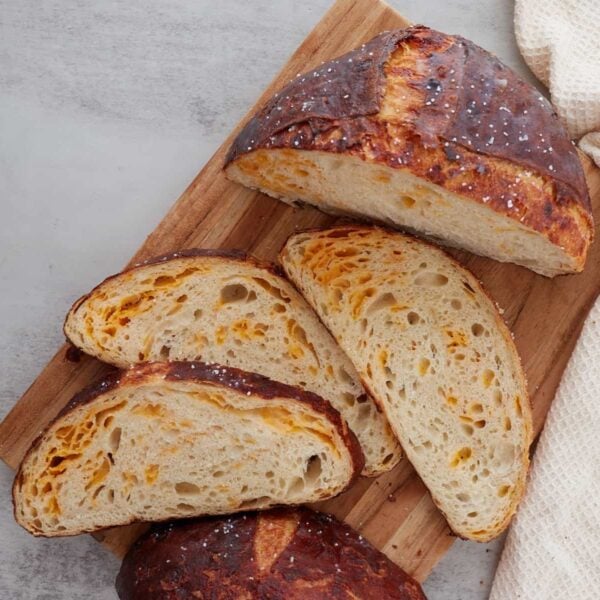
If you’re looking for festive Valentine’s Day recipes you have to try this pink sourdough bread, made without any artificial dyes. You can make your entire loaf pink or create a swirled effect like shown in the photos. This easy, same-day sourdough bread recipe can be made the same day and has a delicious crisp crust and soft crumb.

Save & Summarize
Dragon fruit powder
This loaf is naturally colored with the help of Kate’s Naturals dragon fruit powder. Not all dragon fruit powder will bake pink, but if you use Kate’s Naturals Dragon Fruit Powder it will work. With the small amount added, it does not add a flavor to the bread.

Ingredients
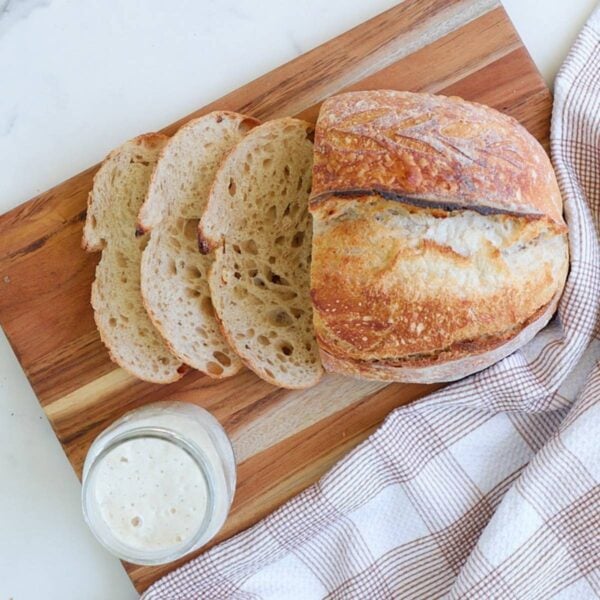
- Active Sourdough Starter – An active sourdough starter is one that has been recently fed, has doubled in size, and is bubbly. To learn more about your sourdough starter or how to make one at home, refer to my Easy Sourdough Starter Recipe. This recipe uses 150 grams of sourdough starter to help to dough rise within one day.
- Bread Flour – Flour with a higher protein content, like bread flour, is ideal for sourdough bread. Sourdough bread is a higher hydration dough so it needs a flour that is efficient at absorbing water like bread flour is. Since I know I will get asked, you can use all purpose flour although it’s not ideal. For all purpose flour reduce the water by 25 grams.
- Water – Despite what some people say, I find that using tap water in sourdough bread works just fine! You can use filtered water if you prefer, but I do not think it is necessary.
- Salt – Any type of salt you have on hand works great.
- Dragon Fruit Powder– Many brands of dragon fruit powder don’t bake up pink. To get the pink swirl you need to use Kate’s Naturals on Amazon.

How to make pink swirled sourdough bread
Feed sourdough starter
The first step to making bread is to feed your sourdough starter. The temperature of your house, activity level of your starter, and how much you feed the starter will all impact how quickly your starter rises. A 1:1:1 ratio meaning 1 part starter: 1 part flour: 1 part water will rise in about 4 hours. Whereas a 1:5:5 ratio meaning 1 part starter: 5 part flour: 5 part water will rise in about 12 hours. Feed based on the timing you want to make bread. Once the starter doubles or exceeds its size and becomes bubbly, it is ready for use. If you can’t use the starter while it is at peak place it in the fridge until you are ready.
Mix ingredients
If you want the swirled loaf you will need to make 2 doughs, one with the dragon fruit powder and one without. Start by making the plain loaf by adding water to a container with straight sides or a medium clear bowl. Add the sourdough starter and salt to the water. Mix with a danish dough whisk (10% off with link), your hands, or a large spoon. Add the flour and mix until the dough is shaggy and the flour is incorporated. Cover with a lid or dinner plate so the dough doesn’t dry out and let sit for 30 minutes in a a warm spot. For a similar timeline as listed below keep the dough temperature at 75 degrees Fahrenheit. Repeat the same steps for the pink dough but add the dragon fruit powder to the water with the starter and salt.

Stretch and folds
Perform a set of stretch and folds or coil folds every 30 minutes on both doughs. It is ok if it is not exact but try to get 3 sets in with a break in between each set. To stretch and fold, grab one side of the dough with a damp hand and gently shimmy the dough up, and then fold it on itself. Repeat this 3 more times rotating the bowl 90 degrees each time. If you are adding mix-ins you can add them during the first stretch and fold.
The goal is to get the dough to pass the “windowpane test”. To perform the windowpane test gently spread a piece of the dough between your pointer fingers and thumbs. You want it thin enough to see light through without it tearing. This tells you the gluten is developed. If it is not passing windowpane after 3 set of stretch and folds I recommend adding a 4th set.
First rise
Let the dough rest on the counter in a warm spot to finish bulk fermentation. Bulk fermentation is done when the dough is jiggly, domed on top, bubbly on the sides, and risen 40-50%. If it does not show these signs, continue to let the dough rise, to finish bulk fermentation. At a dough temperature of 75 degrees Fahrenheit my dough is ready in 4 hours from the time it is mixed.
PreShape
Dump the plain loaf of dough onto the counter. Spread the dough out into a large rectangle. Do not spread it so thin that you can see through it. Dump the pink dough on top and spread into a large rectangle to match the dough underneath. Fold the dough like a trifold, starting with one side bringing it on top of itself two-third of the way. Fold the other side on top. This will make a long log. Roll up the dough like a cinnamon roll. Let the dough rest for 20-30 minutes uncovered.


Final shape
To avoid messing up the swirl inside do not completely reshape this. Begin by pinching the sides together to seal them.
To make a round loaf make a cupping shape with your hands and rotate the dough counter clockwise towards you creating a round smooth ball. Lightly flour a basket with rice flour (or all purpose flour) and turn the dough upside down into the basket.
To make an oval loaf turn the dough over and then gently place your hands under the sides of dough and bring your hands together so the dough meets in the middle. Place the dough in a lightly floured oval basket.

Second proof Option 1- Refrigerator method (my preferred method)
Place the dough in the fridge overnight for 8-12 hours. Bake directly from the fridge.
Second proof Option 2- Counter method
Leave the dough on the counter for 1-3 hours (this will vary depending on temperature of kitchen and strength of starter). Once it passes the “poke” test, meaning when you poke the dough with a lightly floured finger the dough will slowly fill in. If the dough springs back immediately it needs more time and if it does not fill back in at all it is overproofed and needs baked immediately. Place the dough in the freezer while your oven preheat the oven to make it easier to score.
Scoring
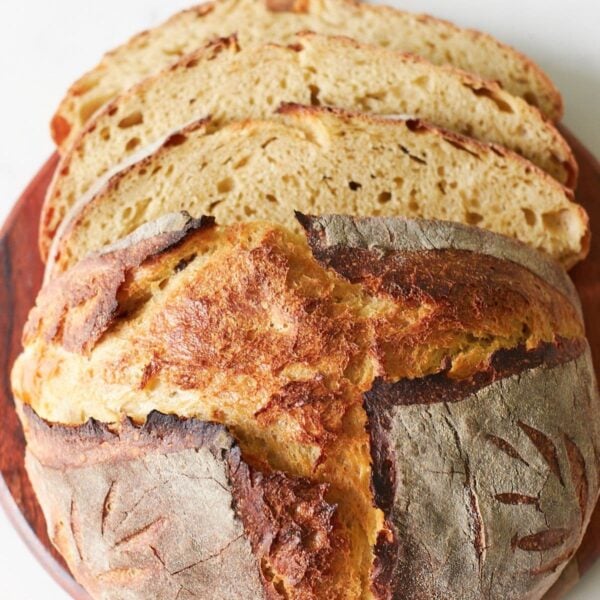
Preheat the dutch oven in the oven at 450 degrees Fahrenheit. Flip dough onto a piece of parchment paper and score the bread with a bread lame or sharp knife about a quarter inch deep. This can be one line or multiple depending on your preferences. For more intricate designs hold the blade at 90 degrees and make shallow cuts.

Baking
Bake the bread for 30 minutes with the lid on. Take the lid off and bake for another 10 minutes. The bread should sound hollow when you knock on the bottom, this will tell you the bread is cooked through.
Remove the bread from the dutch oven and allow it to cool on a cooling rack before slicing.

Sample baking schedule
Many different factors can affect your sourdough bread, such as the temperature of your dough, kitchen, humidity, and the strength of your starter, so this baking schedule is based on rough estimates. It is more important to look for the visual cues of the bread to know when it is ready.
Refrigerator method
This is my favorite method! It always turns out, it has more time to develop flavor, and the dough is cold so it is easier to score. This schedule is assuming dough temperature of 75 degrees Farenheit.
| Steps | Time |
| Feed starter a 1:1:1 ratio (50 grams sourdough starter: 50 grams flour: 50 grams water) *If you do not have extra starter be sure to feed your starter a little more so you have leftover | Day One: 1:00 pm |
| Mix dough | 5:00 pm |
| Stretch & folds | 5:30 pm – 6:30 pm |
| Finish Bulk fermentation | 6:30 – 9 pm |
| Pre-shape | 9 pm |
| Final shape and final proof in the fridge | 9:30 pm |
| Bake | Day two: Between 6-10 am |
Counter method
This method is great to use to bake your sourdough bread within one day. Before scoring, add the dough to the freezer while the oven preheats so it is easier to make your cuts in the dough. This schedule is based on a dough temperature of 75 degrees Farenheit.
| Steps | Time |
| Feed starter a 1:4:4 ratio (or a 1:5:5 ratio if going to be 12 hours before using) *If you do not have extra starter be sure to feed your starter a little more so you have leftover | Day One: 10 pm |
| Mix dough | Day two: 8 am |
| Stretch & folds | 8:30 – 9:30 am |
| Bulk fermentation | 9:30 am – 12 pm |
| Pre-shape | 12 pm |
| Final shape and final rise on the counter | 12:30 pm- 1:30 pm (or whenever dough is passing the poke test) |
| Preheat oven and place dough in freezer while waiting to firm dough and bake | 2 pm |

Storing Sourdough Bread
Store a whole loaf, or a side that can be placed cut side down with only the crust exposed, on the counter up to 2 days with just a tea towel over it. If the inside of the loaf is exposed I store it in a bread box, bread bag or brown paper bag.
Sourdough will not hold its crunch for extended periods of time but can be revived in the oven or toaster. To refresh a loaf preheat the oven to 450F. Run the loaf quickly under water and then place in the oven for 10-15 minutes until the crust is crispy again.
Sourdough bread also freezes really well. To freeze a loaf, either place the whole or half a loaf into a freezer safe bag. Alternatively, preslice the loaf and place parchment paper in between each slice before placing in a freezer bag.
To thaw, place the loaf on the counter for several hours in the ziplock bag. If you are in a time crunch I’ve used the defrost feature in the microwave to thaw my loaf. Once thawed, use the same refresh instructions as listed above. For individual slices, pulled from the freezer, pop it in the toaster.
Frequently Asked Questions
I haven’t tried other brands to confirm, but what I have heard from some people is that the color bakes out with other brands. To ensure a vibrant pink color I recommend using Kate’s Naturals, linked in the recipe card.
Just adding beet root powder by itself will not result in a pink loaf. While the dough will be pink initially, once baked the pink color will be gone. If you really want to use beet root powder you need to add vitamin c as well to get the pink color to stay. Check out Breadtopia’s article on how to add beetroot powder to your bread for more information.
No. We are only using 10 grams of dragon fruit powder in this loaf so it’s not enough to add any noticeable flavor to the loaf.
Yes simply add 20 grams of dragon fruit powder to my Same Day Sourdough Bread recipe.
Yes! You can make a blue or purple loaf using butterfly pea flowers. Add 20 grams of the flowers to 350 grams of hot water and let soak 20-30 minutes. Remove the flowers and use that water to make your loaf.

Pink Sourdough Bread
Equipment
Ingredients
Plain dough
- 175 grams warm water, ¾ cup
- 75 grams active sourdough starter, ⅓ cup
- 5 grams salt, 1 teaspoon
- 250 grams bread flour, 1 ¾ cup
Pink dough
- 175 grams warm water, ¾ cup
- 75 grams active sourdough starter, ⅓ cup
- 5 grams salt, 1 teaspoon
- 10 grams Kate's Natural dragon fruit powder (you need to use this brand) , 1 Tablespoon
- 250 grams bread flour, 1 ¾ cup
Instructions
- Feed sourdough starter: Four hours prior to making this loaf mix together 50 grams of active sourdough starter, 50 grams flour, and 50 grams of water. Let sit in a warm spot to double in size.
- Mix the plain dough: Once the sourdough starter is ready begin mixing your dough. If you want the swirled loaf you will need to make 2 doughs, one with the dragon fruit powder and one without. Start by making the plain loaf by adding 175 grams warm water to a container with straight sides or a medium clear bowl. Add 75 grams of sourdough starter and 5 grams of salt to the water. Mix with a danish dough whisk (10% off with link), your hands, or a large spoon. Add 250 grams of bread flour and mix until the dough is shaggy and the flour is incorporated.175 grams warm water, 75 grams active sourdough starter, 5 grams salt, 250 grams bread flour
- Mix the pink dough: To a second straight edge container add 175 grams of warm water along with 75 grams of active sourdough starter, 5 grams of salt, and 10 grams of dragon fruit powder. Mix with a danish dough whisk (10% off with link), your hands, or a large spoon. Add 250 grams of bread flour and mix until the dough is shaggy and the flour is incorporated.175 grams warm water, 75 grams active sourdough starter, 5 grams salt, 10 grams Kate's Natural dragon fruit powder (you need to use this brand) , 250 grams bread flour
- Cover and rest: Cover the dough with a lid or dinner plate so the dough doesn't dry out. Let sit for 30 minutes in a warm spot. For a similar timeline as listed in the sample schedule keep the dough temperature at 75 degrees Fahrenheit.
- Stretch and folds: Perform a set of stretch and folds (pull dough out and then fold over itself, turn bowl and perform on other 3 sides) or coil folds every 30 minutes on each dough. Perform 3 sets. The goal is to get the dough to pass the windowpane test, described in more detail in the post. You can add your mix-ins in the first set of stretch and folds.
- First Rise: Let the dough rest on the counter in a warm spot to finish bulk fermentation. Bulk fermentation is done when the dough is jiggly, domed on top, bubbly on the sides, and risen 40-50%. If it does not show these signs, continue to let the dough rise. At a dough temperature of 75 degrees Fahrenheit my dough is ready in about 4 hours from the time it is mixed.
- Preshape: Dump the plain loaf of dough onto the counter. Spread the dough out into a large rectangle. Do not spread it so thin that you can see through it. Dump the pink dough on top and spread into a large rectangle to match the dough underneath. Fold the dough like a trifold, starting with one side bringing it on top of itself two-third of the way. Fold the other side on top. This will make a long log. Roll up the dough like a cinnamon roll. Let the dough rest for 20-30 minutes uncovered. See pictures in the blog post for reference.
- Final Shape: To avoid messing up the swirl inside do not completely reshape this. Begin by pinching the sides together to seal them. To make a round loaf make a cupping shape with your hands and rotate the dough counter clockwise towards you creating a round smooth ball. Lightly flour a basket with rice flour (or all purpose flour) and turn the dough upside down into the basket. To make an oval loaf turn the dough over and then gently place your hands under the sides of dough and bring your hands together so the dough meets in the middle. Place the dough in a lightly floured oval basket. Cover the basket.
- Final Rise Option 1: Refrigerator Method (my preferred method)- Place the dough in the fridge overnight for 8-12 hours. Bake the dough directly from the fridge.
- Final Rise Option 2: Counter Method– Leave the dough on the counter for 1-3 hours (this will vary depending on temperature of kitchen and strength of starter). Once it passes the "poke" test, meaning when you poke the dough with a lightly floured finger the dough will slowly fill in. If the dough springs back immediately it needs more time and if it does not fill back in at all it is overproofed and needs baked immediately. Place the dough in the freezer while your oven preheats.
- Preheat Oven: Once ready to bake preheat dutch oven in the oven at 450℉ degrees Fahrenheit.
- Bake: Flip dough onto parchment paper or silicone bread sling and score the bread with a bread lame or sharp knife about a quarter inch deep at a 45 degree angle on one side of the dough following the curvature of the loaf. Bake the bread for 30 minutes with the lid on. Take the lid off and bake for another 10 minutes. The bread should sound hollow when you knock on the bottom, this will tell you the bread is cooked through.
- Remove the bread from the dutch oven and allow to cool on a cooling rack before slicing. The bread should sound hollow when you knock on the bottom after coming out of the oven, this will tell you the bread is cooked through.
Notes
- To ensure the loaf bakes up pink use Kate’s Naturals Dragon Fruit Powder. Many dragon fruit powders will bake up pale.
- For an all pink loaf make one batch of dough with 20 grams of dragon fruit powder.
- If you prefer to proof your loaf on the counter overnight use my simple overnight sourdough bread recipe.
- For best results I recommend using the gram measurements instead of cups, as it will be much more accurate.
- Timing will depend on the temperature of your dough and the activity level of your starter. Watch your dough versus the clock.
- Find step-by-step photos of the process in the post above.
Nutrition
Nutrition information is automatically calculated, so should only be used as an approximation.
This Pink Swirl is so pretty. I made this for my dog groomer today. I used kates dragonfruit & color is great.
(Tried to add a pic of it but it wont let me)
Thank you so much for the review!
This is the prettiest loaf! I’m in the process of making it. Have you tried shaping the dough into a heart? I wonder if that would mess up the marbling.
Did you end up doing a heart? I think it would be fine but curious how it went.
BEAUTIFUL loaf!! Mine turned out perfectly! I used the same brand of dragonfruit powder recommended and it baked up so vibrant! My girls love their pink sandwiches! My favorite source for recipes as they’re all easy to follow and they turn out great!
Thanks so much Allison!
I really wanted to love this loaf, I did get the powder that you recommended but like some of the other comments it didn’t turn out. I even sprinkled a little more after reading what some people said where the color didn’t come through. Mine also didn’t come through so I just figured that I would provide the feedback. Other than that the bread is very soft, and tasted wonderful. I was curious as to why the color didn’t turn out so I asked ChatGPT and it said this is common with dragon fruit powder because it doesn’t always take to high heat. Sometimes beet root powder can help with dragon fruit. I might try that in the next bake I do. Regardless thank you for putting this recipe together everything was still great besides color mishap.
Hi! Curious if you used just any dragon fruit powder or if you used the brand Kate’s Naturals? Many brands don’t work, like I mention in the blog post, but if you use Kate’s Naturals, the color should come through.
The overall taste/bake of this loaf is good, but I’ve tried to make this recipe twice and both times there is no pink color in the loaf at all once it is baked. Anyone looking to try this may as well skip the addition of the dragon fruit powder and just enjoy the loaf.
Did you use Kate’s natural coloring or a different brand? The Kate’s natural brand has always baked up with the pink color.
I baked it today and it tastes really good! I used the powder you recommended and the color was beautiful! My question…is this dough a wetter dough than normal? Mine stayed pretty wet through stretch and folds so shaping was hard after bf. It didnt rise like normal but overall looked pretty good and the taste is great!!
Hi Lynn! Glad it turned out well. As far as the dough being wetter, I guess it depends on what hydration level you are used to with sourdough bread. I do 70% for all my recipes. One thought I had is that it could potentially be an issue with your starter being acidic. When the starter is acidic, it can lead to a sticky, weaker dough. But if your starter is healthy, you may just be used to a lower hydration, which in that case you can always reduce the water by 20-25 grams each to help.
Thank you! My starter is ok I think. I had just made a cranberry walnut one that turned out well. I will try reducing the water next time. I really want to perfect this one for Valentines!!
I have a question about step #1
Do I need to do this step if I am ready feeding equal parts water, starter and flour?
I am so excited to try this recipe. The pink and white is so pretty!!
Thank you!
Hi you can skip this it doesn’t have to be fed this exact amount you just want your starter active and double in size when adding it to your dough.
I used the exact powder mentioned in the recipe, but my pink did not really come out much at all. Definitely nothing like the picture! Maybe it was a shaping issue, although I tried to follow the instructions exactly. The bread came out good otherwise though! Next time I would try and add more powder I guess!
Hi Ana! Oh no I hope Kate’s Naturals didn’t change their product. I never had an issue with it baking out before. Was it pink at all or not really?
Hey there! I want to make a bunch of these for my friends for v-day this week. Do you have any recommendations for making smaller loaves (I plan to open air bake with a mist of water since I don’t have 8 dutch ovens or the patience to bake them back to back)? Mostly wondering about if halving each loaf will affect BF. TIA!
Hi!
I just made this pink sourdough swirl bread following your recipe exactly except I cold proofed for 15 hrs overnight in the fridge. It tastes wonderful, but the pink color baked out! Any idea why? Should I add more dragon fruit powder next time?
Thanks!
Did you use the brand Kate’s Naturals or a different brand? I’m hearing from some people on Instagram that some brands are not holding color as well.
Different brand. I used Microingredients organic freeze dried dragon fruit powder.
Unfortunately some brands don’t work as well. If you can I would get the Kate’s Naturals brand.
What I read somewhere is that you should add ascorbic acid to the dough. I’m researching this myself before I try it out as I don’t want to waste the dragon fruit powder.
If you use Kate’s Natural you don’t need to worry about it but it would be a good idea with other brands.