This post may contain affiliate links . Read my full Disclosure Policy.

This beginner-friendly, same day Sourdough Bread Bowl recipe is just what you need for soup season! With a crisp crust and soft interior, these naturally leavened bowls are just the right size to fill with your favorite soup.

Save & Summarize
These sourdough bread bowls have a forgiving timeline that can be adjusted to your schedule. You can make them in one day, or let them ferment overnight in the fridge. This recipe is based on my Same Day Sourdough recipe and is then split into 4 mini loaves for sharing.
This recipe follows an open bake method, making it easy to bake multiple loaves of bread at a time without a Dutch oven! Double the recipe and you’ll have enough bread bowls to share or to freeze for later.
Table of Contents
- Reasons you will love this recipe
- What is open baking?
- Important tools to make Homemade Sourdough Bread Bowls
- Ingredients to make Sourdough Bread Bowls
- Instructions to make Sourdough Bread Bowls
- Recipe Tips
- Sample baking schedule
- How to store Sourdough Bread Bowls
- Recipe FAQ
- More sourdough Bread Recipes
- Sourdough Bread Bowls Recipe
Reasons you will love this recipe
- Perfect for soup night- These bread bowls have a delicious sourdough flavor that pairs perfectly with your favorite soups such as clam chowder or chicken noodle. My Sourdough Breadsticks are also great for pairing with soup.
- Naturally leavened-These homemade bread bowls are naturally leavened with a sourdough starter; no commercial yeast is required!
- No kneading required- This is a no-knead bread recipe, you will just follow a simple stretch and fold schedule.
- No special equipment- You don’t need mini dutch ovens or mini banneton baskets for this recipe, just use cereal bowls and a heavy-duty baking sheet.
- Same day schedule- These bread bowls can be made in one day so you can have them in time for dinner.
What is open baking?
To make an artisan loaf of sourdough bread, you typically use a dutch oven to cook the bread in. Cooking the bread in the dutch oven with the lid on helps to trap in steam and allow the bread to rise before the crust hardens at higher heats. To mimic this, we add drenched tea towels to a pan and place it on the rack underneath. This gives the perfect amount of steam and allows a good rise and crispy crust. You can also use ice cubes like I do in my Sourdough bread in a loaf pan recipe.
Important tools to make Homemade Sourdough Bread Bowls
- Baking steel– Using a baking steel or stone helps ensure even cooking with the open bake method. I use a 1/4″ thick baking steel.
- Small baking pan and tea towels – Using this in the oven helps create steam to open bake the bread bowls. An 8×8 or 9×9 pan works great.
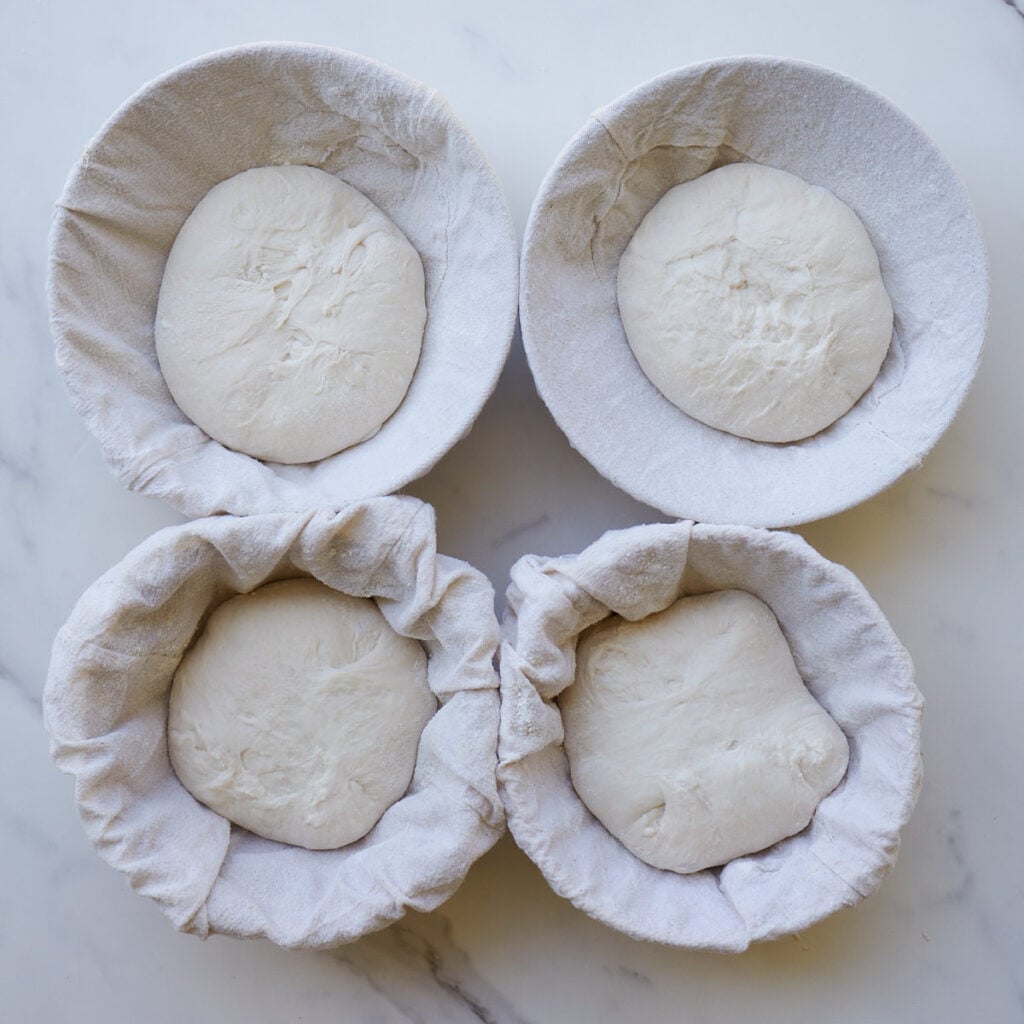
- Cereal bowls – Instead of using a traditional proofing basket, you will want to use a smaller bowl that will fit the small loaves in. I find cereal bowls lined with tea towels to be the perfect size. Or you can buy 5 inch banneton baskets.
Ingredients to make Sourdough Bread Bowls
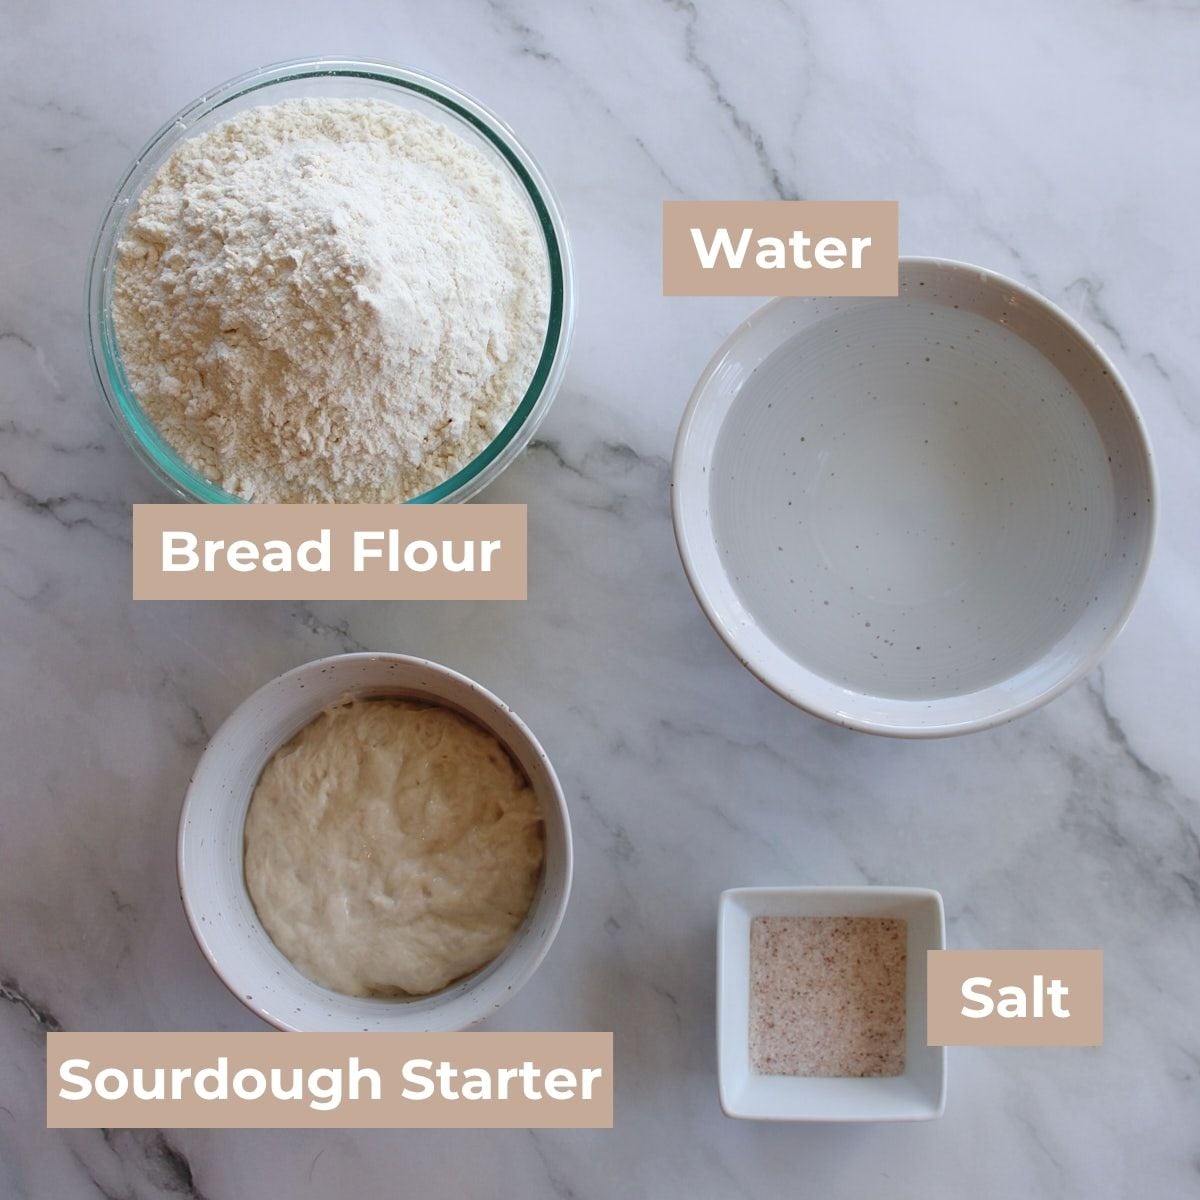
- Active Sourdough Starter – An active sourdough starter is one that has been recently fed, has doubled in size, and is bubbly. If you do not have a sourdough starter you can make one in an little as two weeks with my Easy Sourdough Starter Recipe.
- Bread Flour – Sourdough bread is a higher hydration dough, so using flour that is efficient at absorbing water is ideal. Bread flour has a high protein content and works well for that purpose. You can use all-purpose flour, but I recommend reducing the water by 25 grams.
- Water – Any type of water will work. Despite what some people say, I have never had any trouble using tap water while baking sourdough bread.
- Salt – Any type of salt you have will work for this recipe.
Instructions to make Sourdough Bread Bowls
Feed sourdough starter
The first step to making bread is to feed your sourdough starter. The temperature of your house, activity level of your starter, and how much you feed the starter will all impact how quickly your starter rises. A 1:1:1 ratio meaning 1 part starter: 1 part flour: 1 part water will rise in about 4-6 hours. Whereas a 1:5:5 ratio meaning 1 part starter: 5 part flour: 5 part water will rise in about 12 hours. Feed based on the timing you want to make bread. Once the starter doubles or exceeds its size and becomes bubbly, it is ready for use. If you can’t use the starter while it is at peak place it in the fridge until you are ready.
Mix ingredients
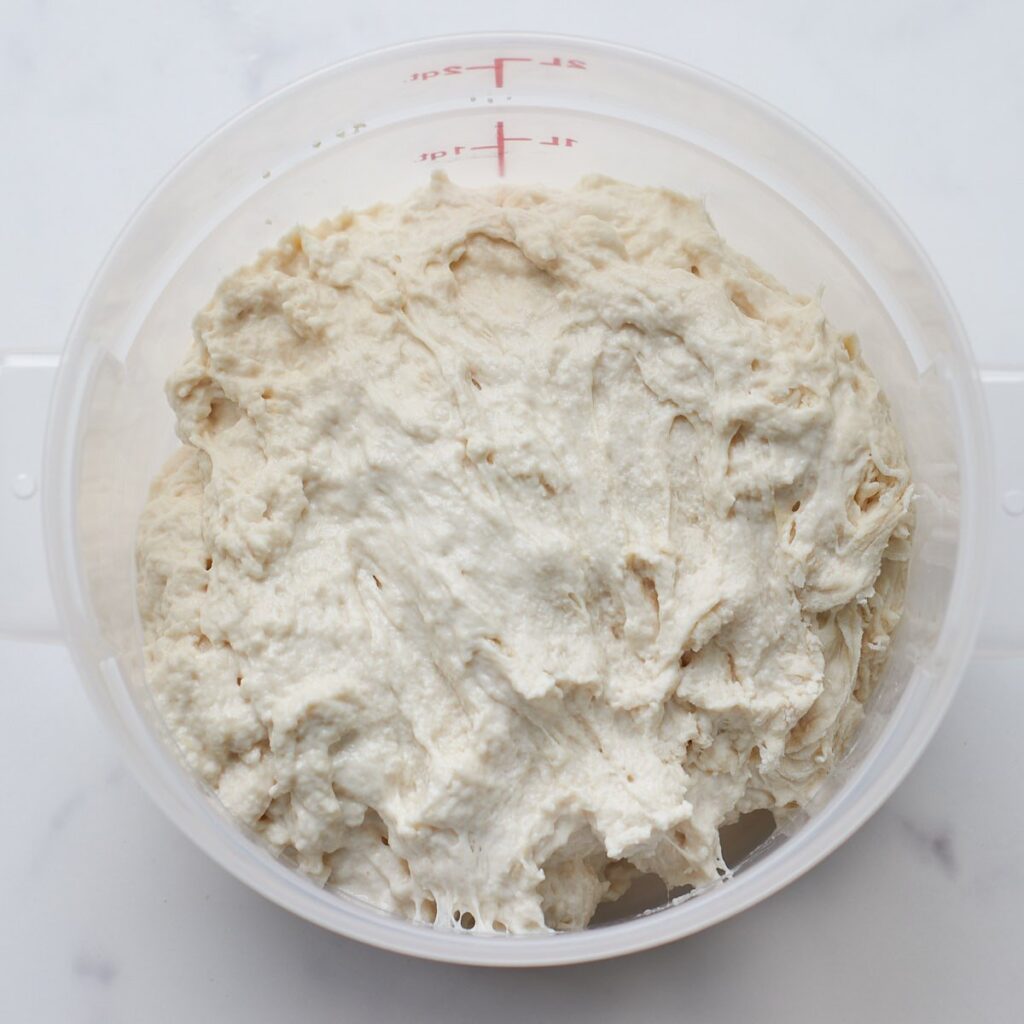
With a danish dough whisk (10% off with link) hands, or large spoon mix together active starter, water, and salt in a container with straight sides or a medium clear bowl. Add the flour and mix until the dough is shaggy and the flour is incorporated. Cover with a lid or dinner plate so the dough doesn’t dry out and let sit for 30 minutes in a a warm spot. For a similar timeline as listed below keep the dough temperature at 75 degrees Fahrenheit.
Stretch and folds
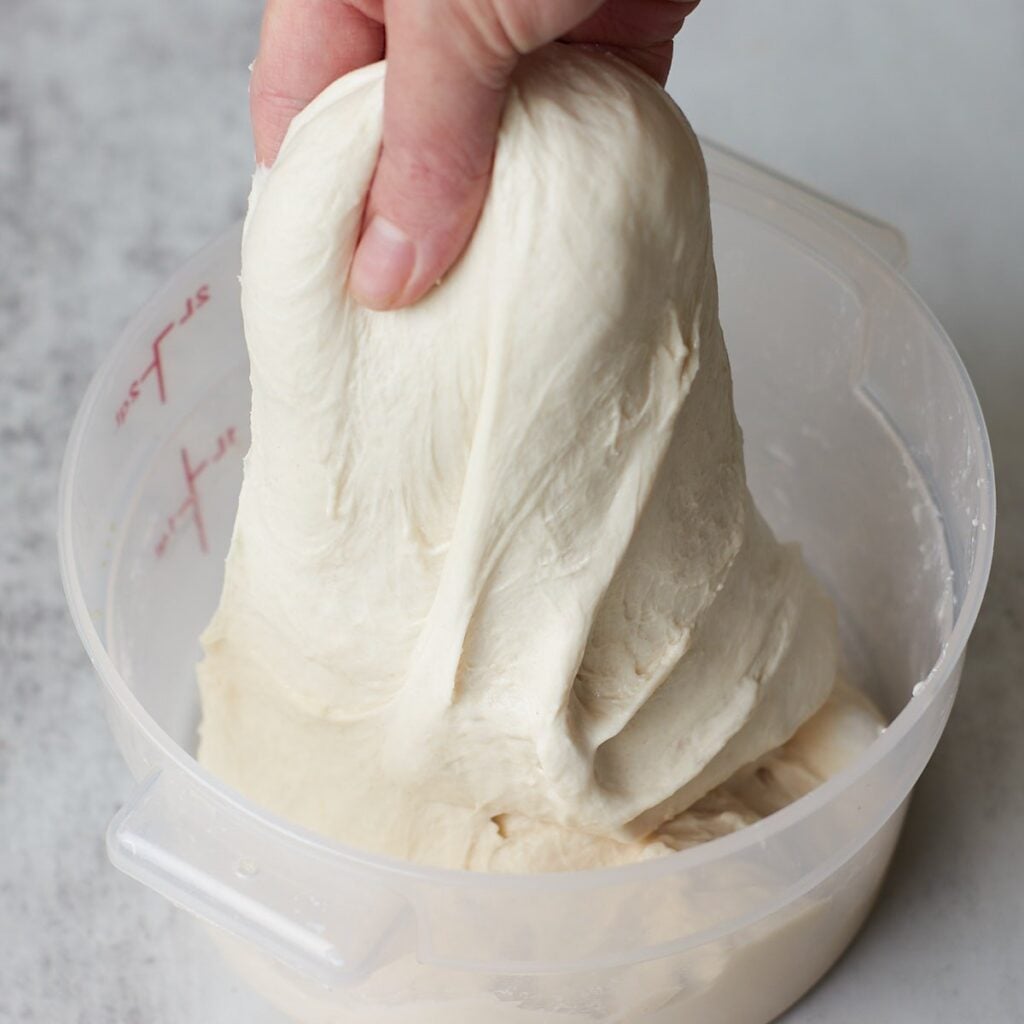
Perform a set of stretch and folds or coil folds every 30 minutes. It is ok if it is not exact but try to get 3 sets in with a break in between each set. To stretch and fold, grab one side of the dough with a damp hand and gently shimmy the dough up, and then fold it on itself. Repeat this 3 more times rotating the bowl 90 degrees each time. If you are adding mix-ins you can add them during the first stretch and fold.
The goal is to get the dough to pass the “windowpane test”. To perform the windowpane test gently spread a piece of the dough between your pointer fingers and thumbs. You want it thin enough to see light through without it tearing. This tells you the gluten is developed. If it is not passing windowpane after 3 set of stretch and folds I recommend adding a 4th set.

First Rise
Let the dough rest on the counter in a warm spot to finish bulk fermentation. Bulk fermentation is done when the dough is jiggly, domed on top, bubbly on the sides, and risen 40-50%. If it does not show these signs, continue to let the dough rise, to finish bulk fermentation. At a dough temperature of 75 degrees Fahrenheit my dough is ready in 4 hours from the time it is mixed.
Shaping
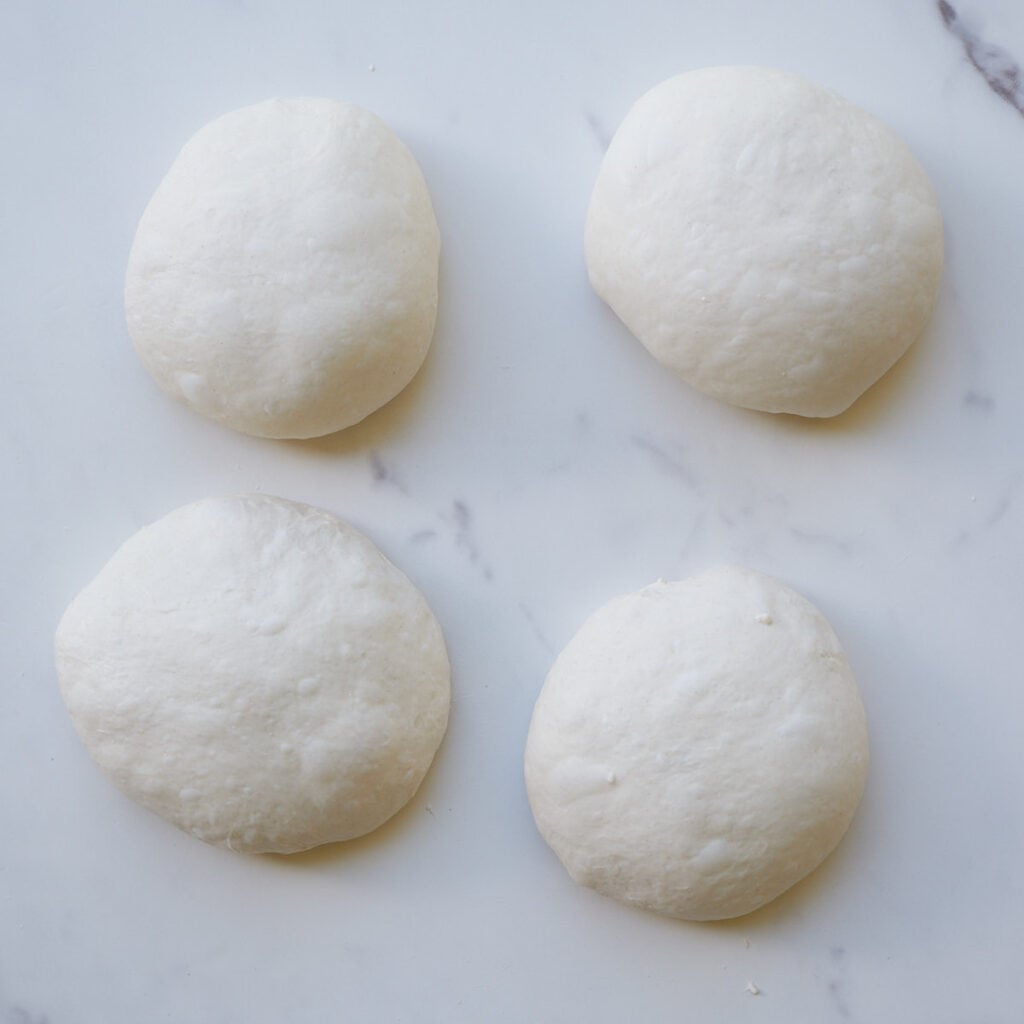
Once the first proof or rise is done separate the dough into 4 equal portions using a bench scraper. For exact measurements weigh the dough and divide by 4 or you can just eyeball it.
Pull the dough towards the middle into a ball and then flip it over. Cup your hands around the dough and rotate counter- clockwise while sliding the dough towards you. Using a bench scraper or your hands, flip the dough upside down, with the seam side up, into a cereal bowl lined with a clean tea towel or bowl cover and a dusting of rice flour or all-purpose flour. Cover the baskets with a tea towel or foil.
Second proof
(option 1)- Refrigerator method (my preferred method)
Place the dough in the fridge overnight for 8-12 hours.
(option 2)- Counter method
Leave the dough on the counter for 1-2 hours (this will vary depending on temperature of kitchen and strength of starter). Once it passes the “poke” test, meaning where you poke slowly fills in, place it in the freezer while your oven preheats so the dough is easier to score.
Baking
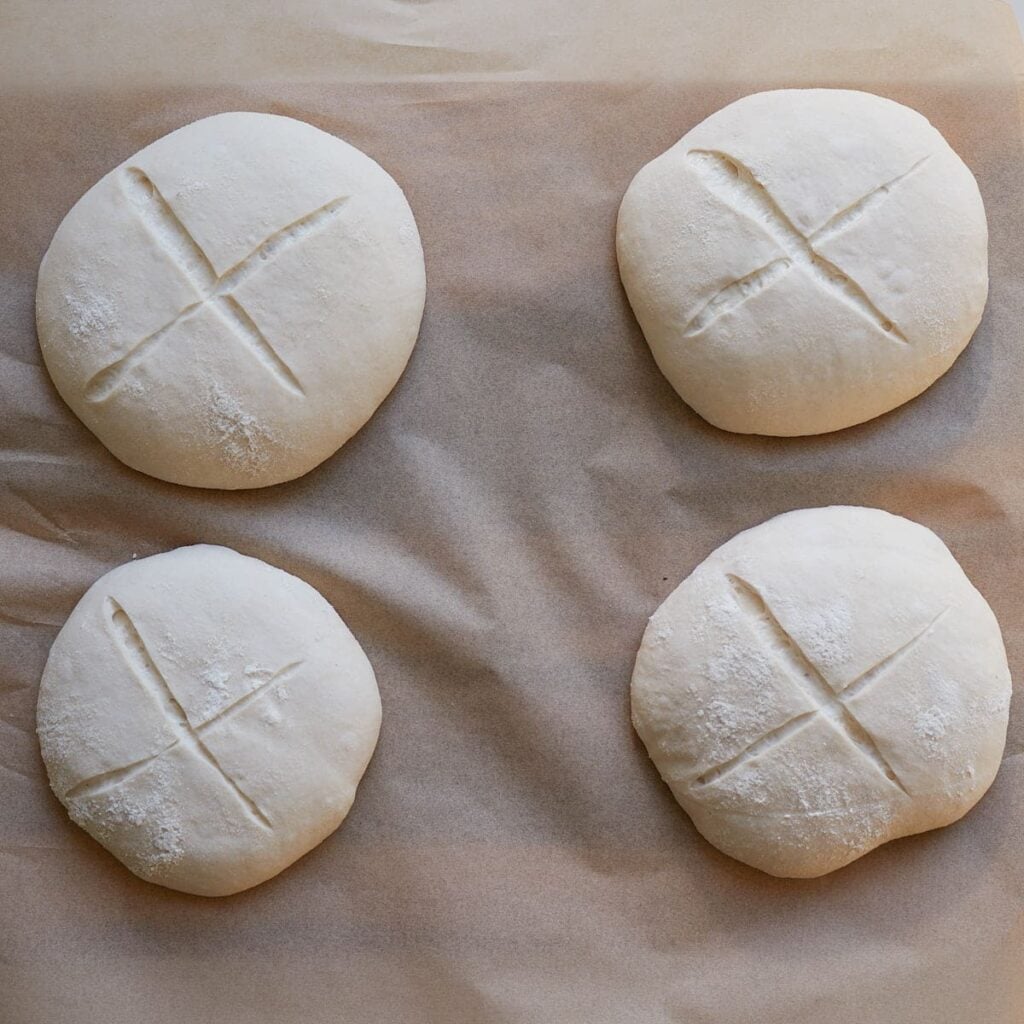
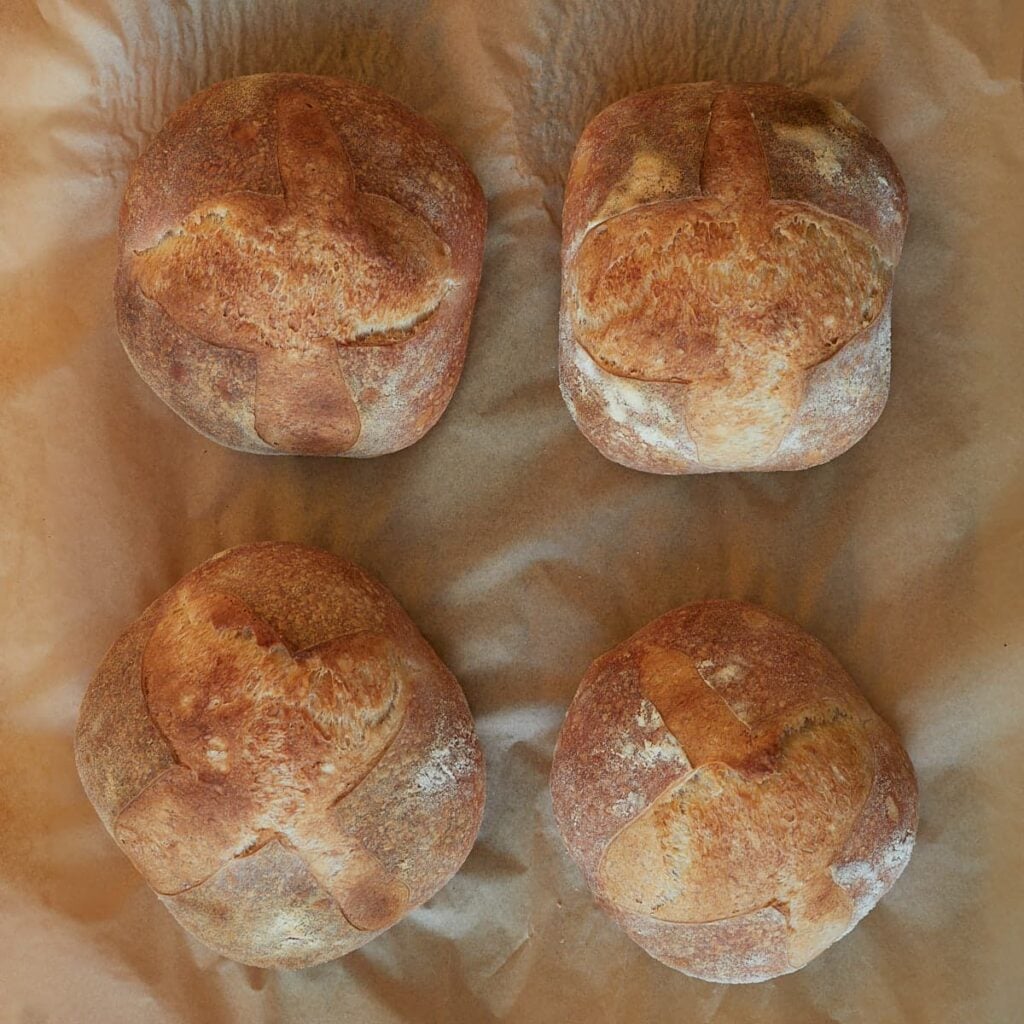
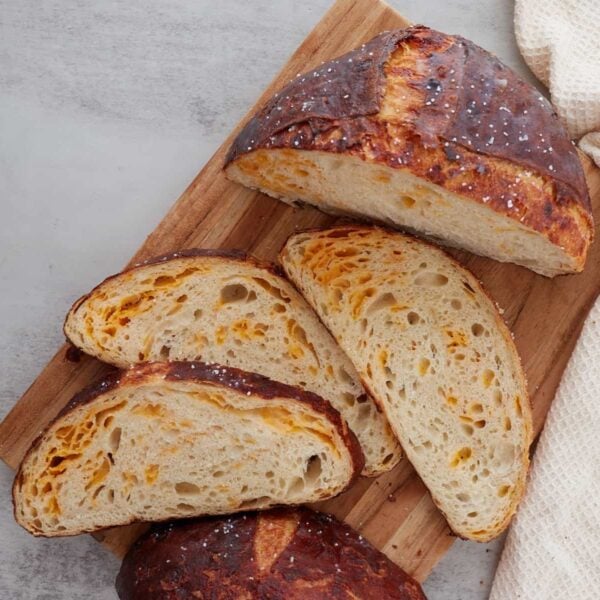
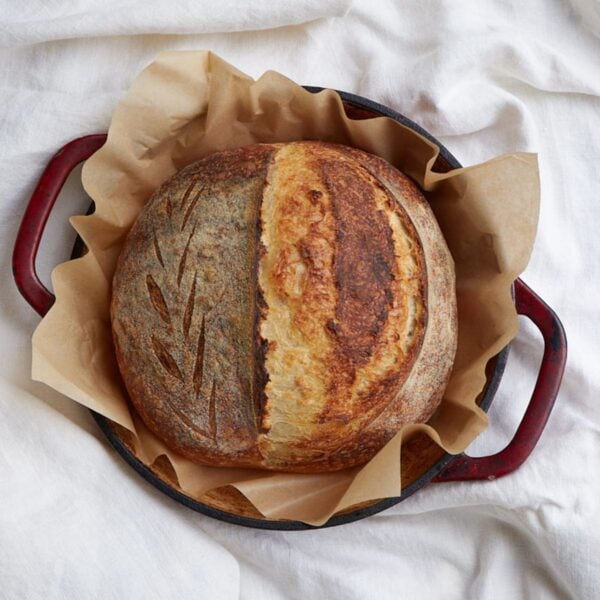
When you are ready to bake, place a baking steel, pizza stone, or cookie sheet in the oven at 400°F to preheat. Soak three tea towels in water and then roll them up and place them in a 8×8 or 9×9 pan. Add ½ cup of water to the pan. Once preheated, dump the bowls of dough onto a piece of parchment paper. Score an x on the top of each dough ball using a sharp knife or bread lame. Using a flat baking sheet, transfer the parchment paper with the loaves into the oven onto the hot baking steel. Place the pan of water and towels on the rack underneath. Bake at 400°F for 20 minutes. Then, remove the pan of water and follow with 15 more minutes at 450°F. You’ll know the bread is cooked through if it sounds hollow when you knock on the bottom.
Serving
Remove the bread bowls from the oven and let them cool on a wire rack. To serve, use a sharp knife to cut a circle in the top of each bread bowl. Hollow out the insides as much as desired and add hot soup of choice, and enjoy!
Recipe Tips
- Be sure to use a sourdough starter that is mature and is bubbly and has consistently doubled in size. If you make a sourdough starter from scratch it should be at least 10 days old before baking bread with it. You can learn more about the sourdough starter life cycle here.
- The temperature of your kitchen can affect how quickly your bread with rise. If your home is running cool, you can use a bread mat (use code country10 for 10%) or proofing box to keep the dough warm to ensure it will rise properly. You can also try leaving the dough in the oven with the light on, above the refrigerator, or near a heating vent.
- Mix your dough in a straight edge container so you can easily see when the dough has risen 40-50%.
- Let the bread bowls cool at least for 15-30 minutes before cutting out the middle and hollowing out.
Sample baking schedule
Many different factors can affect your sourdough bread, such as the temperature of your dough, kitchen, humidity, and the strength of your starter, so this baking schedule is based on rough estimates. It is more important to look for the visual cues of the bread to know when it is ready.
Refrigerator method
This is my favorite method! It always turns out and the dough is cold so it is easy to score. This schedule is assuming dough temperature of 75 degrees Fahrenheit during the first proof.
| Steps | Time |
| Feed starter a 1:1:1 ratio (50 grams sourdough starter: 50 grams flour: 50 grams water) *If you do not have extra starter be sure to feed your starter a little more so you have leftover | Day One: 1:00 pm |
| Mix dough | 5:00 pm |
| Stretch & folds | 5:30 pm – 6:30 pm |
| Finish Bulk fermentation | 6:30 – 9 pm |
Pre-shape | 9 pm |
| Final shape and final proof in the fridge | 9:30 pm |
| Bake | Day two: Between 6-10 am |
Counter method
This method is great to use to bake your sourdough bread within one day. Before scoring, add the dough to the freezer while the oven preheats so it is easier to make your cuts in the dough. This schedule is based on a dough temperature of 75 degrees Fahrenheit.
| Steps | Time |
| Feed starter a 1:4:4 ratio (or a 1:5:5 ratio if going to be 12 hours before using) *If you do not have extra starter be sure to feed your starter a little more so you have leftover | Day One: 10 pm |
| Mix dough | Day two: 8 am |
| Stretch & folds | 8:30 – 9:30 am |
| Finish Bulk fermentation | 9:30 am – 12 pm |
| Pre-shape | 12 pm |
| Final shape and final rise on the counter | 12:30 pm- 1:30 pm (or whenever dough is passing the poke test) |
| Preheat oven and place dough in freezer while waiting to firm dough and bake | 1:30 pm (or whenever dough is ready) |

How to store Sourdough Bread Bowls
To store, you can leave the sourdough bread bowls on the counter covered with a tea towel for up to 2 days. Sourdough will not hold its crunch for extended periods of time but can be revived in the oven or toaster. To refresh the bread bowls, preheat the oven to 450F. Run the loaf quickly under water and then place in the oven for 8-12 minutes until the crust is crispy again. Then cut off the top and add your favorite soup.
Sourdough bread also freezes really well. If you have extra bread bowls, add them to a freezer safe bag and freeze. To thaw, place the bread bowls on the counter for several hours in the ziplock bag. If you are in a time crunch I’ve used the defrost feature in the microwave to thaw my loaf. Once thawed, use the same refresh instructions as listed above.
Recipe FAQ
If you do not want to open bake, you could bake the bread bowls in the Dutch oven in batches. If you have a smaller Dutch oven, only bake one at a time. If you have a larger Dutch oven you may be able to bake two at a time but keep in mind that the bread may not brown evenly if the bread is touching each other inside the Dutch oven. When baking in the Dutch oven preheat to 450°F and bake with the lid on for 20 minutes, followed by 10-15 minutes uncovered.
The baking stone or pizza stone retains a high heat and an even heat distribution, which ensures an even bake and a crisp crust. However, if needed, you can use a sheet pan, just ensure the temperature can get to 450°F.
You can add whatever type of soups you’d like! They are sturdy enough for a creamy soup, soups with broth like chicken noodle, of hearty soups and stews. Chili is another great option that would be perfect for game day!
I recommend using bread flour because it absorbs more liquid than all-purpose. However, in a pinch you can use all-purpose flour, but I recommend reducing the amount of water added by 25 grams.
There are 3 common reasons your sourdough bread did not turn out as you hoped.
1. A Weak Starter
If you made a starter from scratch it should be at least 10 days old, bubbly and doubling consistently, before baking with it. No matter the age of your starter if it is not doubling and getting bubbly with each feeding it is best to strengthen it before baking with it. To strengthen it leave it on the counter and feed it daily until it is doubling.
This is when your dough does not have long enough to ferment. This is especially common in the winter months because fermentation is slower in cooler temperatures.
2. Underproofing
Your loaf may be underproofed if the dough does not rise, the crumb is dense and gummy, the crust is pale with a doughy center even with long bake times, or has large holes at the top with dense areas surrounding it.
If your loaf is underproofed extend the time your dough is on the counter for the first proof. Use a bread mat (use code country10 for 10% off) or proofing box to keep the dough warm to ensure it will rise properly. You can also try leaving the dough in the oven with the light on, above the refrigerator, or near a heating vent.
3. Overproofing
This happens when the dough is left for too long to rise. The gluten bonds begin to wear out and the loaf rises too much resulting in the loaf collapsing.
Your loaf may be overproofed if the dough won’t hold shape, puffy and sticky dough, flat loaf with lots of small holes through out. If your loaves are overproofing, shorten the time your dough is on the counter for the first proof or find a cooler temperature.
More sourdough Bread Recipes
Sourdough Artisan Bread Recipes
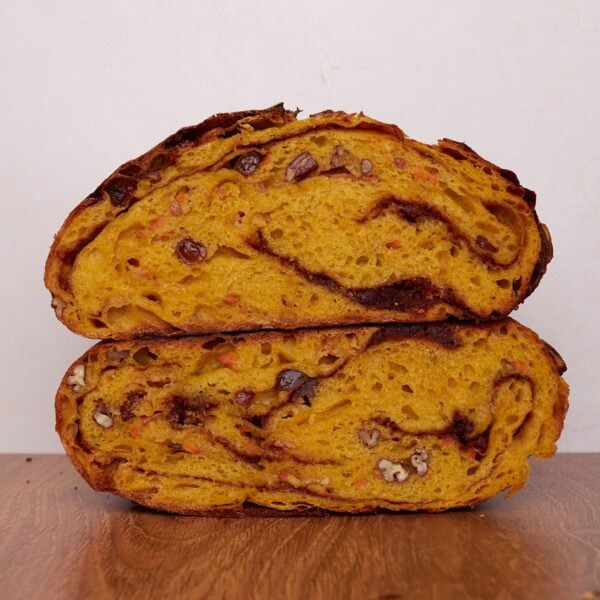
Carrot Cake Sourdough Bread
Sourdough Bread Recipes
Cheesy Sourdough Pretzel Bread
Same Day Sourdough Recipes
30+ Same Day Sourdough Recipes (with active starter)
Same Day Sourdough Recipes
Einkorn Sourdough Bread
Tried this Sourdough Bread Bowls or another recipe from the site? I’d love to hear about it! Drop a star rating and share your thoughts in the comments—can’t wait to see what you’re baking!

Sourdough Bread Bowls
Equipment
Ingredients
- 150 grams sourdough starter, ⅔ cup
- 500 grams bread flour, 3½ cups
- 350 grams water, 1½ cups
- 10 grams salt, ½ Tablespoon
Instructions
- Mix the dough: With a danish dough whisk, hands, or large spoon mix together active starter, water, and salt in a 2 quart container with straight sides or a medium clear bowl. Add the flour and mix until the dough is shaggy and the flour is incorporated. Cover with a lid or dinner plate so the dough doesn't dry out and let sit for 30 minutes in a a warm spot. For a similar timeline as listed below keep the dough temperature at 75 degrees Fahrenheit. 150 grams sourdough starter, 350 grams water, 10 grams salt, 500 grams bread flour
- Stretch and folds: Perform a set of stretch and folds (pull dough out and then fold over itself, turn bowl and perform on other 3 sides) or coil folds every 30 minutes. Perform 3 sets. The goal is to get the dough to pass the windowpane test, described in more detail in the post. You can add your mix-ins in the first set of stretch and folds.
- First Rise: Let the dough rest on the counter in a warm spot to finish bulk fermentation. Bulk fermentation is done when the dough is jiggly, domed on top, bubbly on the sides, and risen 40-50%. If it does not show these signs, continue to let the dough rise. At a dough temperature of 75 degrees Fahrenheit my dough is ready in 4 hours from the time it is mixed.
- Pre-shape: Once the first proof is done separate the dough into 4 equal portions using a bench scraper. Pull the dough towards the middle into a ball and then flip it over. Cup your hands around the dough and rotate counter- clockwise while sliding the dough towards you. Let sit for 30 minutes on the counter. If your dough is extra sticky you can leave it uncovered to help dry it out slightly. Or, cover it with plastic wrap or a damp kitchen towel. This step can be skipped if needed but will help your mini loaves with their shape.
- Final Shape: To shape, take one portion of the dough and flip it over. Gently pull all the sides to the center of the dough and then turn it over. Cup your hands and begin rotating counter clockwise while sliding the dough towards you. Once you have a taut round ball place the dough upside down into a 5" banneton basket or cereal bowl lined with a tea towel and a dusting of rice flour or all-purpose flour. Repeat with the remaining three dough balls. Cover with a tea towel.
- Final Rise Option 1 Refrigerator Method (my preferred method)- Place the dough in the fridge overnight for 8-12 hours. Bake the dough directly from the fridge.
- Final Rise Option 2 Counter Method – Leave the dough on the counter for 1-3 hours (this will vary depending on temperature of kitchen and strength of starter). Once it passes the "poke" test, meaning when you poke the dough with a lightly floured finger the dough will slowly fill in. If the dough springs back immediately it needs more time and if it does not fill back in at all it is overproofed and needs baked immediately. Place the dough in the freezer while your oven preheats.
- Bake: When you are ready to bake place a baking steel or pizza stone in the oven at 400°F to preheat. Soak three tea towels in water and then roll them up and place them in a 8×8 or 9×9 pan. Add ½ cup water to the pan. When ready to bake, dump the bowls of dough onto parchment paper. Score an x on the top of each dough ball using a sharp knife or bread lame. Using a flat baking sheet, transfer the parchment paper with the loaves into the oven onto the hot baking steel. Place the pan of water and towels on the rack underneath. Bake at 400°F for 20 minutes. Then, remove the pan of water and follow with 15 more minutes at 450°F. You'll know the bread is cooked through if it sounds hallow when you knock on the bottom.
- Remove the bread from the oven and let them cool on a cooling rack.
- To serve the bread bowls, use a sharp knife to cut a circle in the top of each bread bowl. Hollow out the insides as much as desired and add soup and enjoy!
Notes
- For best results I recommend using the gram measurements instead of cups, as it will be much more accurate.
- Timing will depend on the temperature of your dough and the activity level of your starter. Watch your dough versus the clock.
- This recipe can easily be doubled or tripled.
Nutrition
Nutrition information is automatically calculated, so should only be used as an approximation.


After the bulk proof, If I want to cook them in the evening, will it be ok to leave them in the fridge for 24 hours before baking?
Yes after you shape them, instead of letting them rise on the counter put them directly into the fridge. As long as your fridge doesn’t run warm, they should be fine!
Gas or electric oven for the open baking?
I have an electric oven. I’ve heard mixed things on open baking in a gas oven.
Hi Emily! I have a question for you. I’m trying your bread bowl recipe but my bowls kind merged and actually instead of doing the usual burst at the top, they burst from the bottom.
Hi Marcel, my guess if they all merged together is they were either too close together or if they all came out flat and didn’t hold shape they likely overproofed meaning they needed a shorter rise time. As far as bursting from the bottom did you score the tops? If you did and they still burst at the bottom it could have been an issue of not having enough steam. Do you have a gas oven or electric?
Easy to follow instructions and tastes amazing. Bread bowls served filled with broccoli soup. The bowls held up incredibly well! Will definitely make again.
Thanks so much, Sheila!