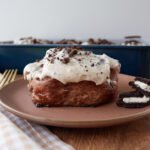
Cookies & Cream Sourdough Chocolate Rolls
Irresistibly soft sourdough chocolate rolls, a gooey, buttery Oreo filling, and a cream cheese frosting sprinkled with Oreos—the dream team.
Servings: 12 rolls
Equipment
Ingredients
Levain
- 20 grams active sourdough starter heaping 1 Tablespoon
- 100 grams all-purpose flour or bread flour ¾ cup
- 100 grams water ⅓ cup + 1 Tablespoon
Sourdough Chocolate Rolls
- 200 grams sourdough starter, bubbly and active scant 1 cup
- 100 grams sugar ½ cup
- 55 grams butter, melted ¼ cup
- 240 grams milk, warm 1 cup
- 1 large egg 50 grams
- 20 grams unsweetened cocoa powder ¼ cup
- 5 grams salt 1 teaspoon
- 550 grams bread flour 4 cups
Oreo Filling
- 115 grams butter, softened ½ cup
- 220 grams brown sugar 1 cup
- 100 grams Oreo® cookies, crushed 9 cookies
Cookies & Cream Frosting
- 55 grams salted butter, softened ¼ cup
- 115 grams cream cheese, softened ½ cup
- 240 grams powdered sugar 2 cups
- 2 grams vanilla extract ½ teaspoon
- 45-60 grams milk 3-4 Tablespoons
- 100 grams Oreo® cookies, divided 9 cookies
Instructions
The day before:
- Feed your starter: 10-12 hours before making the dough, make a levain or feed your sourdough starter a 1:5:5 ratio and leave it covered at room temperature.20 grams active sourdough starter, 100 grams all-purpose flour or bread flour, 100 grams waterSkip this step if your starter is already activated and ready to bake with.
- Mix dough: In the bowl of a stand mixer or large mixing bowl, add dough ingredients. Option 1- Mix in a stand mixer: Mix the dough with a dough hook attachment on low speed in a stand mixer for 3-5 minutes until the dough pulls away from the bowl and forms a smooth, soft ball. Option 2- Mix in a bowl: Mix the dough with a Danish dough whisk or your hands until the dough begins to come together. Once you can no longer mix it in the bowl, place the dough on a lightly floured work surface and knead for about 5 minutes or until the dough forms a soft, smooth ball. If the dough is too sticky, add a little extra flour until it comes together.200 grams sourdough starter, bubbly and active, 100 grams sugar, 55 grams butter, melted, 240 grams milk, warm, 1 large egg, 20 grams unsweetened cocoa powder, 5 grams salt, 550 grams bread flour
- Bulk Fermentation: Place the dough in a bowl and cover. Let the dough rise until doubled in size. At 72ºF, this took my dough 11 hours.
The next morning:
- Roll out the dough: Dump the dough onto a lightly floured work surface and roll the dough out into a 12×18-inch rectangle with a rolling pin.
- Mix the Filling: Place 9 Oreo cookies in a ziploc bag and use a rolling pin to crush the Oreo cookies. Pour in a bowl with the brown sugar and mix. Sprinkle over the dough. 100 grams Oreo® cookies, crushed, 220 grams brown sugar
- Add filing: Spread the softened butter over the dough and then evenly sprinkle the Oreo® filling.115 grams butter, softened
- Shape: Along the long side, cut the dough into 12, 1.5-inch strips using a pizza cutter. Roll each strip up. Alternatively, you can roll up the dough into a log and cut it into 12 equal pieces using a sharp knife or unflavored dental floss. Add the rolls to the greased 9x13 pan.
- Second proof: Cover and let the rolls rise in a warm spot for an additional 1-2 hours until puffy. Do not proceed forward until the rolls have risen or the rolls will be dense.
- Bake: Preheat the oven to 350ºF. Bake for about 25-30 minutes until baked all the way through and rolls register 190ºF.
- Make the Icing: While the rolls bake, crush 3 Oreo® cookies. In a medium bowl, beat butter and cream cheese until smooth. Mix in the vanilla, powdered sugar, and crushed Oreo® cookies. Slowly add the milk until you reach your desired consistency.55 grams salted butter, softened, 115 grams cream cheese, softened, 2 grams vanilla extract, 240 grams powdered sugar, 45-60 grams milk, 100 grams Oreo® cookies, divided
- Add icing: Spread the icing on the warm rolls. Break up the remaining 6 cookies into larger chunks and sprinkle them on top of the icing.
Notes
- Ensure your starter is strong and doubled in size when making this dough. Using a weak starter will result in a dough that won’t rise.
- Storage: Without the icing the chocolate rolls can be stored on the counter for 1-2 days in an airtight container followed by a few extra days in the fridge. If the icing is on the rolls they need to be stored in an airtight container in the fridge. To reheat the rolls place them in the microwave for 30 seconds.
- Bake & Reheat– This is a great option because you don’t have to worry about the rolls over proofing in the fridge or even worry about baking the next day. For this method, feed your starter in the evening 2 nights prior and make the dough the morning before you want the rolls. I recommend starting as soon as you get up. Go through the entire process and finish the night by baking the rolls. Cover with foil and leave on the counter. In the morning, preheat the oven to 350F and brush the tops with just a little bit of water to rehydrate them. Cover and bake for 8-10 minutes or until warm, and then add your icing.
- Prep & bake later- This option can work, but if your rolls overproof they may not be as light and fluffy when baking. Don’t leave the rolls longer than 12 hours in the fridge. For this method, feed your starter in the evening two nights prior to when you want to eat it and make the dough the morning prior. Follow all the instructions for the first and second rise and then once the rolls have almost doubled in size in the pan, place in the fridge overnight. Then, the next morning, remove the rolls from the fridge and let them sit out while the oven preheats, then bake.
- Freeze & bake later- After you finish rolling up the rolls, place them on a pan and flash freeze them until solid (about 1 hour). Place them in a freezer-safe, airtight container. When you want to eat them, put them in a greased pan and cover. Let them thaw and rise overnight, about 10-12 hours. Once doubled and puffy, bake. For best results, use within a week of freezing.
Nutrition
Serving: 1roll | Calories: 661kcal | Carbohydrates: 104g | Protein: 10g | Fat: 24g | Saturated Fat: 13g | Polyunsaturated Fat: 2g | Monounsaturated Fat: 7g | Trans Fat: 1g | Cholesterol: 66mg | Sodium: 399mg | Potassium: 202mg | Fiber: 3g | Sugar: 54g | Vitamin A: 657IU | Calcium: 75mg | Iron: 3mg
