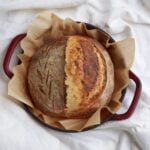
Same Day Sourdough Bread
This Same Day Sourdough Bread recipe will create a beautiful, crusty sourdough loaf that has a crisp outside and soft, fluffy inside that is naturally fermented with sourdough starter and no commercial yeast. It has a quick timeline that can easily be adjusted to meet your schedule to bake a beautiful, freshly baked loaf of bread.
Servings: 12 servings
Ingredients
Feed sourdough starter
- 50 grams active sourdough starter ¼ cup
- 50 grams warm water ¼ cup
- 50 grams all-purpose or bread flour ⅓ cup
Sourdough Bread
- 150 grams active sourdough starter ⅔ cup
- 500 grams bread flour 3 ½ cups
- 350 grams water 1 ½ cups
- 10 grams salt ½ Tablespoon
Instructions
- Feed starter: About 4 hours before making the loaf, build a levain or feed your sourdough starter at a 1:1:1 ratio. Cover and let it rest at 77–80°F until bubbly and doubled in size. Skip this step if your starter is already activated and ready to bake with.If you don’t have extra starter, add an extra 5–10 grams to each portion (starter, flour, and water) so you have enough to bake with and still keep your starter going.50 grams active sourdough starter , 50 grams warm water , 50 grams all-purpose or bread flour Note: If you want to start the loaf in the morning, you can feed your starter a 1:5:5 ratio (15 grams active sourdough starter, 75 grams flour, 75 grams water) the night before and leave for about 10 hours at 70-72℉.
- Mix the dough: With a danish dough whisk, hands, or large spoon mix together active starter, water, and salt in a 2 quart container with straight sides or a medium clear bowl. Add the flour and mix until the dough is shaggy and the flour is incorporated. Cover with a lid or dinner plate so the dough doesn't dry out and let sit for 30 minutes in a a warm spot. For a similar timeline as listed below keep the dough temperature at 75℉. 150 grams active sourdough starter, 350 grams water, 10 grams salt, 500 grams bread flour
- Stretch and folds: Perform a set of stretch and folds (pull dough out and then fold over itself, turn bowl and perform on other 3 sides) every 30 minutes. Perform 3 sets. The goal is to get the dough to pass the windowpane test, described in more detail in the post. You can add your mix-ins in the first set of stretch and folds.
- First Rise: Let the dough rest on the counter in a warm spot to finish bulk fermentation. Bulk fermentation is done when the dough is jiggly, domed on top, bubbly on the sides, and risen 50%. If it does not show these signs, continue to let the dough rise. At a dough temperature of 75 degrees Fahrenheit my dough is ready in 4 hours from the time it is mixed.
- Shape: Turn the dough out onto an unfloured surface and gently stretch it into a chubby rectangle. Begin shaping by folding the top edge down toward the center of the dough like an envelope, pulling gently to create tension. Then, lift the top two corners and fold them toward the center, slightly overlapping. Repeat with the bottom two corners. Finally, roll the dough up like a log. Place it seam-side up in a lightly floured (I recommend using rice flour but you can also use all-purpose or bread flour) oval proofing basket and cover. To shape a round loaf instead, skip rolling it into a log. Fold the dough once onto itself so the smooth side is facing up. Then place your hands around the dough in a cupped position and rotate it counterclockwise, gently pulling it toward you as you turn. This motion builds surface tension and forms a smooth ball.
- Final Rise Opt 1 Same Day Method- Leave the dough on the counter for 1-3 hours (this will vary depending on temperature of kitchen and strength of starter). Once it passes the "poke" test, meaning when you poke the dough with a lightly floured finger the dough will slowly fill in. If the dough springs back immediately it needs more time and if it does not fill back in at all it is overproofed and needs baked immediately. Place the dough in the freezer while your oven preheats.
- Final Rise Opt 2 Overnight Method (my preferred method)- Place the dough in the fridge overnight for 8-12 hours. Bake the dough directly from the fridge.
- Preheat Oven: Preheat dutch oven in the oven at 450℉. To prevent the bottom of the loaf from burning, place a heavy-duty baking sheet on the rack below.
- Bake: Flip dough onto parchment paper or silicone bread sling and score the bread with a bread lame or sharp knife about a quarter inch deep at a 45 degree angle on one side of the dough following the curvature of the loaf. Bake the bread for 25 minutes with the lid on. Take the lid off and bake for another 15-20 minutes. To check for doneness, remove the loaf from the pan and tap the bottom of the loaf; it should sound hollow, indicating it’s fully baked. Or check that the internal temperature reaches 205°F.
- Remove the bread from the dutch oven and allow to cool on a cooling rack before slicing. The bread should sound hollow when you knock on the bottom after coming out of the oven, this will tell you the bread is cooked through.
Video
Notes
- For best results I recommend using the gram measurements instead of cups, as it will be much more accurate.
- Timing will depend on the temperature of your dough and the activity level of your starter. Watch your dough versus the clock. Check out my baking sample schedules for this recipe.
- I recommend using a straight-edge container so you can visually see how much the dough has risen. A 2-quart container is big enough for 1 loaf. If you are doubling the recipe, use a 4-quart container.
- Keep your dough at a temperature around 75°F to match the timeline listed. Use a bread mat (use code country10 for 10%) or proofing box to keep the dough warm, or see more tips on how to keep your dough warm.
- If the dough is very pillowy, sticky, and deflates when working with it, it is overproofed. At this point, you can try to bake it if it will hold some shape. Personally my favorite thing to do with overproofed dough is to make focaccia. Put it in an oiled 9×13 pan with more oil on top and add seasoning and cheese. Dimple the dough and bake at 425°F for 25-30 minutes. Check out my tutorial.
Nutrition
Serving: 1slice | Calories: 162kcal | Carbohydrates: 33g | Protein: 5g | Fat: 1g | Saturated Fat: 0.1g | Polyunsaturated Fat: 0.3g | Monounsaturated Fat: 0.1g | Sodium: 325mg | Potassium: 42mg | Fiber: 1g | Sugar: 0.1g | Vitamin A: 1IU | Calcium: 7mg | Iron: 0.4mg
