This post may contain affiliate links . Read my full Disclosure Policy.


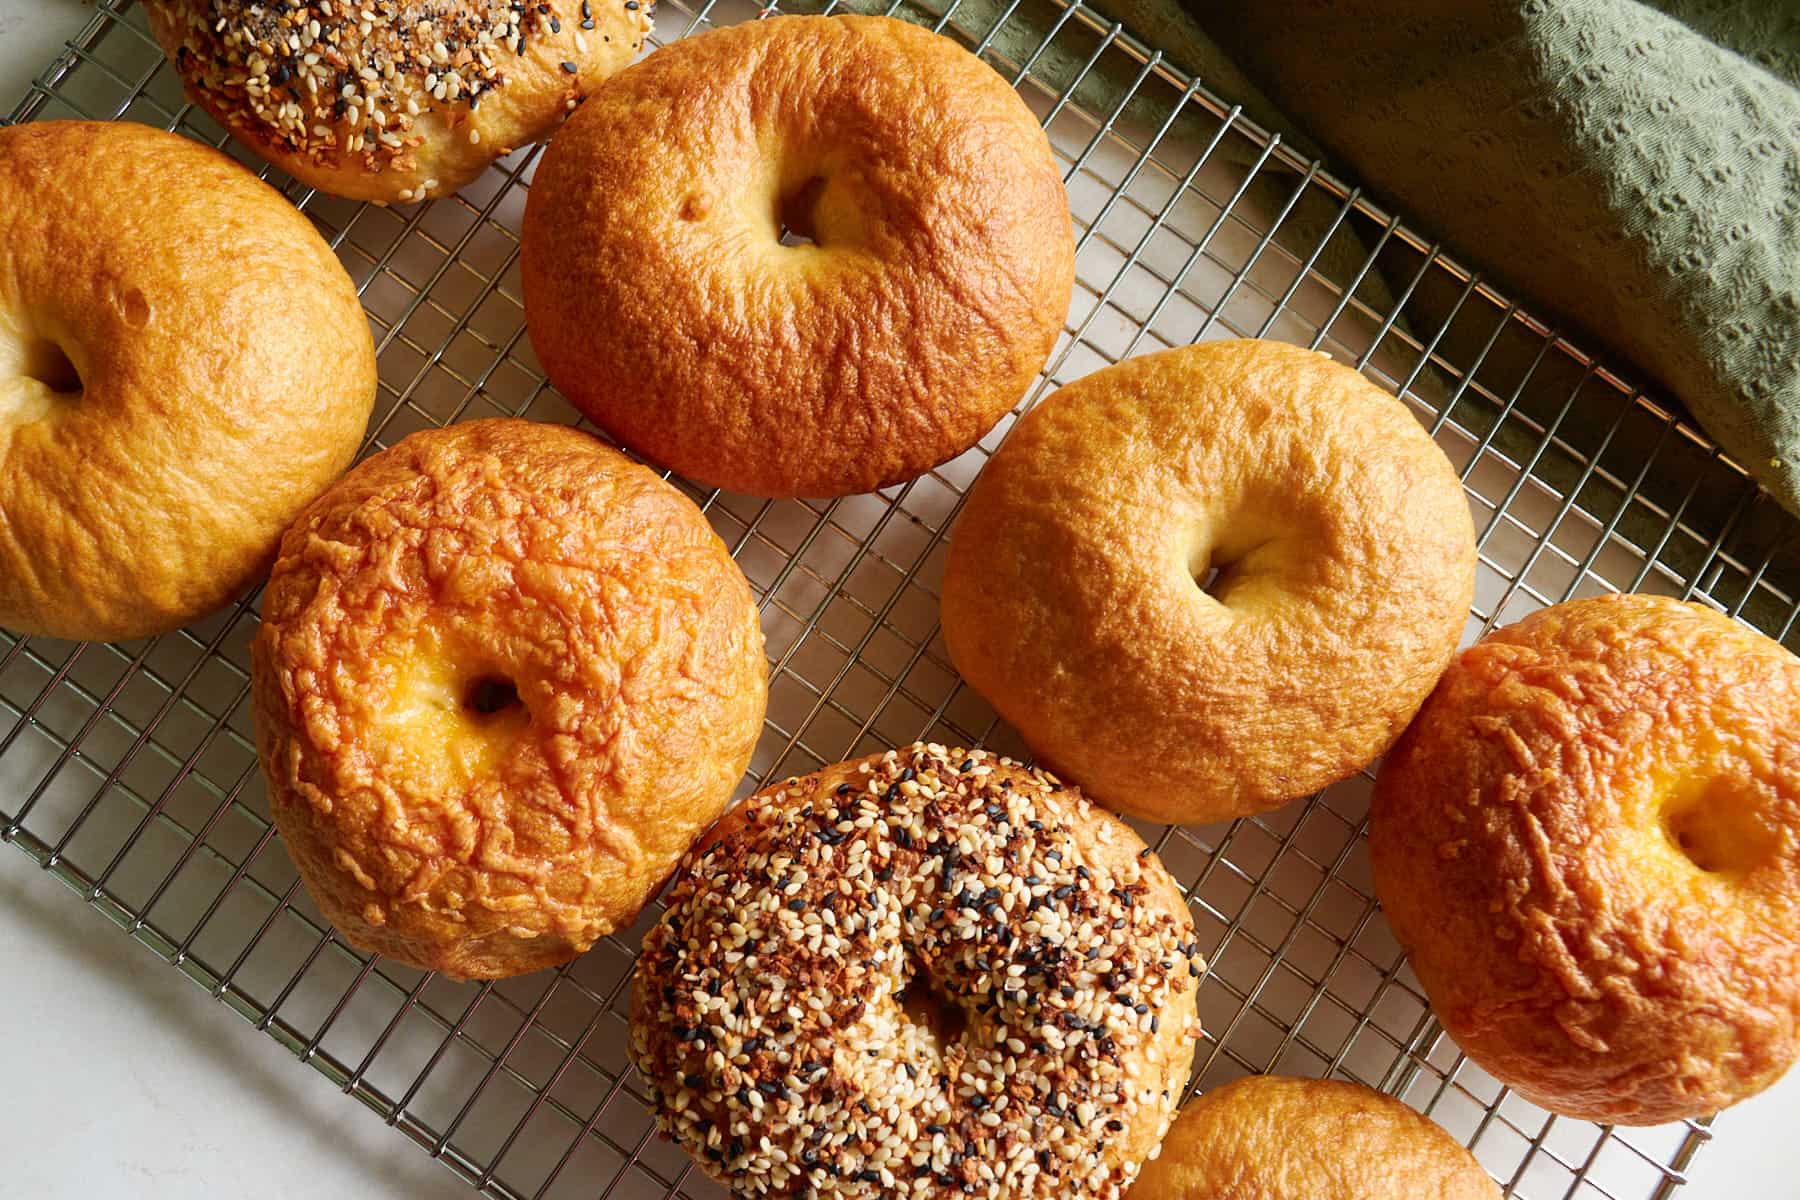
These Sourdough Discard Bagels are quick, easy, and have a delicious chewy texture. Based on my popular Overnight Sourdough Bagels, this recipe features a quicker 2-hour timeline with sourdough discard and instant yeast.
Save & Summarize
I developed this recipe for those busy mornings with my kids when I need something homemade, but fast. I wanted the process to be quick and easy without sacrificing the chewy texture and flavor you expect from a good bagel, and these check all the boxes. They are also less tangy than naturally leavened sourdough bagels, making them perfect for kids.
For more quick sourdough discard breakfast recipes try my Sourdough Discard Cinnamon Rolls with a single one hour rise and these quick and easy Sourdough Discard Waffles.
Why you will love this recipe
- Quick rise times – Adding the yeast helps create a super quick rise, so these bagels are ready in under 2 hours.
- You can start the dough at any time – I love discard recipes made with yeast, like my Sourdough Discard Dinner Rolls, because you can make the dough whenever you want, no need to wait for your sourdough starter to rise.
- Customizable – You can add whatever toppings from savory options like jalapeno cheddar, everything but the bagel seasoning, and asiago to sweet like cinnamon raisin.
Important Ingredients and Substitutions
- Sourdough discard – For this recipe, you can use cold discard because as it kneads in the mixer, the dough will warm up. If you are kneading by hand though, I recommend using room temperature discard.
- Instant yeast – I like instant yeast because you can add it in with the rest of the ingredients. If you would like to use active dry yeast, you can, but be sure to read the instructions on how to bloom the yeast, and keep in mind the rise times could take longer.
- Bread flour- I like to use bread flour for this recipe to get the best chewy texture. In a pinch, you can use all-purpose flour but I recommend reducing the water by 25 grams.
- Baking soda – Just like my Sourdough Discard Pretzel Bites, to get the chewy texture of the bagels, you will boil them in water mixed with baking soda.
See all the ingredients and amounts in the recipe card below.
How to Make Sourdough Discard Bagels
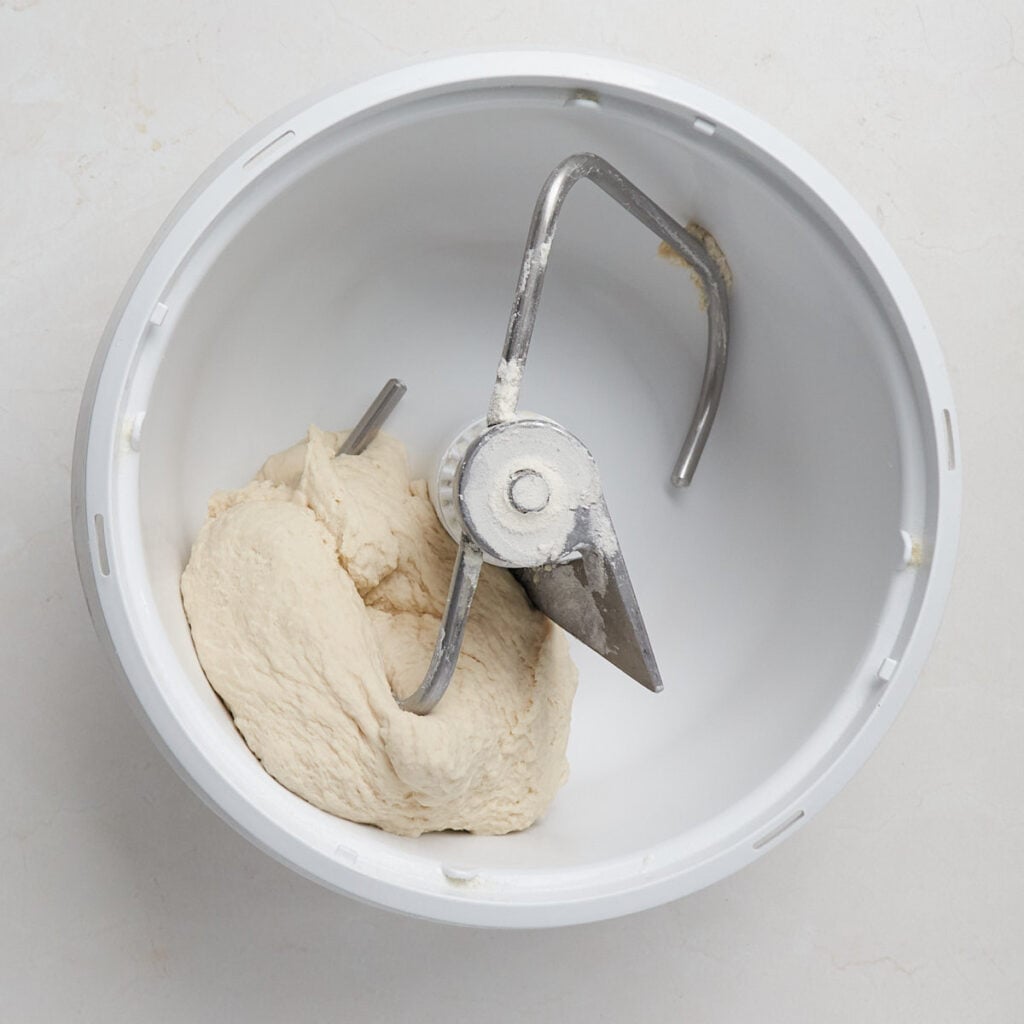
Step 1 – Mix & Knead
Add all the dough ingredients to the bowl of a stand mixer. Using your dough hook, knead the dough for about 20 minutes or until the dough can pass the windowpane test.
If the dough gets too warm in the mixer (I find I can only do 20 minutes in my Bosch mixer), I recommend kneading by hand at the end until the dough is soft, pliable, and can pass the windowpane test. You can also mix this dough in a bowl and then knead it by hand.
The windowpane test is used to see how well the gluten has developed. When the dough is able to stretch thin enough that you can see light through, without it tearing, it has passed.
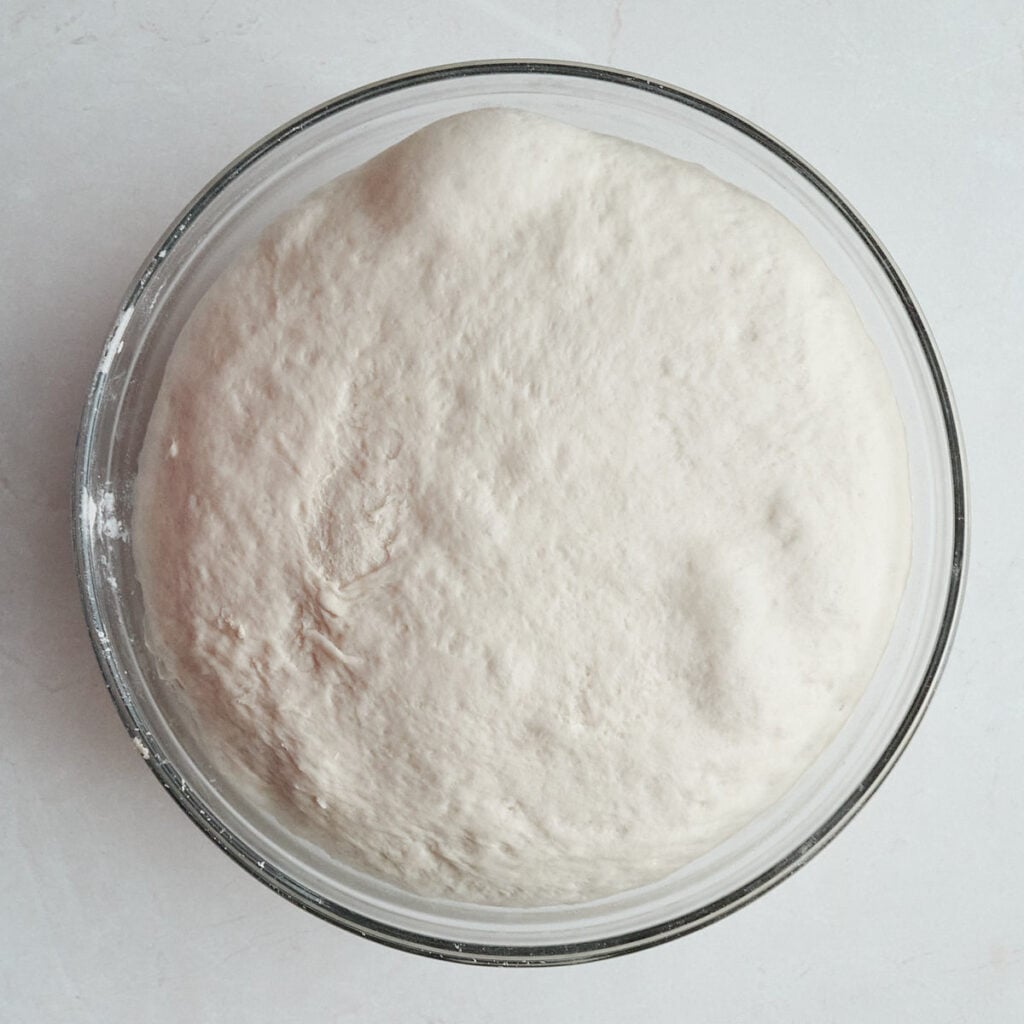
Step 2 – First rise
Transfer the bagel dough to a bowl or straight-edge container and cover. Let it rise in a warm spot until doubled in size. About 30-45 minutes at 80-90ºF, or longer at cooler temperatures.
Tip: One easy way to create a warm proofing environment is to turn your oven on at the lowest setting for 1–2 minutes, then turn it off. Before placing your dough inside, check the temperature with a thermometer to make sure it’s below 110ºF. Once it’s ready, place the dough in the oven, close the door, and let it rise.
Step 3 – Divide dough
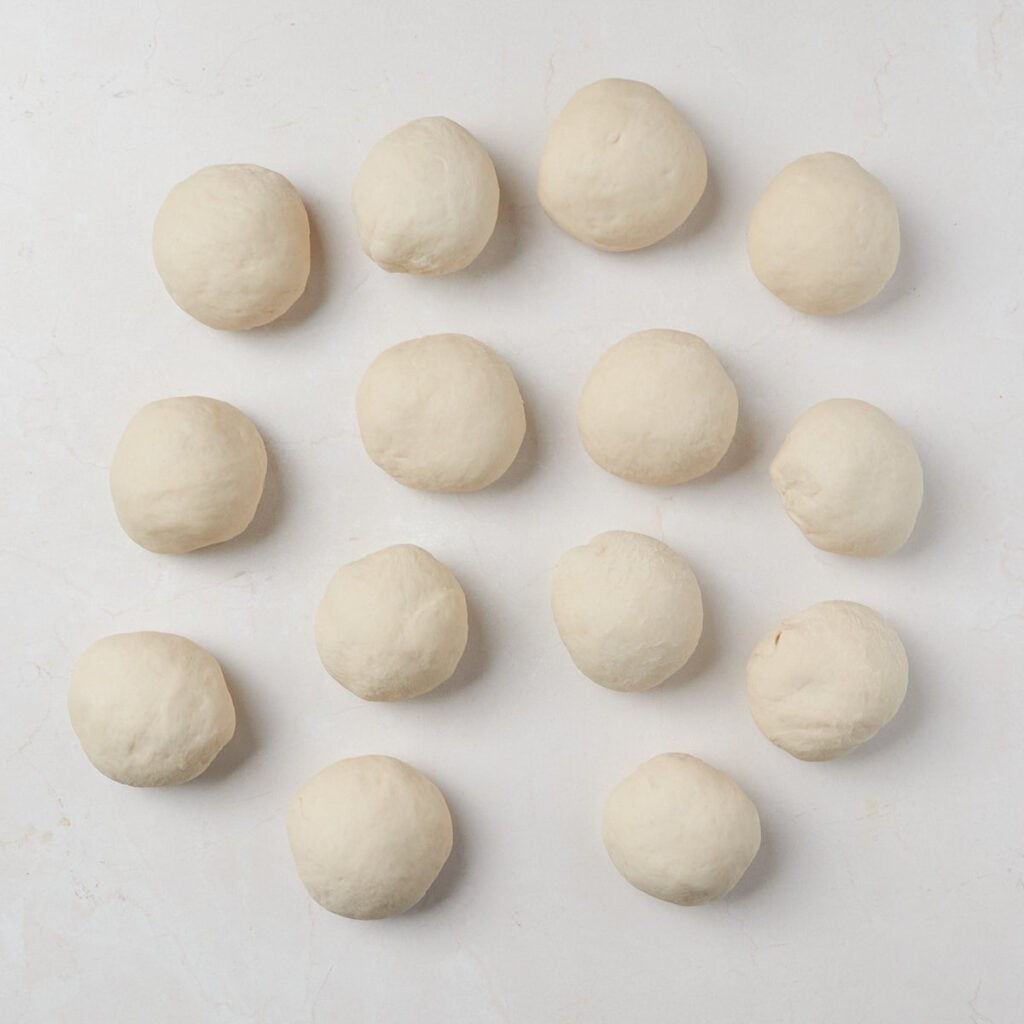
Once doubled, punch down the dough and divide the dough into 14 equal pieces, about 94 grams each. I like to use a bench scraper for this.
Taking one section at a time, form the dough into a ball by pulling the sides to the middle of the dough and then flipping it over. With your hand in a cupping shape, rotate the dough ball a few times in a circle on an unfloured surface. Repeat with the remaining 13.
Step 4 – Shape into bagels
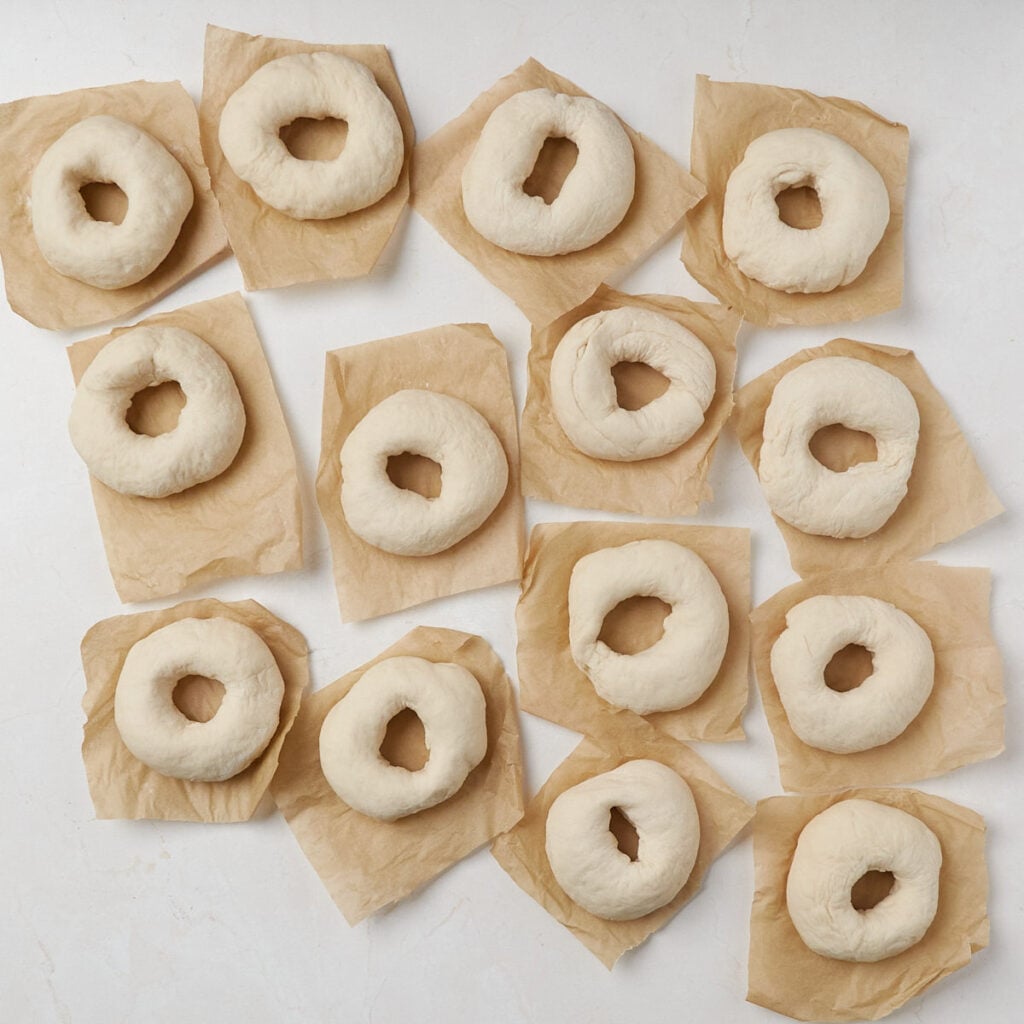
Poke a hole in the middle of the dough and then, using both pointer fingers inserted on each side, rotate your fingers around each other, making a hole in the middle of the dough. Ideally, you want the size of the hole to be 1.5-2 inches.
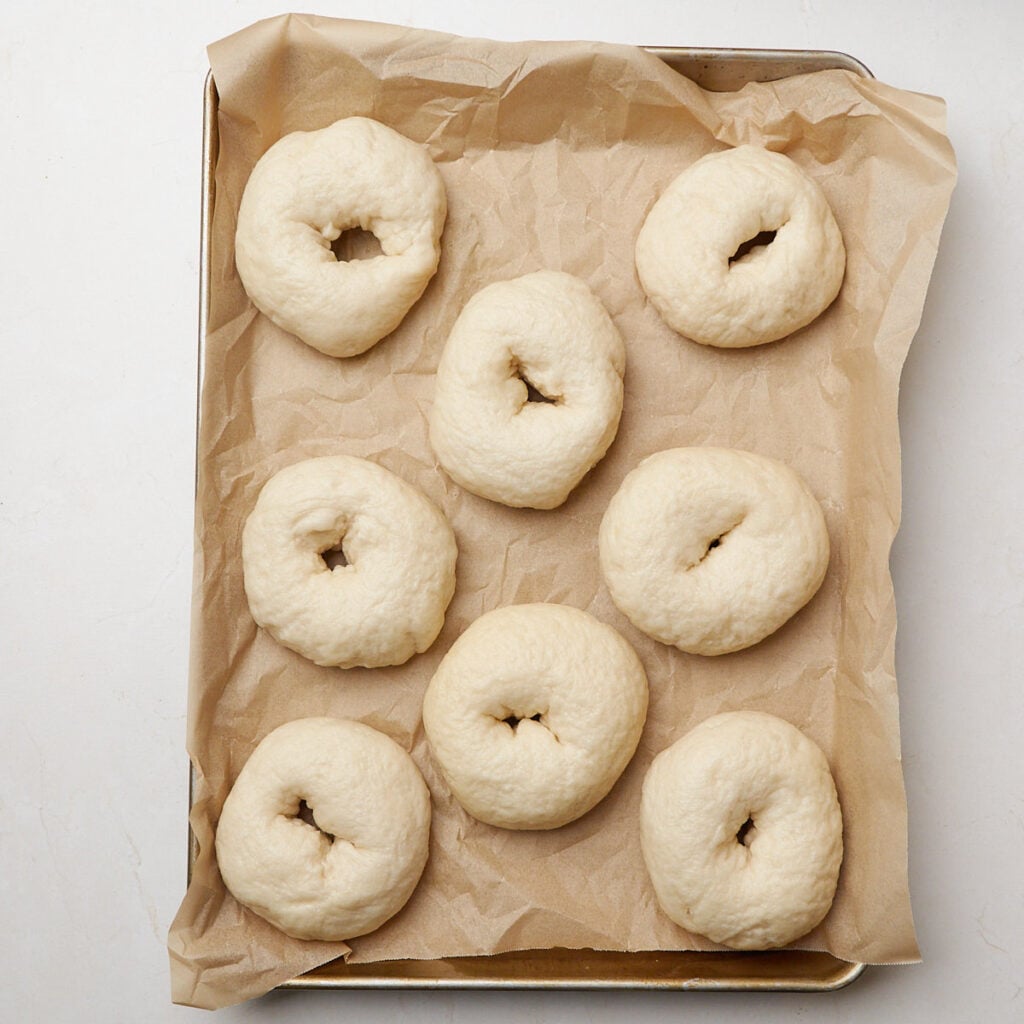
Step 5 – Add to baking sheet
Cut 14 4×4-inch squares of parchment paper. Place a shaped bagel on each piece of parchment paper, and then place all 14 of them on two large baking sheets.
Alternatively, you can place them on silicone mats, but when you pick them up to boil them, the shape of the bagel can change.
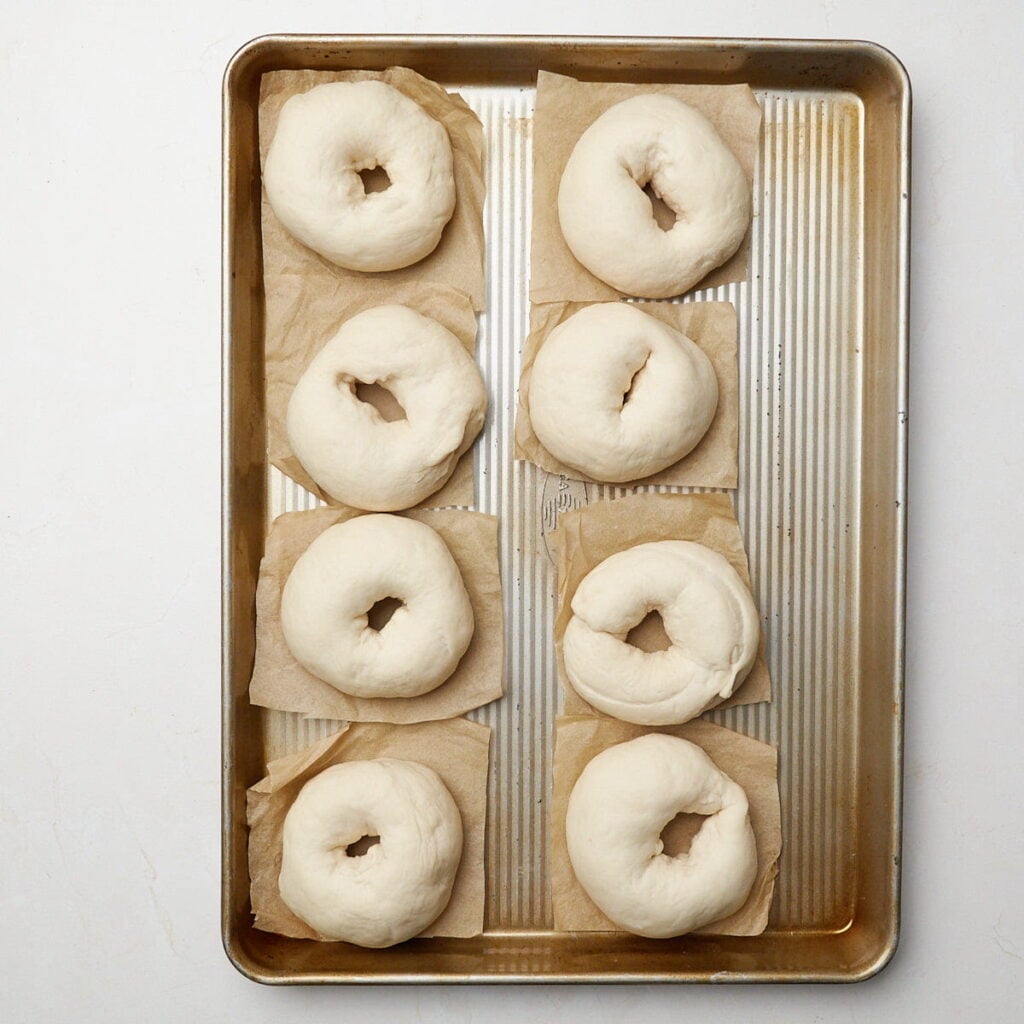
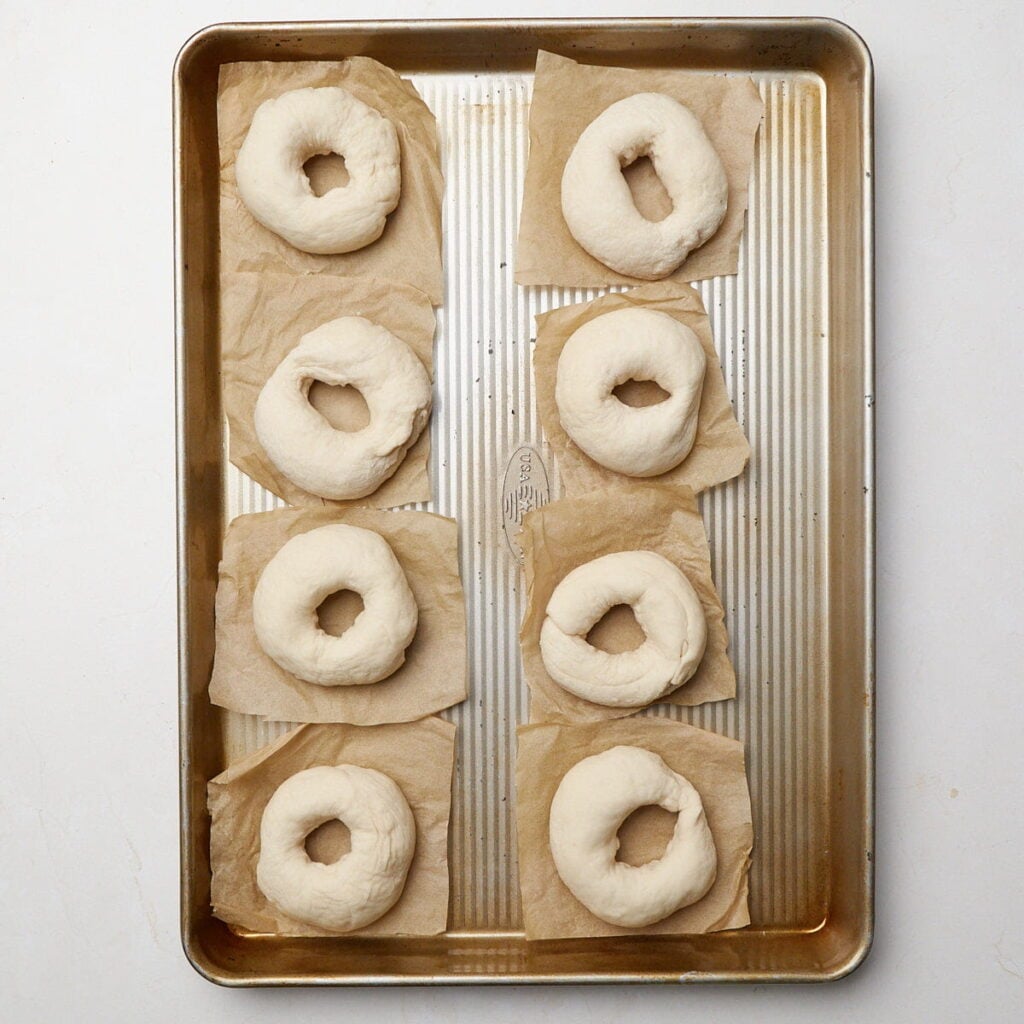
Step 6 – Second rise
Cover with a slightly damp tea towel or lid and let the bagels rest for about 20-30 minutes until the bagels have puffed up slightly (you don’t need to wait for them to double in size).
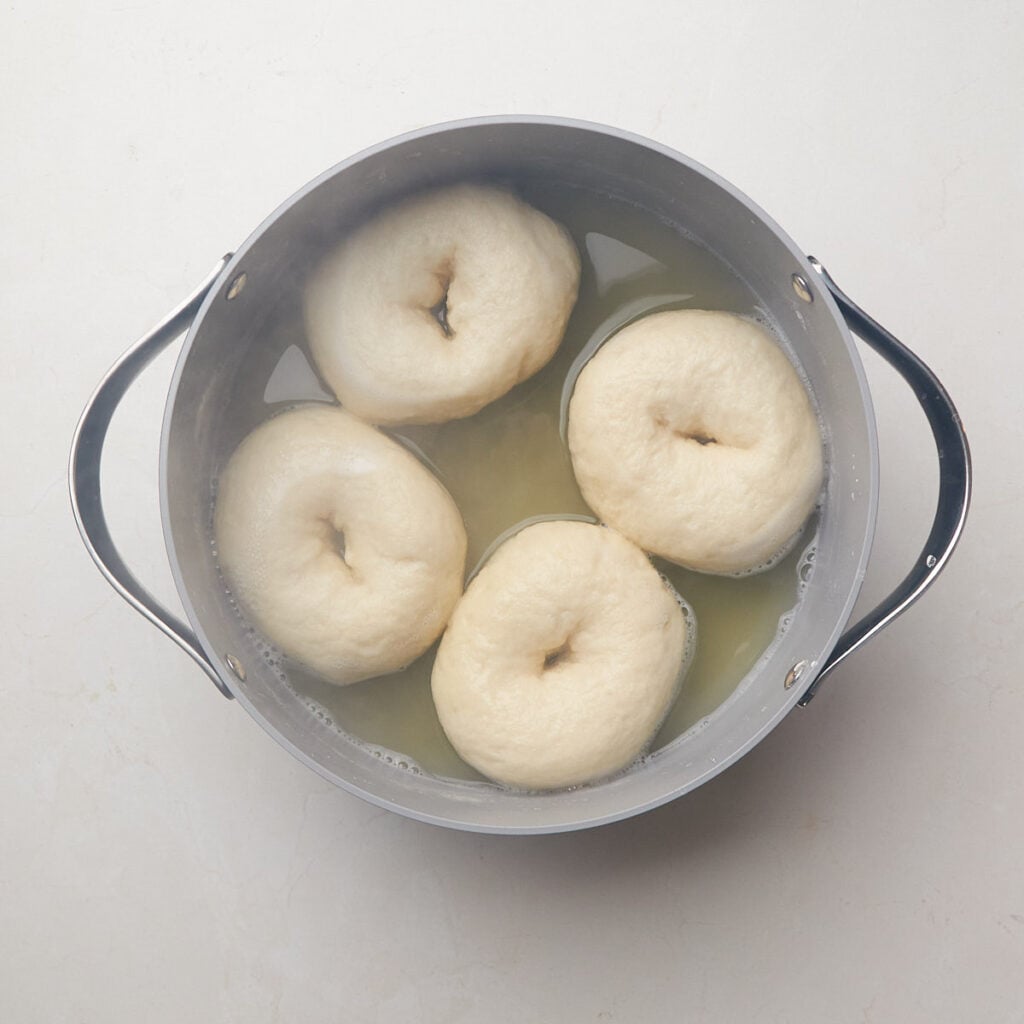
Step 7 – Boil
While the bagels are rising, preheat your oven to 425°F. Bring a pot of water to a boil and add 1 tablespoon of baking soda.
After they are finished rising, add a few bagels at a time to the boiling water, parchment paper side up, and boil them for about 45 seconds on each side. Once the bagels are in the water, you can easily remove the parchment paper from the dough.
Use a slotted spoon or spider strainer to easily remove the bagels from the water and drain excess liquid.
Step 8 – Add toppings
Place the bagels on lined sheet pans, 7-8 to each pan. Add your toppings of choice to the tops (see notes on flavor options above and for tips on adding toppings to bagels).
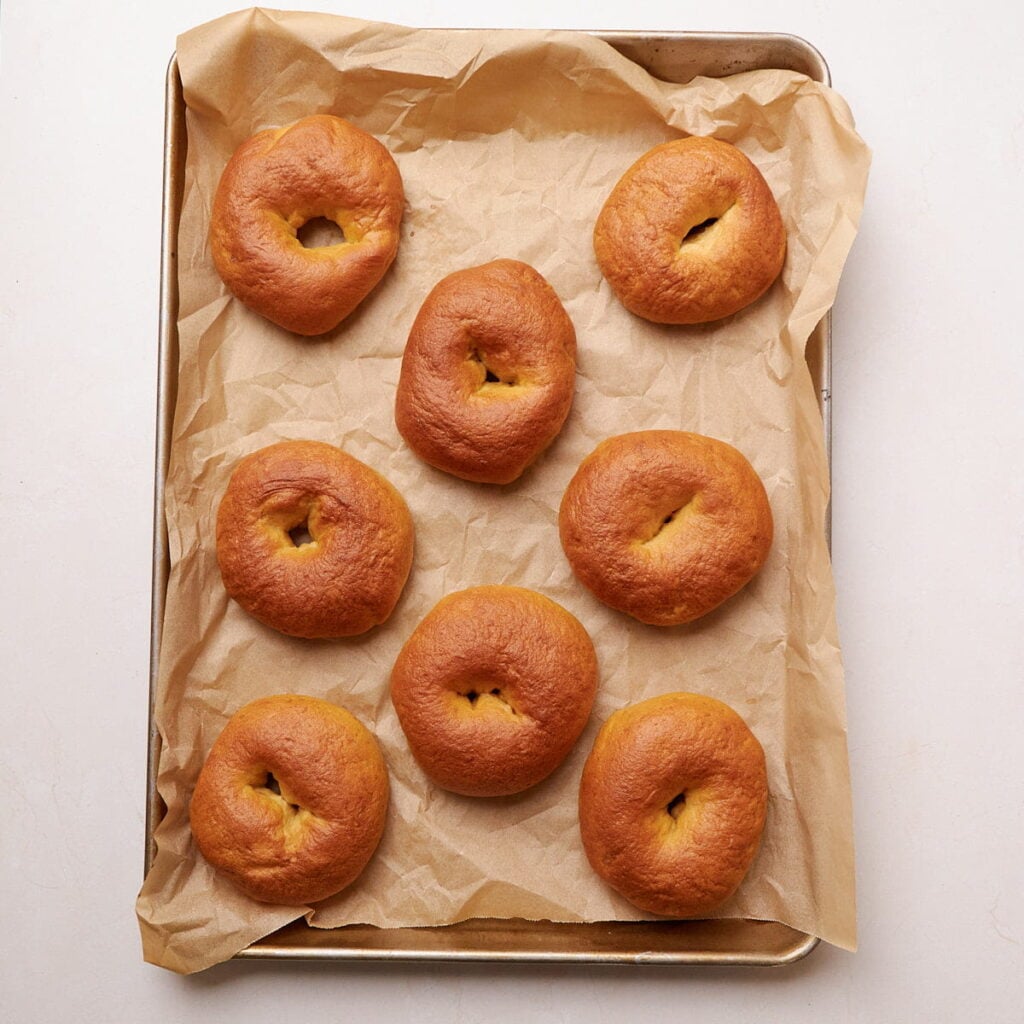
Step 9 – Bake
Bake for 18-20 minutes or until lightly golden brown. Let the bagels cool on a wire rack and then enjoy them with butter or cream cheese.
How to add toppings to Sourdough Discard Bagels
To add different toppings to the bagels, you will add them after you boil them and before baking. Here are some tips on how to add the toppings:
- Dry seasoning – If you are adding seasoning such as everything bagel or cinnamon sugar, add the seasoning to a plate and then, after you boil the bagel and while they are still wet, dip them in the seasoning and then place on the baking tray.
- Cheeses – To add cheese, simply sprinkle it over the bagel after you have boiled it and add it to the baking tray. You can use whatever type of shredded cheese you’d like. And for a spicy kick, try adding pickled jalapeños.
Recipe Tips
- I highly recommend making individual parchment paper squares for the bagels to rise on. It makes it easier to put the bagels into the boiling water without messing up the shape.
- For a warm spot for your bagels to rise, you can turn on the oven for 1-2 minutes at the lowest temperature and then turn it off so it doesn’t get too hot (you don’t want over 100°F). Then add the covered bagels to the oven and close the door. Or you can also use a bread mat (use code country10 for 10%) or proofing box to keep the dough warm.
- Knead the dough until it passes the windowpane test. This ensures proper gluten development in the dough so you get that dense, chewy texture.
- Add toppings, especially seasonings and seeds, when the bagels are damp to help them stick to the bagels.
- While the bagels rise for the second time, get the boiling water and baking soda ready before they are done proofing. If you wait to boil the water after they rise, they could overproof.
- If you are kneading by hand, you can use warmer ingredients to speed up the proofing process. Use room temperature discard and water that is about 80°F. Warmer ingredients are not recommended when using a stand mixer because the mixer naturally warms the dough as it kneads. If the dough gets too warm, it can become sticky, weak, and harder to work with.
How to store and freeze Sourdough Discard Bagels
You can store these bagels on the counter in an airtight container for 3-4 days. To store the bagels longer, you can freeze them for three to four months. You can either freeze them whole or sliced, and then add them to a freezer gallon bag. To defrost the bagels, pop them in your toaster or oven on a low setting.
Recipe FAQ
I prefer to use bread flour because it helps yield a chewy texture, but in a pinch, you can use all-purpose flour and reduce the water by 25 grams.
I have a 5qt Kitchen Aide mixer and mine is not strong enough to knead this dough. Unless you have one of the more powerful Kitchen Aide mixers I don’t recommend it as it can burn up the motor. I use my Bosch mixer to knead this dough. Or you can knead by hand.
Yes, you can use active dry yeast but be sure to read the instructions on how to activate the yeast and keep in mind the rise times may vary.
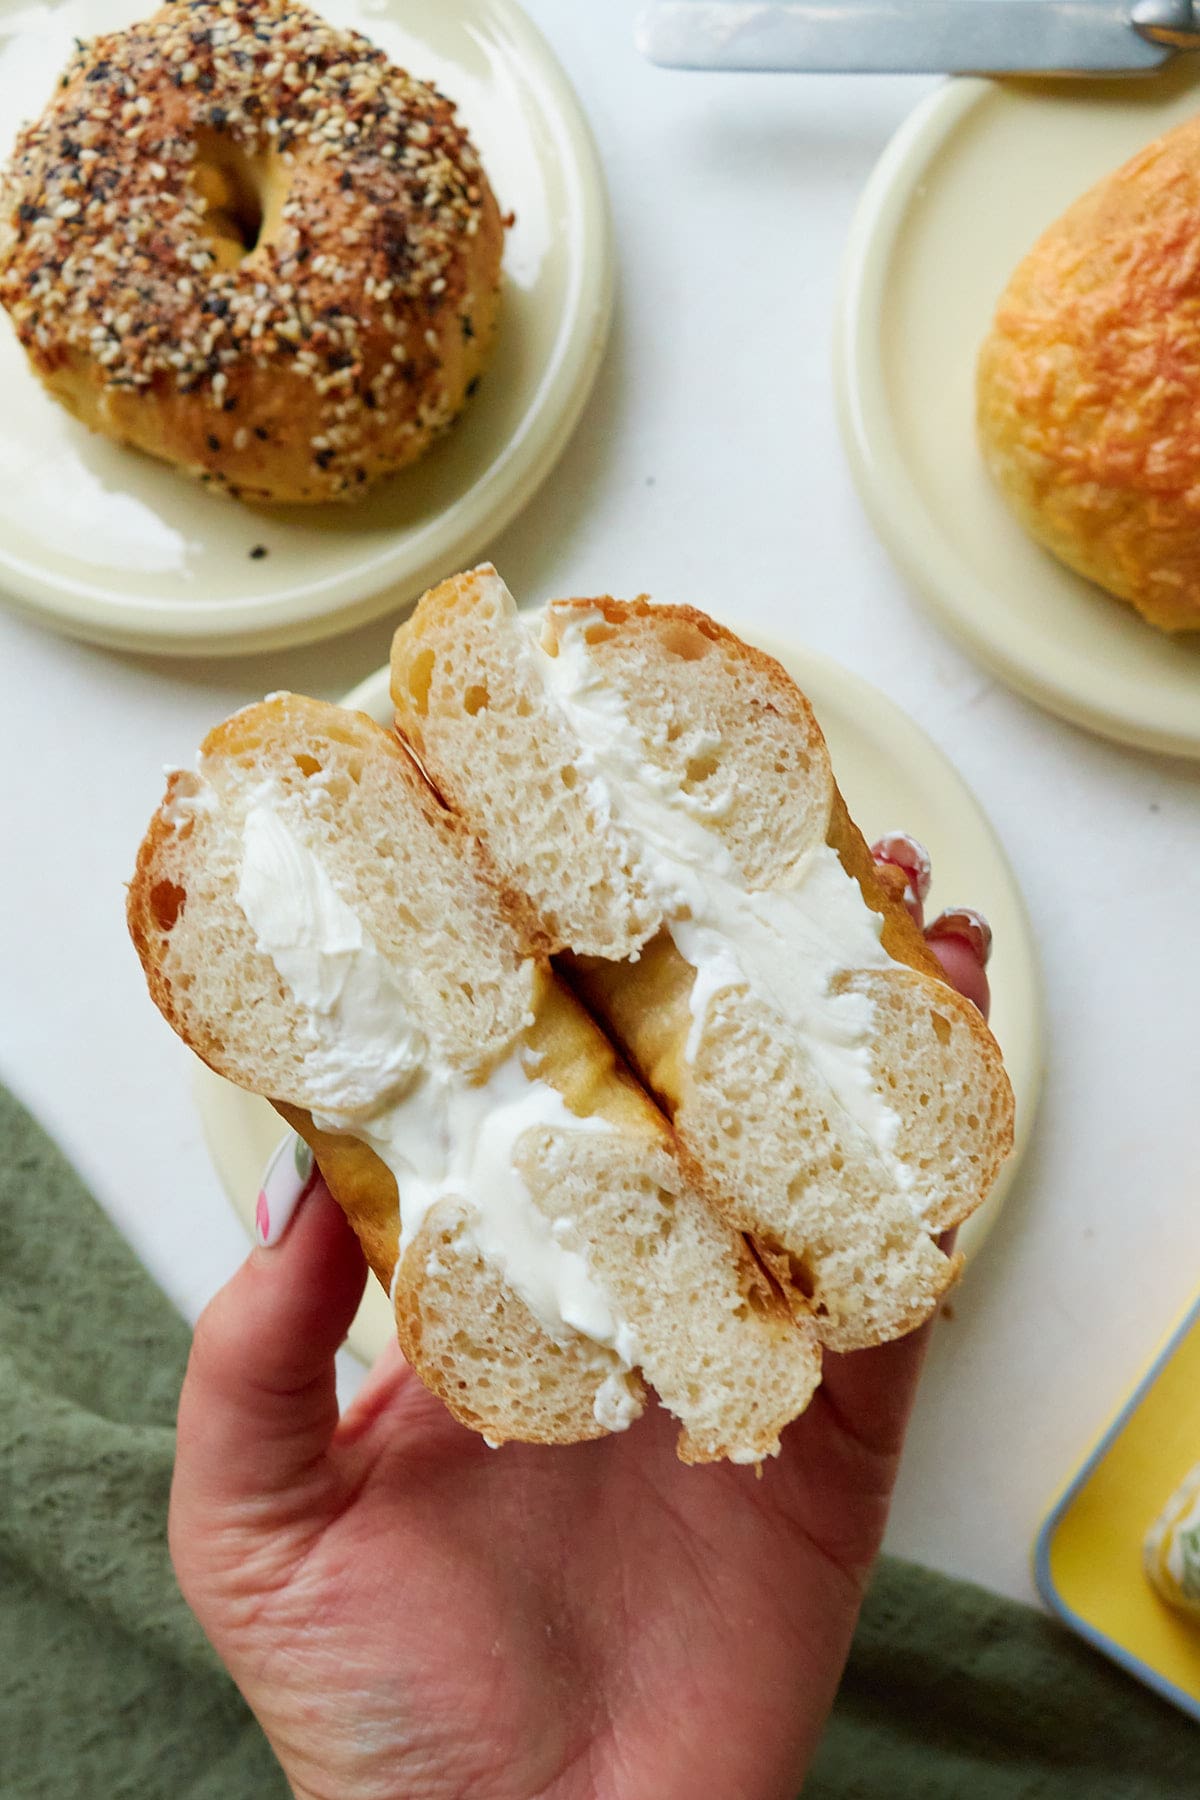
I love these homemade bagels with cream cheese or as a breakfast sandwich with sausage, cheese, and a fried egg. They are also delicious with smoked salmon or jam.
Boiling bagels before baking is what gives them their classic chewy crust, so it can’t be skipped! The baking soda makes the water more alkaline, which helps the outside of the bagels brown and develop that bagel-shop texture.
Yes, after shaping the bagels, you can place them in the refrigerator for a slower rise. If you choose to do this, I recommend completing the first rise at room temperature, then shaping the bagels before refrigerating them.
Keep in mind that warm dough will take longer to cool down in the refrigerator, which means it may continue rising quickly at first. For best results, I would not refrigerate the shaped bagels for longer than 8 hours to prevent overproofing.
Yes, check out my overnight sourdough bagel recipe that uses only active starter.
More sourdough discard recipes

Soft Sourdough Bread Recipes
Quick Sourdough Dinner Rolls (Using Discard!)

Sourdough Discard Recipes
Sourdough Discard Pizza Dough (45 minute rise)
Soft Sourdough Bread Recipes
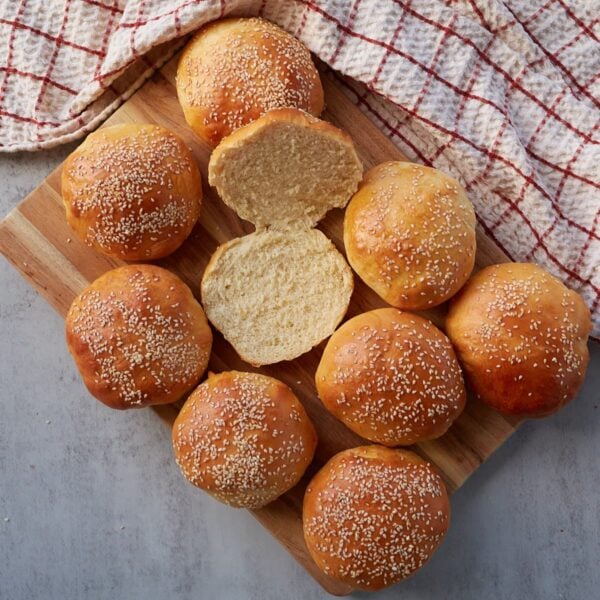
Sourdough Discard Hamburger Buns (1 hour rise)

Sourdough Discard Recipes
Sourdough Discard Sandwich Bread Recipe
Tried this Sourdough Discard Bagels or another recipe from the site? I’d love to hear about it! Drop a star rating and share your thoughts in the comments—can’t wait to see what you’re baking!

Sourdough Discard Bagels
Equipment
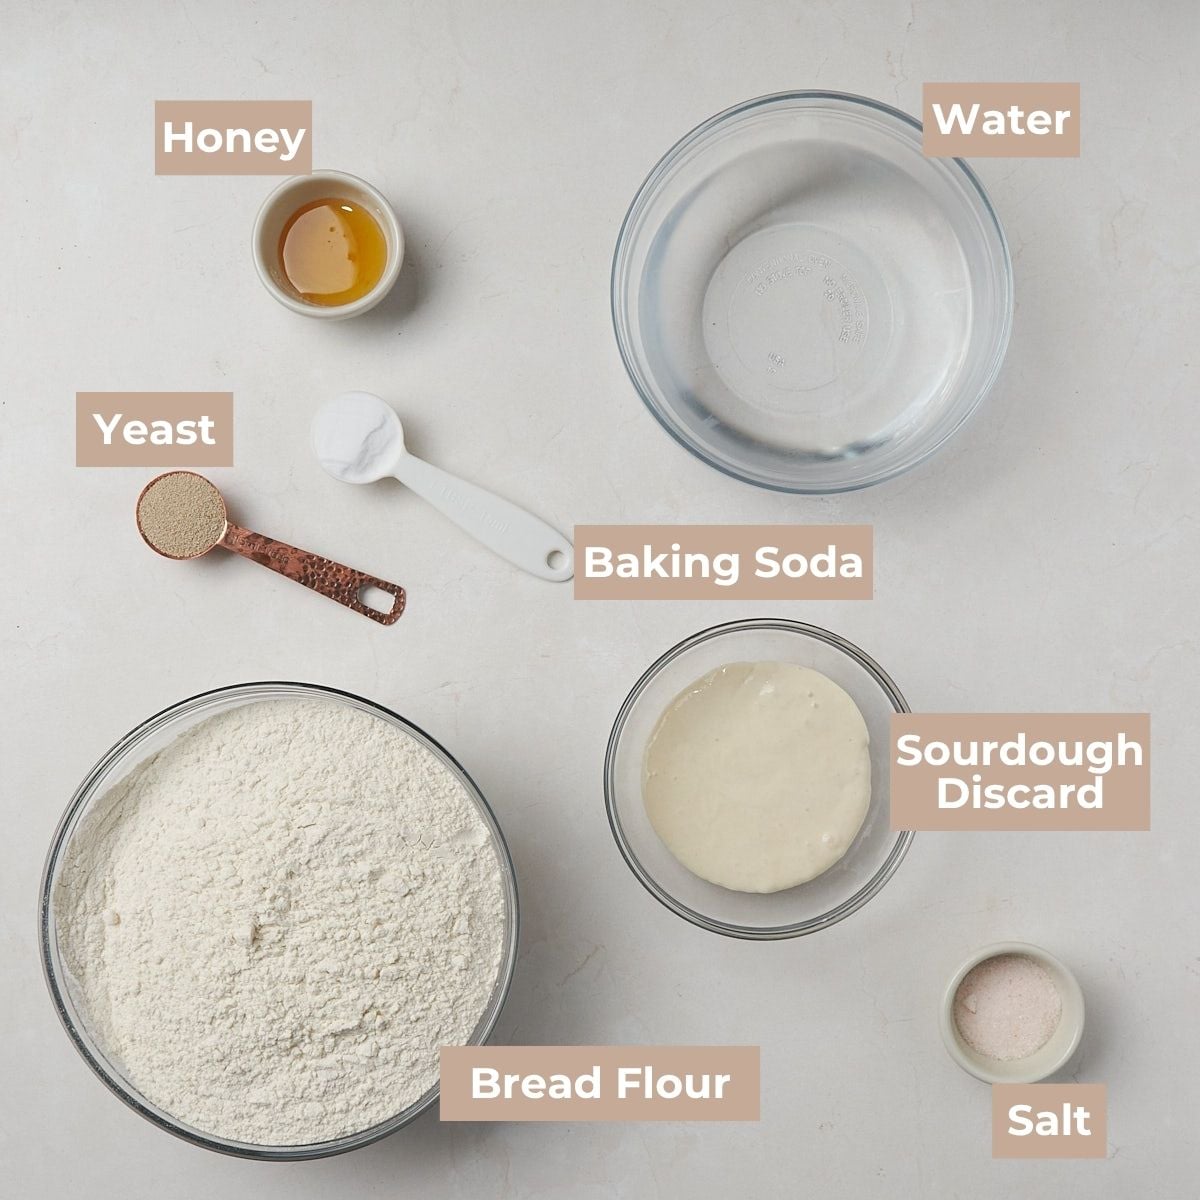
Ingredients
Bagel dough
- 150 grams sourdough discard, ½ cup + 2 Tablespoons
- 400 grams water, room temperature, 1 ¾ cups
- 15 grams sugar or honey, 1 tablespoon
- 15 grams salt, 2 ½ teaspoons
- 750 grams bread flour, 5 ¼ cups
- 7 grams instant yeast, 2 teaspoons
Baking soda bath
- 14 grams baking soda, 1 Tablespoon
- Optional toppings
Instructions
- Mix & Knead: Add all the dough ingredients to the bowl of a stand mixer. Using your dough hook, knead the dough for about 20 minutes or until the dough can pass the windowpane test. If the dough gets too warm in the mixer (I find I can only do 20 mins in my Bosch mixer), I recommend kneading by hand at the end until the dough is soft, pliable, and can pass the windowpane test. You can also mix this dough in a bowl and then knead it by hand.150 grams sourdough discard, 400 grams water, room temperature, 15 grams sugar or honey, 15 grams salt, 750 grams bread flour, 7 grams instant yeast
- First rise: Transfer the bagel dough to a bowl or straight-edge container and cover. Let it rise in a warm spot until doubled in size. About 30-45 minutes at 80-90ºF, or longer at cooler temperatures.
- Divide dough: Once doubled, punch down the dough and divide the dough into 14 equal pieces, about 94 grams each. I like to use a bench scraper for this.
- Form into balls: Taking one section at a time, form the dough into a ball by pulling the sides to the middle of the dough and then flipping it over. With your hand in a cupping shape, rotate the dough ball a few times in a circle. Repeat with the remaining 13.
- Shape into bagels: Poke a hole in the middle of the dough and then, using both pointer fingers inserted on each side, rotate your fingers around each other, making a hole in the middle of the dough. Ideally, you want the size of the hole to be 1.5-2 inches.
- Prep paper: Cut 14 4×4-inch squares of parchment paper. Place a shaped bagel on each piece of parchment paper, and then place all 14 of them on two large baking sheets.Alternatively, you can place them on silicone mats, but when you pick them up to boil them, the shape of the bagel can change.
- Second rise: Cover with a slightly damp tea towel or lid and let the bagels rest for about 20-30 minutes until the bagels have puffed up slightly (you don't need to wait for them to double in size).
- Boil: While the bagels are rising, preheat your oven to 425°F. Bring a pot of water to a boil and add 1 tablespoon of baking soda. After they are finished rising, add a few bagels at a time to the boiling water, parchment paper side up, and boil them for about 45 seconds on each side. Once the bagels are in the water, you can easily remove the parchment paper from the dough. Use a slotted spoon or spider strainer to easily remove the bagels from the water and drain excess liquid. 14 grams baking soda
- Add toppings: Place the bagels on lined sheet pans, 7-8 to each pan. Add your toppings of choice to the tops (see notes on flavor options above and for tips on adding toppings to bagels).
- Bake: Bake for 18-20 mins or until lightly golden brown. Let the bagels cool on a wire rack and then enjoy them with butter or cream cheese.
Notes
- I highly recommend making individual parchment paper squares for the bagels to rise on. It makes it easier to put the bagels into the boiling water without messing up the shape.
- If you are kneading by hand, you can use warmer ingredients to speed up the proofing process. Use room temperature discard and water that is about 80°F. Warmer ingredients are not recommended when using a stand mixer because the mixer naturally warms the dough as it kneads. If the dough gets too warm, it can become sticky, weak, and harder to work with.
- For a warm spot for your bagels to rise, you can turn on the oven for 1-2 minutes at the lowest temperature and then turn it off so it doesn’t get too hot (you don’t want over 100°F). Then add the covered bagels to the oven and close the door. At 90°F, it will take about 30 minutes to an hour to rise.
- Knead the dough until it passes the windowpane test. This ensures proper gluten development in the dough.
- Add toppings, especially seasonings and seeds, when the bagels are damp to help them stick to the bagels.
- While the bagels rise for the second time, get the boiling water and baking soda ready before they are done proofing. If you wait to boil the water after they double in size, they could overproof.
- Dry seasoning – If you are adding seasoning such as everything bagel or cinnamon sugar, add the seasoning to a plate and then, after you boil the bagel and while they are still wet, dip them in the seasoning and then place on the baking tray.
- Cheeses – To add cheese, simply sprinkle it over the bagel after you have boiled it and add it to the baking tray. You can use whatever type of shredded cheese you’d like. And for a spicy kick, try adding pickled jalapenos too.
Nutrition
Nutrition information is automatically calculated, so should only be used as an approximation.


Absolutely delish. Made plain, cinnamon sugar, cheddar and everything seasoning. Thanks for sharing
Can you make this and substitute gluten free starter and gluten free bread flour?
This may be a silly question can I leave out the discard all together? I want to make them today but have no discard 😂 Thank you!
can’t wait to try when I have discard!
It will impact the dough by not having it in there. You could potentially add an extra 75 grams of both flour and water to the dough but it might need some tweaking to get the right dough texture.
Can I use all purpose flour instead of bread flour?
If so do I need to adjust the water flour ratio ?
Yes you will want to reduce the water at least 25 grams.
Wow, just Wow! This one is a keeper.
My first attempt was a total success thanks to your style of laying out the recipe. Your recipes are so easy to follow and I am a total fan-man!
Thank you for sharing your talent.
Thanks so much Robert!
So easy and so delicious!!!! I decided to make the bagels slightly larger and made a full dozen of plain. Thank you for the great recipe.
Thanks so much Betty!
I have never made bagels and think discard may be the best first try. Can I just divide the ingredients in half to make a half batch or are there some ingredients that require more than 50%? Can’t wait to try
Absolutely! Just half the recipe and it will work well.
These sourdough discard bagels are so quick and easy! They are ready in under 2 hours and I don’t have to think about feeding my starter ahead of time. They are full of flavor and are nice and chewy!