
This post may contain affiliate links . Read my full Disclosure Policy.


This Sourdough Discard Sandwich Bread is a staple in my kitchen, and I make it almost weekly. It’s soft, fluffy, and a favorite with my toughest taste testers, my kids. You can always count on kids to be super honest, and after trying their way through more sourdough recipes than I can count, this is still one they request again and again.

Save & Summarize
“This is the BEST sandwich bread I’ve found on my sourdough journey! I literally tell people it’s like you bought a loaf at the store but without all the junk! I’m making a double batch tonight!”– Amanda
Made with sourdough discard and instant yeast, this recipe is made in under 3 hours, making it quick, reliable, and a recipe I can depend on when I forget to feed my sourdough starter. I love that this recipe includes whole wheat flour and bread flour, giving you the nutrients without sacrificing a soft crumb. One request I often get is for recipes that are friendly for dietary restrictions or allergies, so I made this bread both dairy-free and refined sugar-free.
If you want to make bread with a sourdough starter instead of dry yeast, check out my Sourdough Sandwich Bread recipe or Sourdough Cinnamon Raisin Bread!

Table of Contents
- Reasons You Will Love this Sourdough Discard Bread
- Ingredients for Sourdough Discard Sandwich Bread
- How to make Sourdough Discard Sandwich Bread
- Recipe Tips
- How to Use This Sourdough Discard Sandwich Bread
- How to Store Sourdough Discard Bread
- Recipe Updates
- Frequently Asked Questions
- More sourdough bread recipes
- Quick Sourdough Discard Sandwich Bread Recipe
Reasons You Will Love this Sourdough Discard Bread
- Quick timeline – This bread has a forgiving timeline and can be made on the same day, in as little as three hours, thanks to the instant yeast.
- Uses up extra discard – It is the perfect way to use up extra sourdough discard. Be sure to also try my Sourdough Discard French Bread and Sourdough Discard Artisan Bread recipes too!
- Allergen-friendly – Made with honey or maple syrup instead of refined sugar and oil instead of butter, this bread is both refined sugar-free and dairy-free.
- Freezer-friendly – This recipe makes two loaves and freezes beautifully, so I like to keep one on the counter and save the other in the freezer for later.
Ingredients for Sourdough Discard Sandwich Bread
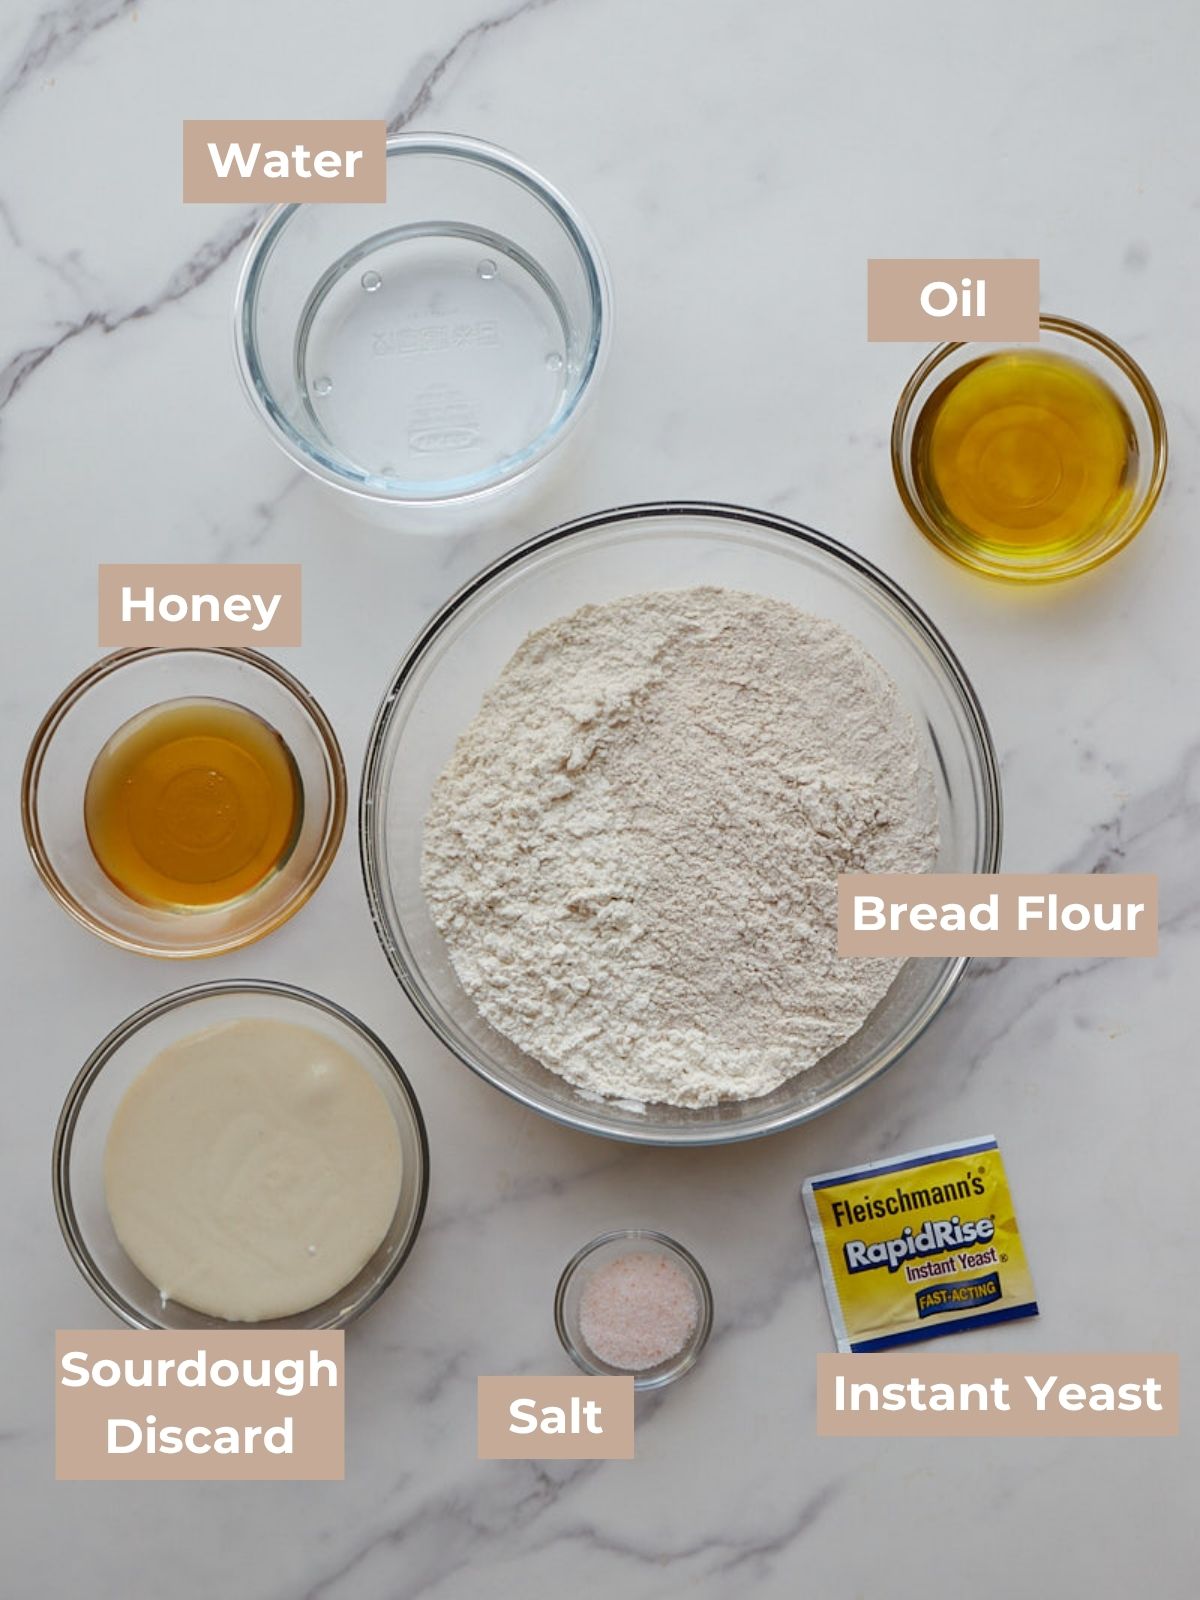
- Instant Yeast – The yeast is added to leaven the bread, making the rise time much quicker than bread leavened with a sourdough starter. You can also use active dry yeast but keep in mind you will need to read the instructions on how to active it plus it could take longer to rise.
- Water – You can use tap water or filtered water but I highly recommend heating up the water to about 120 degrees F.
- Sourdough discard – Discard is used to give the sourdough flavor.
- Honey – You can also swap for pure maple syrup or sugar.
- Salt – Any type of salt works!
- Flour- A combination of whole wheat flour and bread flour is used in this recipe. If you prefer you can just use all bread flour.
- Oil – I recommend olive oil or avocado oil, but you can use other types like coconut, vegetable or canola oil.
How to make Sourdough Discard Sandwich Bread
1. Kneading
Add the dry ingredients to the bowl of a stand mixer. In a separate bowl, mix the wet ingredients and add to the dry ingredients. Knead together for 10-15 minutes in a stand mixer with the dough hook attachment or by hand. The dough should be soft and pliable and be able to pass the windowpane test.


2. Windowpane Test
The windowpane test is performed by gently pulling a section of the dough thinly enough that you can see light through it. If you can see light through the dough, it is a sign the dough is strong and elastic enough to move forward. Be sure to let the dough rest for 2-3 minutes before performing the test to ensure the dough is relaxed. If the dough tears when pulled thin continue kneading it up to 20 minutes.

3. First Rise
Shape the dough into a ball and add to a large bowl. Cover with a tea towel and let rise in a warm place. At 80°F this will take 1-2 hours, depending on if your sourdough discard was cold or room temperature.


4. Shaping
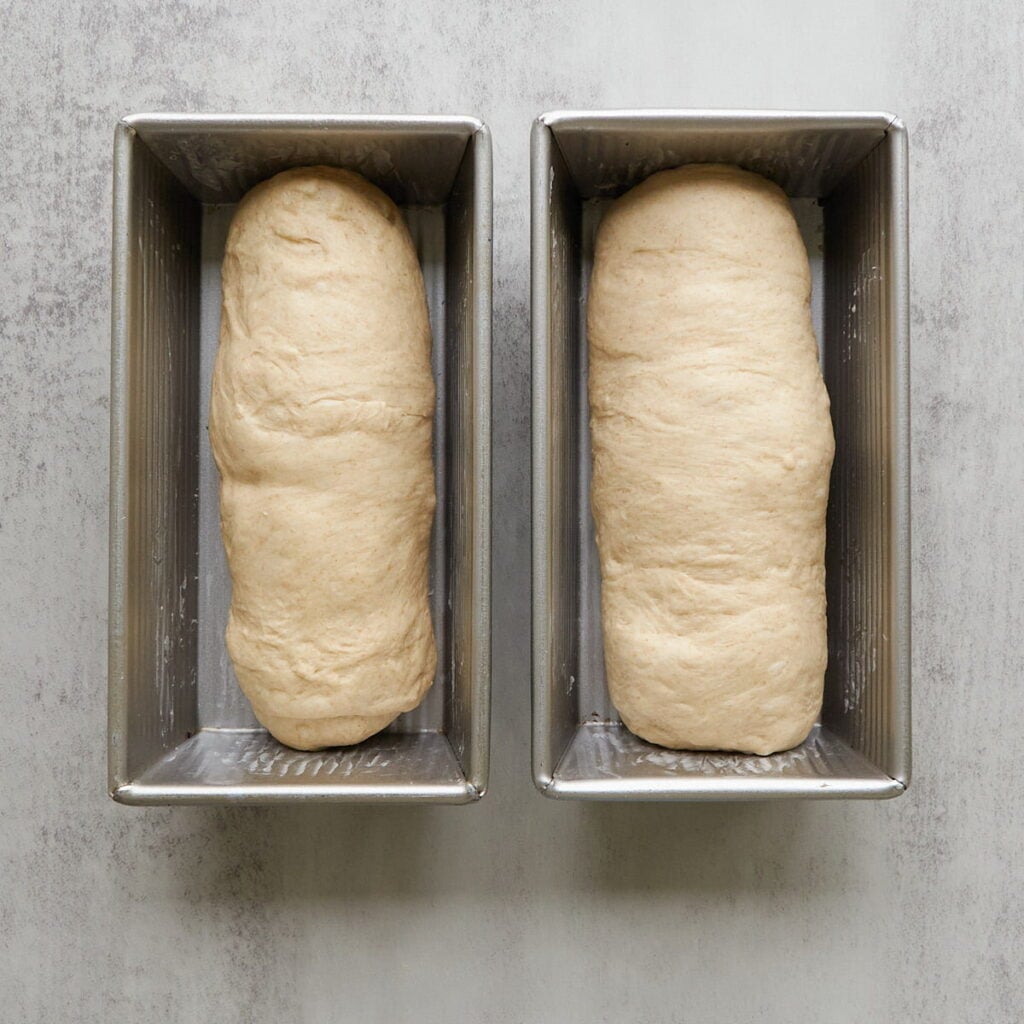
Once the dough doubles in size, punch the dough down. Place the dough on the counter, lightly flouring if needed, and divide the dough into 2 equal sections. Gently pull the dough into a rectangle. Roll the dough up. Pinch the sides of the dough to seal the seams. Repeat with the other loaf.


5. Second Rise
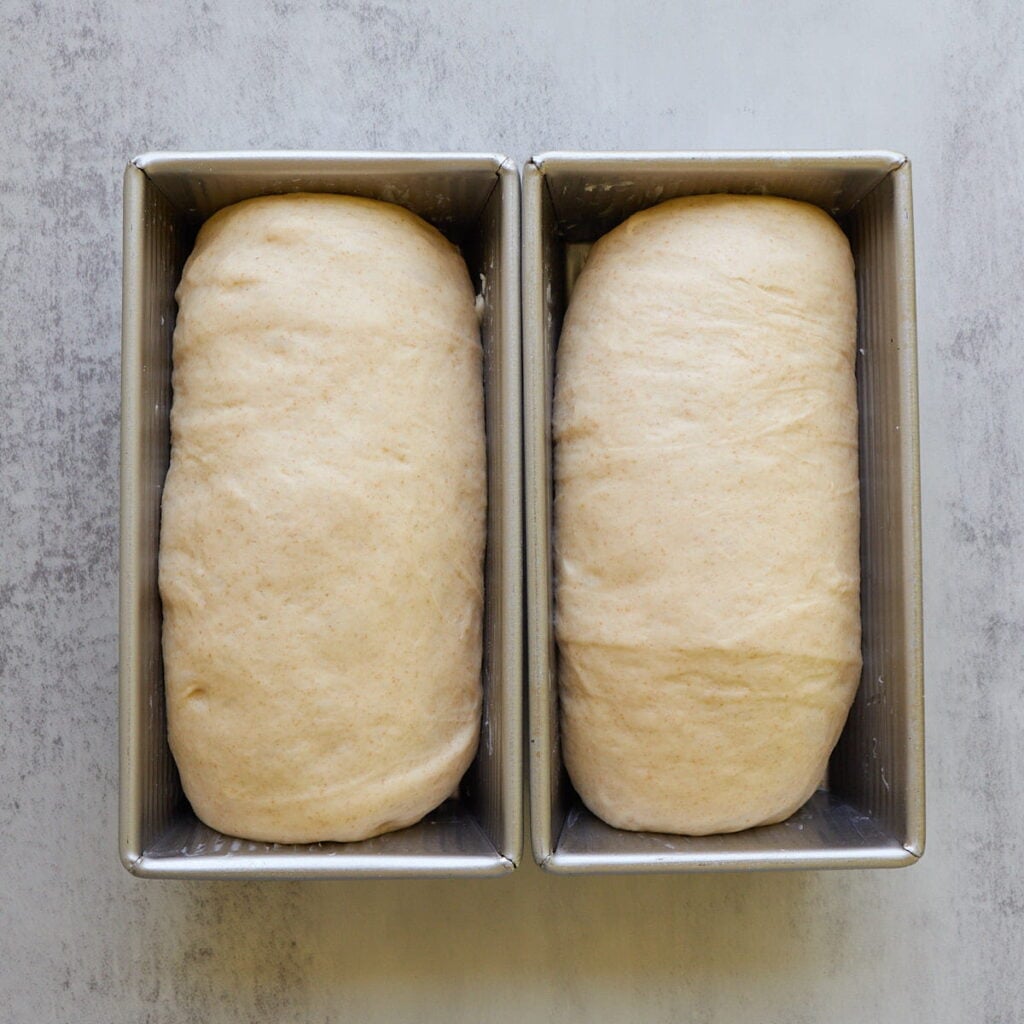
Place the dough into two greased 8.5×4.5 inch loaf pans with the seam side down. Let the dough rise for another 30 mins-1 hour until is has doubled in size in the pan. The dough doesn’t need to completely fill the bread pan before baking. The center of the loaf should be about a half an inch above the pan but the sides will not. If you wait until the sides reach the very top, the loaves will be overproofed and likely collapse when cooling.
6. Baking
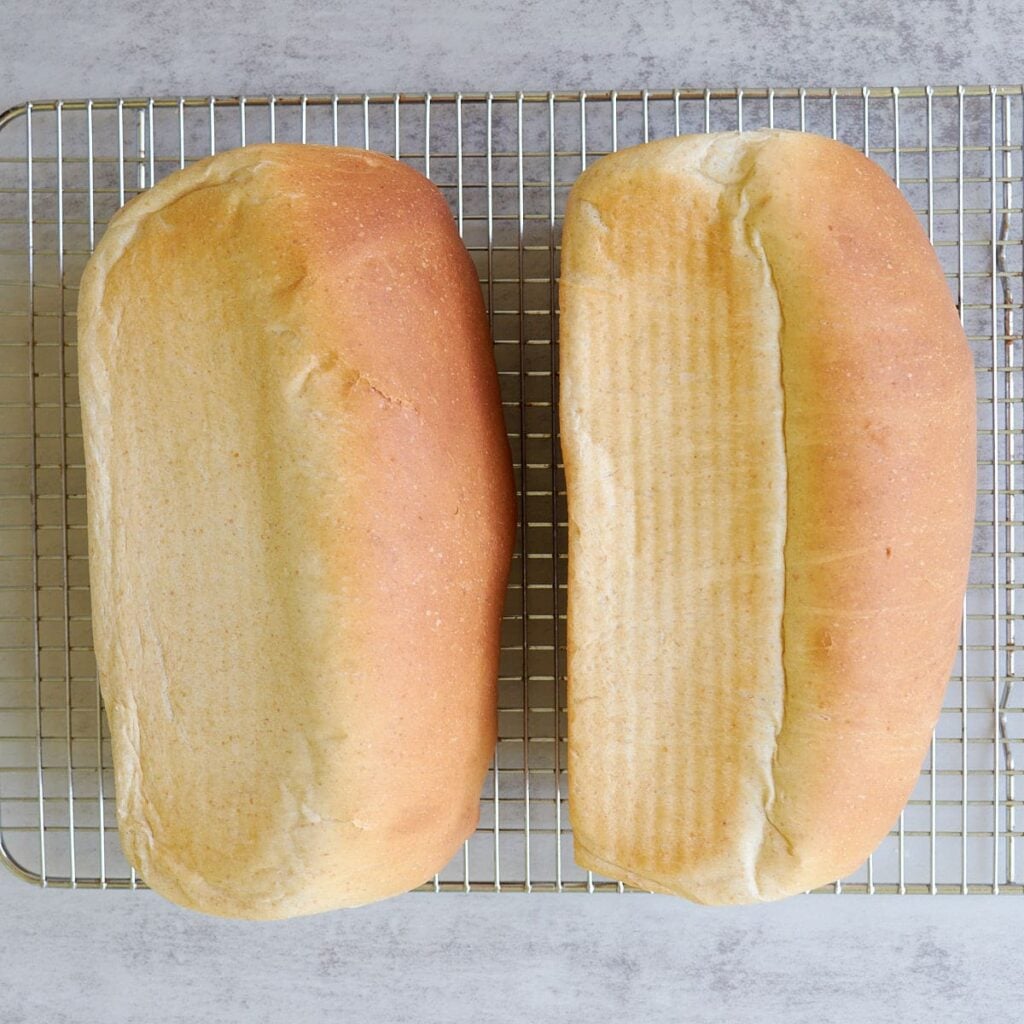
Bake in a 350℉ oven for 25 minutes or until the internal temperature of the loaf reaches 190℉. Once baked, remove the loaf from the pan and let it cool on a cooling rack. Brush the tops with oil or butter for a softer crust.
Recipe Tips
- Be sure that the dough doubles in size during the first rise. This ensures a soft and fluffy loaf. The key to getting your dough to rise is a warm temperature. If you are having trouble getting your dough to rise or your house is on the cooler side, you can use a warming mat to speed up the process.
- During the second rise in the loaf pans, don’t wait for the dough to completely fill the pan. The center of the loaf should be about a half an inch above the pan, but the sides will not. If you wait until the sides reach the top, the loaves will be over-proofed and may collapse after baking. (See photo in instructions above)
- Use warm water that is about 120℉. The warmth helps activate the yeast, but be careful not to use hot water.
- Use room temperature sourdough discard in the recipe to avoid longer rise times.
- Wait for the loaf to cool on a cooling rack before slicing the loaf. This will help the crumb to set and will keep the loaf fresher for longer. To make slicing easier turn the loaf on its side to cut.
- To make sure there are no holes on the top of your loaf, you can poke holes along the top of the loaf with a fork or toothpick after the second rise. This will pop any air bubbles that formed while rising, which creates the holes in the final loaf.
How to Use This Sourdough Discard Sandwich Bread
This Sourdough Discard Sandwich Bread is perfect for toast and all your favorite sandwiches. I especially love how kid-friendly it is. I use it to make homemade PB&J Uncrustables, then freeze them for quick and easy school lunches.
How to Store Sourdough Discard Bread
Once the loaf cools completely, you can store it in a bread box, bread bag or ziplock bag. It usually will last 5-7 days unless humidity is high which can cause it to mold quicker.
This sourdough discard sandwich bread freezes well too. I like to keep one on my counter and one in the freezer. You can either freeze the entire loaf uncut or sliced. To freeze an uncut loaf simply wrap it in foil or place it in a freezer-safe ziplock. Once you are ready to eat the loaf place it on your counter covered overnight to thaw. To pull slices out individually, cut the loaf and place pieces of parchment paper in between each slice. Place in a freezer-safe ziplock or bread bag and pull slices out as needed.

Recipe Updates
This recipe was updated on 5/15/26.
I increased the measurements so that the recipe made slightly larger loaves, so that they fill the loaf pan better. This makes it much easier to judge when the dough has doubled and helps prevent accidental overproofing, which was a common problem before the updates.
Frequently Asked Questions
This is usually caused by under-proofing or over-proofing. If the loaves were very full in the pans and felt airy before baking, they were likely overproofed—next time, shorten the rise time. If they felt dense before baking, they were likely underproofed, so try extending the rise time.
A 9×5-inch pan is a little too big for these loaves but can be used in a pinch. When using a 9×5-inch pan do not wait for the dough to fill the loaf pan. Once the dough has doubled it is ready to use.
Yes, you can use 180 grams of active starter in place of the discard in this recipe and remove the yeast just note that your rise times will be longer.
Yes, but be sure to follow the instructions on how to active
This is a sign of overproofing. Shorten your second rise time the next time you make it.
More sourdough bread recipes
Sourdough Bread Recipes
Same Day Sourdough Sandwich Bread Recipe

Recipes with Sourdough Discard
Sourdough Discard French Bread

Sourdough Bread Recipes
Sourdough Bread in a Loaf Pan (no dutch oven required)
Sourdough Artisan Bread Recipes
Easy Sourdough Bread Recipe
Tried this Sourdough Discard Sandwich Bread or another recipe from the site? I’d love to hear about it! Drop a star rating and share your thoughts in the comments—can’t wait to see what you’re baking!

Quick Sourdough Discard Sandwich Bread
Ingredients
- 425 grams bread flour, 3 cups + 2 tablespoons
- 150 grams whole wheat flour, 1¼ cup
- 7 grams instant yeast, 2 ¼ teaspoon
- 10 grams salt, 1 ½ tsp
- 240 grams warm water (120℉), 1 cup
- 60 grams honey, ¼ cup
- 220 grams sourdough discard, room temperature, scant 1 cup
- 75 grams olive oil, ⅓ cup
Instructions
- To the bowl of a stand mixer add bread flour, whole wheat flour, instant yeast, and salt and combine.425 grams bread flour, 150 grams whole wheat flour, 7 grams instant yeast, 10 grams salt
- Mix together the wet ingredients and add to the dry ingredients. 240 grams warm water (120℉), 60 grams honey, 220 grams sourdough discard, 75 grams olive oil
- Knead all the ingredients together for 10-15 minutes in a stand mixer with the dough hook attachment or by hand. The dough should be soft and pliable and be able to pass the windowpane test, meaning you can pull a piece of the dough thin enough that you can see light through without it tearing. If it is still weak knead for a couple more minutes.
- Shape the dough into a ball and add to a straight-edge container or medium-sized bowl. Cover with plastic wrap and let rise in a warm place until doubled in size. At 80°F this will take 1-2 hours.
- Once the dough doubles in size, punch the dough down. Place the dough on the counter, lightly flouring if needed, and divide the dough into 2 equal sections. Gently pull the dough into a rectangle. Roll the dough up like a log. Pinch the sides of the dough to seal the seams. Repeat with the other loaf.
- Place the dough into two greased 8.5×4.5" loaf pans with the seam side down. Let the dough rise covered for another 30 mins-1 hour until it has doubled in size in the pan. The center of the loaf should be about a half an inch above the pan but the sides will not. If you wait until the sides reach the very top, the loaves will be overproofed and likely collapse when cooling.
- Bake in a 350℉ degree oven for 25 minutes or until internal temperature of the loaf is 190℉. Once baked remove the loaf from the pan and let it cool on a cooling rack. Brush the tops with oil or butter for a softer crust.
Video

Notes
- During the second rise in the loaf pans, don’t wait for the dough to completely fill the pan. The center may rise slightly above the rim, but the sides will stay lower. If you wait until the sides reach the top, the loaves will be overproofed and may collapse after baking.
- Wait for the loaf to cool on a cooling rack before slicing the loaf. This will help the crumb to set and will keep the loaf fresher for longer. To make slicing easier, turn the loaf on its side to cut.
- You can use cold sourdough discard in the recipe but it will extend the rise times.
- Instant yeast is used instead of active dry yeast and can be added directly in with the rest of the ingredients.
- Water is increased to 200 grams and should be a temperature of about 120℉
- Cooking time reduced to 25 minutes or until the internal temperature is 190℉
Swaps:
- You can swap olive oil for a different type if you prefer.
- You can swap honey for maple syrup or sugar.
- You can remove whole wheat flour and swap for all bread flour if you want a full white bread.
Nutrition
Nutrition information is automatically calculated, so should only be used as an approximation.


Emily. Can you make the dough and freeze? This is the 3rt time a make it for my grandkids they LOVE IT
Has anyone tried add-ins with this recipe?
I’m curious too!!
I saw one of the comments where someone said they added a seed mixture after passing the windowpane test and came out great!
Thank you
Hi Emily! Is there a way to make just one loaf of bread and half the recipe?
Thank you!
Hi Cindy, yes you could just divide all the ingredients by 2 to get the gram measurements for 1 loaf.
Thank you!
How is this only 4.5 stars?????
It’s clearly a 5. It’s the best sandwich sourdough out there.
Thanks so much Della!
I rarely come across a recipe that compels me to leave a comment but this one absolutely does. Hands down the best discard sandwich bread I’ve tried so far or possibly even the best sandwich bread, period. I love the whole meal in it. Thank you for sharing this recipe.
Thanks so much Amanda!
I like that this recipe included wheat flour so thought I would try it to use up some sourdough discard. The recipe turned out fine. I didn’t have fast acting yeast, so I had to use regular. This added to the rise time. I did swap honey for sorghum syrup, due to it being lower on the FODMAP scale. This added an interesting a depth of flavor, but I am not sure it works with the sourdough flavor, so may try just plain sugar next time around. The bake time stated in the recipe was WAY OFF for our oven. It took every bit of 45 minutes at 350 degrees to reach the internal temp of 190 + (45 minutes is more of the time that I am used to seeing in using in bread recipes). What type of oven is everyone using to bake off a loaf in 25 minutes? Thanks for the recipe! I would definitely try it again using the quick rise yeast!
Thanks Catherine! I appreciate the feedback.
Did you use glass pans? That could be why it took longer. Or possibly altitude, type of pans used, actual temp of ovens. There are a few factors that can impact bake times which is why I also add the internal temp to ensure it bakes correctly. Thanks!
What is the best way to store the sandwich bread to keep it fresh?
A bread bag or bread box works best. If it is going to be sitting out for more than a couple days I recommend putting some in the freezer to keep it fresh.
Are we suppose to put steam in the oven with the loaves of bread dough in the loaf pans??
My dough in the pan rose perfectly and when I put them in the oven they deflated right back down to before the rise.
What happened? Everything was perfect. The measurements were right on, the starter was perfect. I didn’t take any pictures of the rise before I put it in the oven. It normally works out right except for this time – flat
Best bread!
I’m so happy to hear you like it!
Can I bake this in a Dutch oven instead of loaf pans?
Are you wanting to bake it into a round loaf? It won’t hold a loaf shape in a dutch oven but if that doesn’t bother you then it should be fine.