This post may contain affiliate links . Read my full Disclosure Policy.


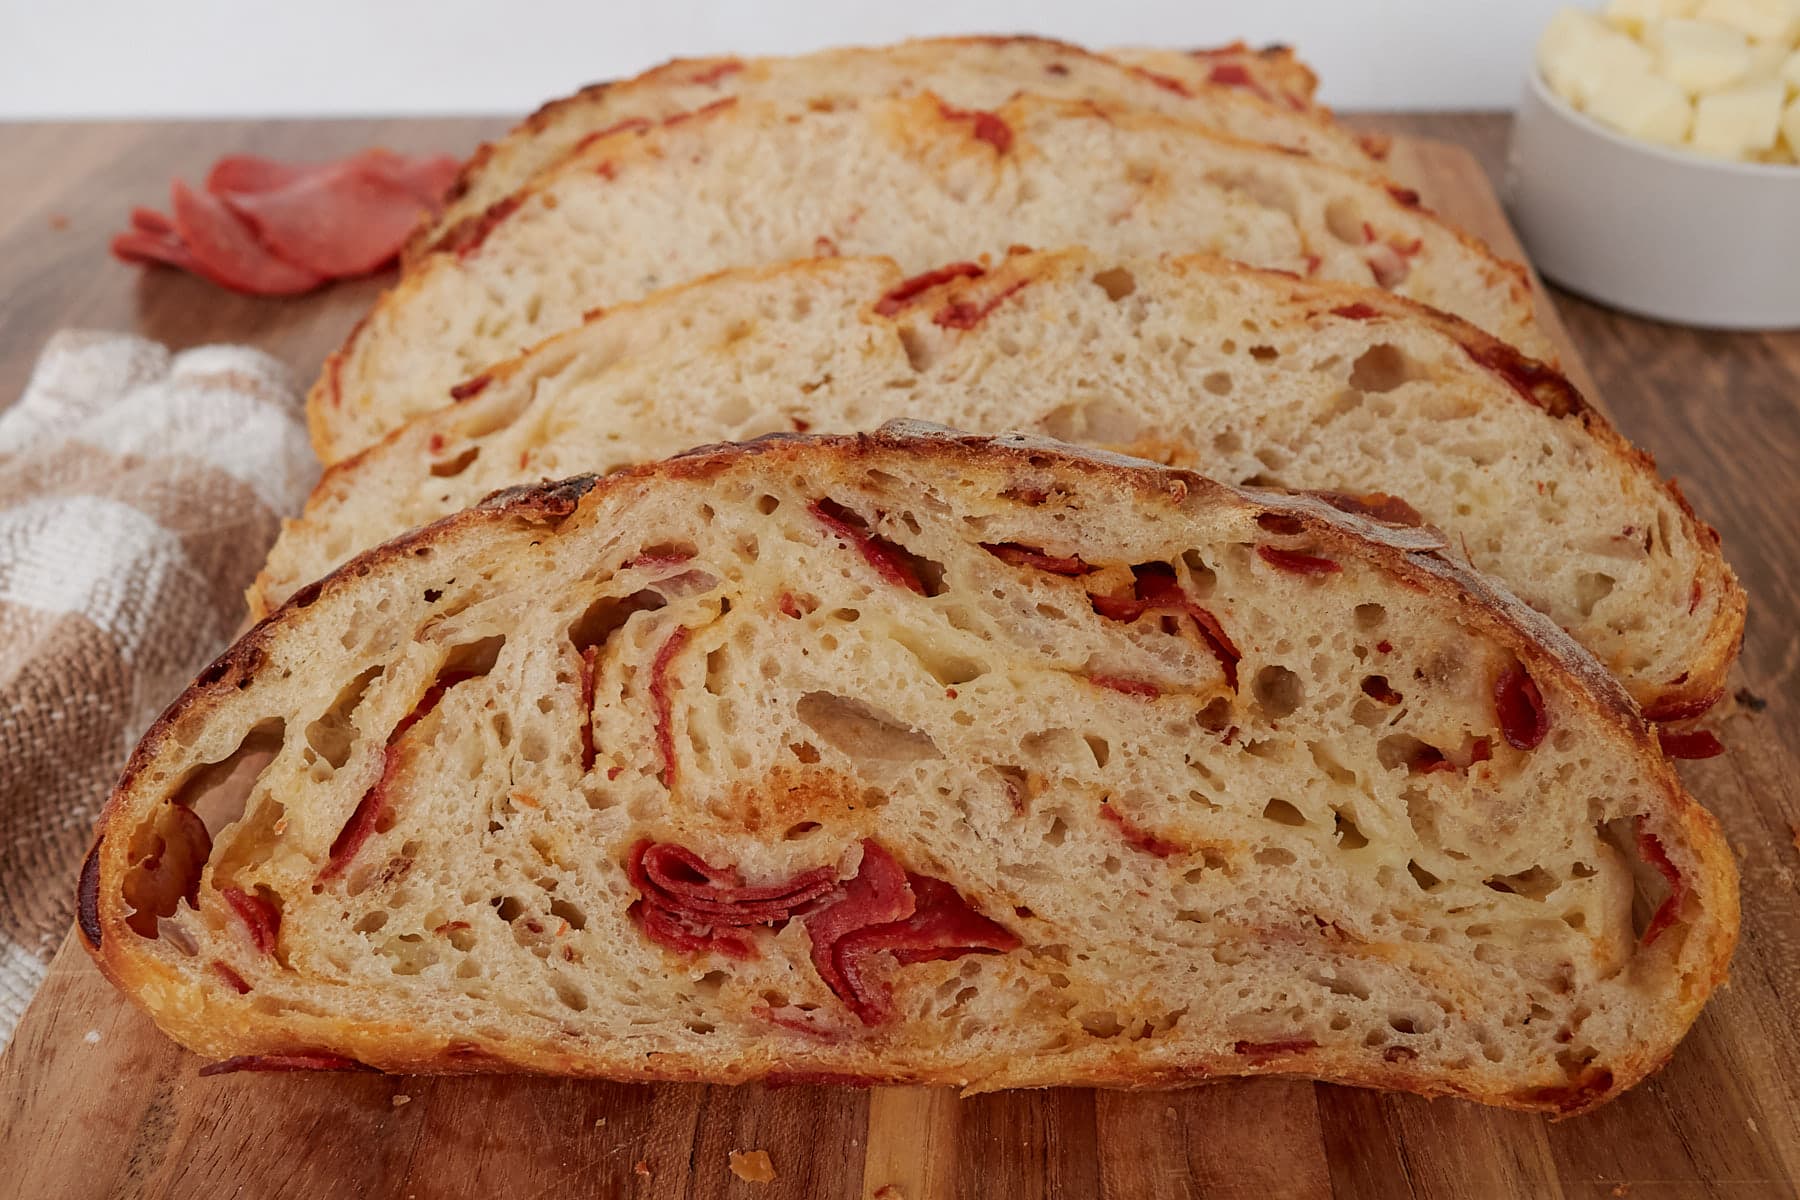
This Pepperoni and Cheese Sourdough Bread is everything you love about pizza baked into a crusty sourdough loaf. Packed with pepperoni, melty mozzarella cheese, and a little heat from red pepper flakes, this flavorful bread is delicious on its own or dipped in warm marinara sauce.
Save & Summarize
“My family loves this recipe! It truly feels like the most West Virginian sourdough bread. A lunch favorite for my son! Thank you for the detailed instructions that make trying something new totally doable for a sourdough newbie.” -Gina
This recipe starts with my Same Day Sourdough Bread as the base dough with the addition of the mix-ins, making it flexible enough to fit your schedule. You can bake it the same day for a quick loaf or let it ferment overnight for even more sourdough flavor.
If you love pizza-inspired sourdough recipes, be sure to check out my Sourdough Pizza Dough and Quick Sourdough Discard Pizza Dough for dough ready in under an hour. Or try my Pizza Sourdough Focaccia, which swaps the water in the dough for marinara sauce for even more pizza flavor. You can also find my recipe for Sourdough Pepperoni Rolls in my cookbook Same Day Sourdough.
Table of Contents
- Why You’ll Love This Recipe
- Ingredients & Substitutions for Pepperoni and Cheese Sourdough Bread
- How to Make Pepperoni and Cheese Sourdough Bread
- Sample Baking Schedules
- Recipe Tips
- Storage & Reheating Instructions
- Frequently Asked Questions
- More Flavored sourdough Breads
- Pepperoni and Cheese Sourdough Bread Recipe
Why You’ll Love This Recipe
- Same-day or overnight timeline– The dough is based on my Same Day Sourdough Bread recipe, so you can bake it the same day or stretch the fermentation overnight, depending on your schedule.
- Flavor in every bite– Adding the pepperoni and cheese during the stretch and folds distributes the fillings throughout the dough, so every slice is loaded with flavor.
- Perfect for dipping– This loaf is incredible served warm with marinara sauce, making it great as an appetizer, game day snack, or side with pasta night. If you’re looking for more appetizers, check out my Sourdough Pizza Wreath.
Ingredients & Substitutions for Pepperoni and Cheese Sourdough Bread
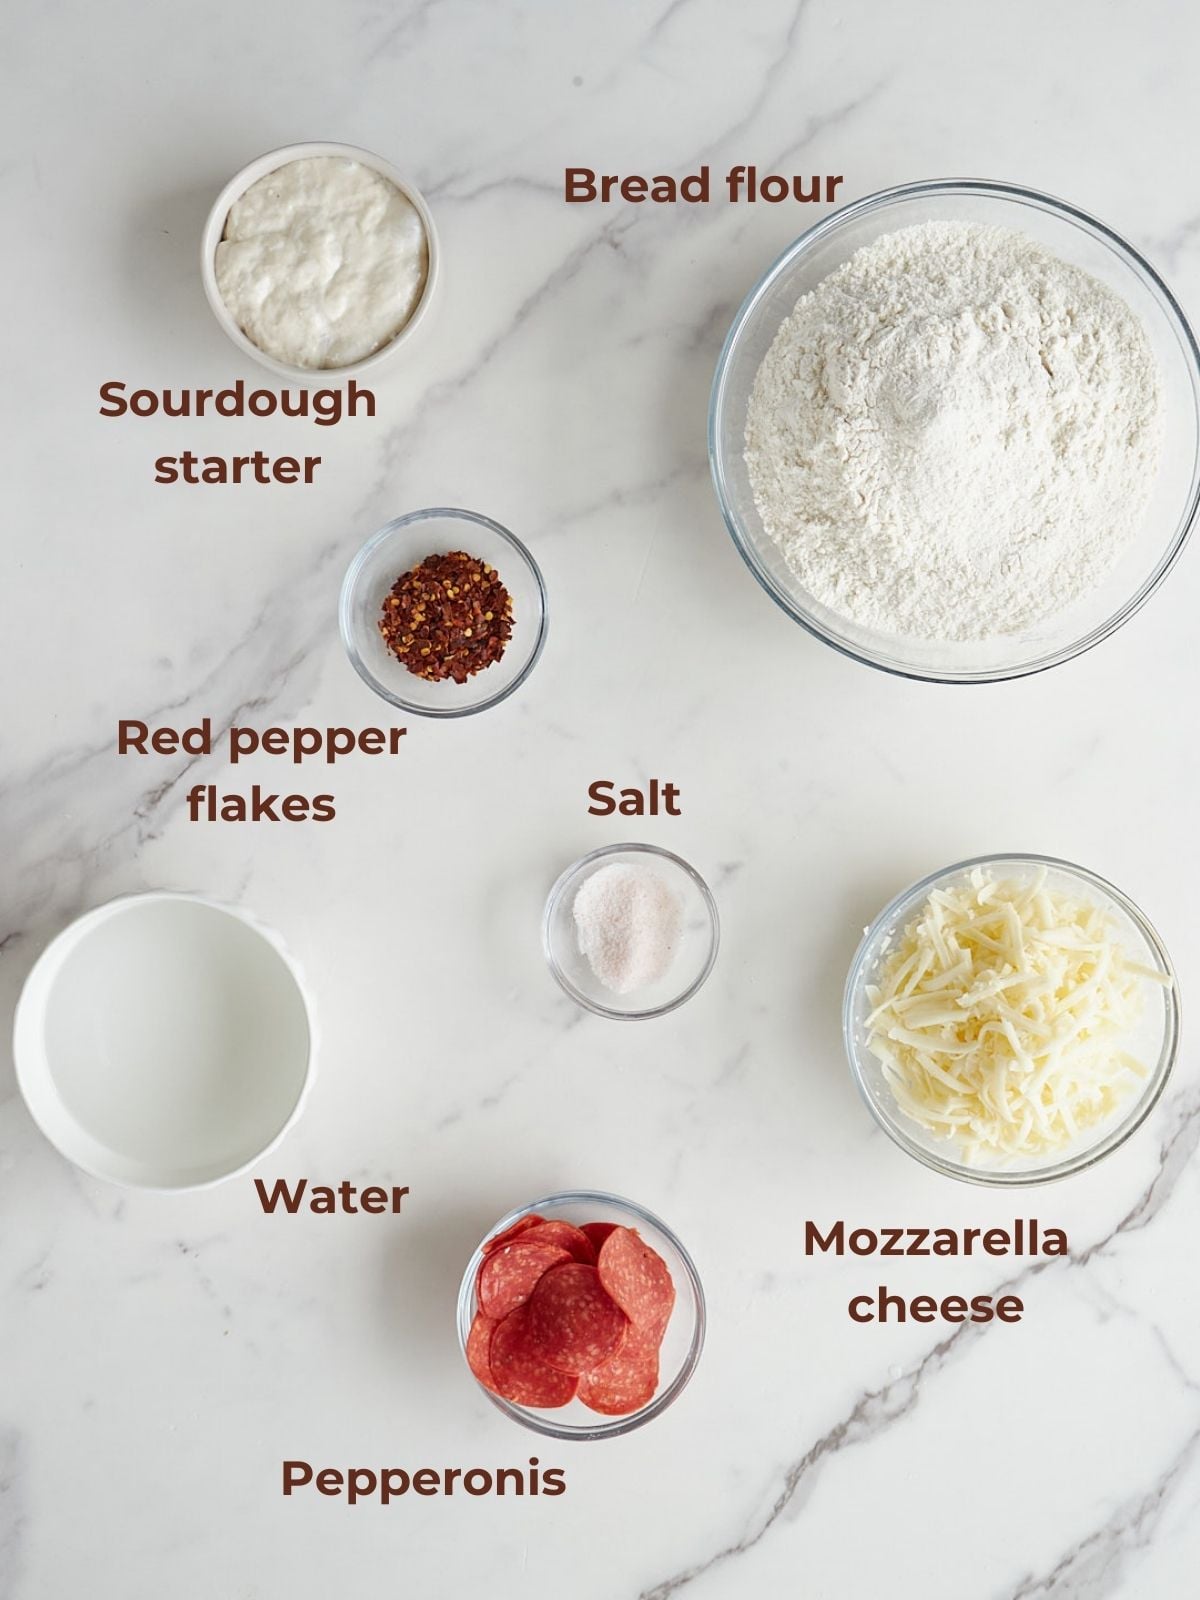
- Bread Flour – Flour with a higher protein content, like bread flour, is ideal for sourdough bread because it is it is efficient at absorbing water. You can also use unbleached all-purpose flour, but I recommend reducing the water by 25 grams.
- Active Sourdough Starter– You will want to use a sourdough starter that is doubled in size and bubbly.
- Red pepper flakes– We like the heat the red pepper flakes add to this loaf but if you prefer a more mild flavor you can remove it all together or swap for italian seasoning.
- Mozzarella Cheese- I recommend shredding your own cheese to ensure it melts properly. You can also use cubed cheese instead for larger bites of cheese throughout. You can also add different types of cheese, like parmesan or cheddar.
- Pepperoni Slices– If the pepperonis you get have a lot of grease on them I recommend patting them dry with a paper towel before incorporating into the dough.
See the full ingredients and recipe in the recipe card.
How to Make Pepperoni and Cheese Sourdough Bread
Feed sourdough starter
About 4 hours before making the loaf, build a levain or feed your sourdough starter at a 1:1:1 ratio (5o grams sourdough starter: 50 grams flour: 50 grams water). Cover and let it rest at 77–80°F until bubbly and doubled in size.
If you don’t have extra starter, add an extra 5–10 grams to each portion (starter, flour, and water) so you have enough to bake with and still keep your starter going.
Skip this step if your starter is already activated and ready to bake with.
Note: If you want to start the loaf in the morning, you can feed your starter a 1:5:5 ratio (15 grams active sourdough starter, 75 grams flour, 75 grams water) the night before and leave it covered for about 10 hours at 70-72℉.
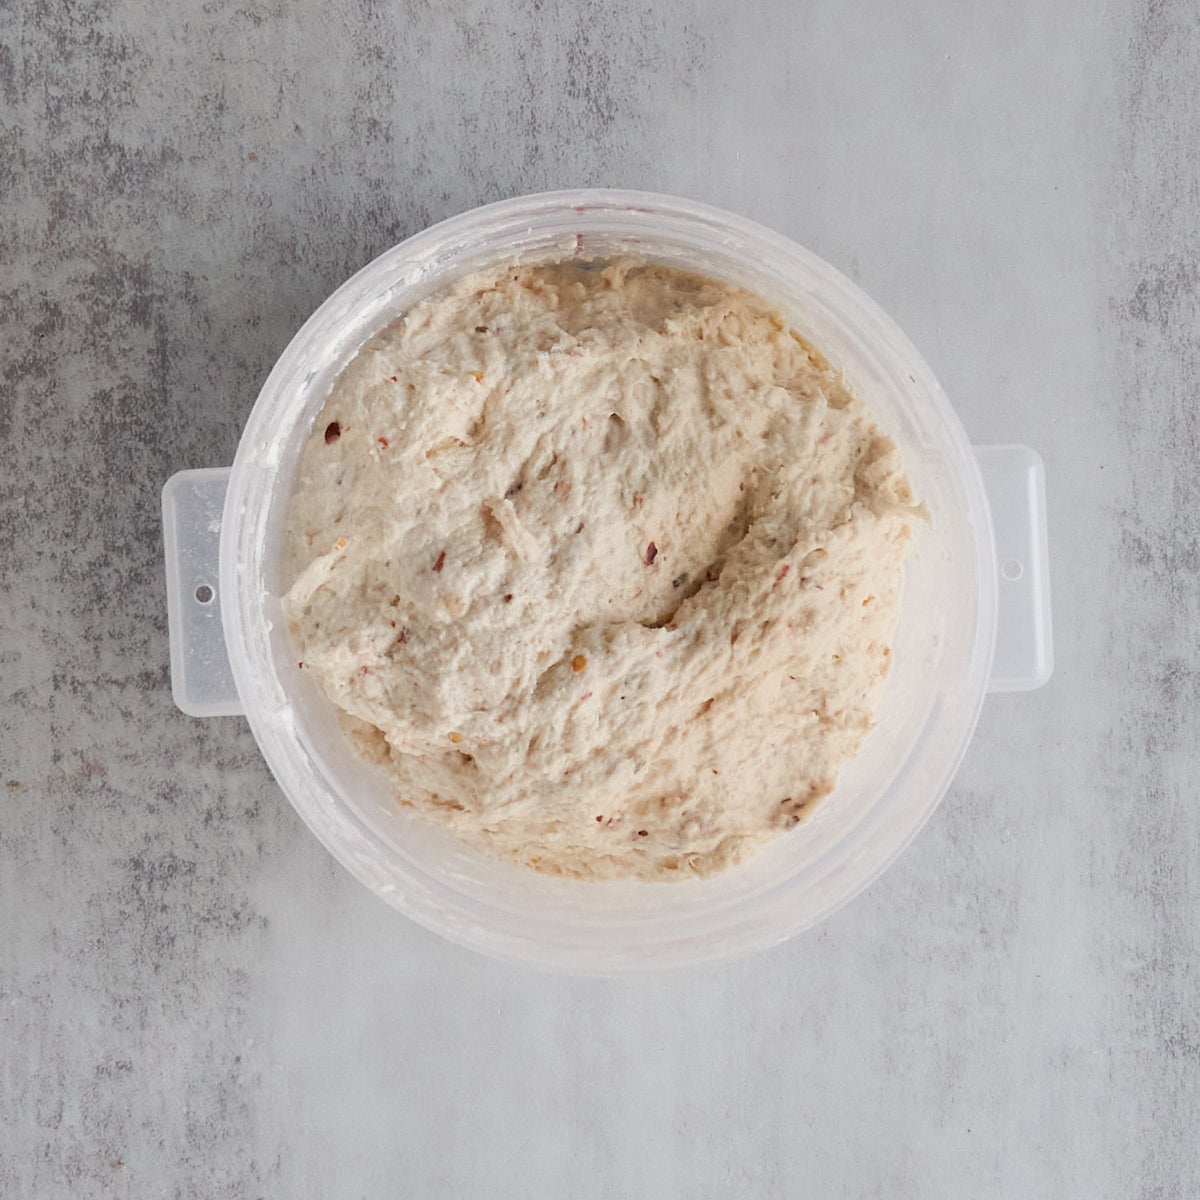
Step 1 – Mix the dough
In a 2-quart straight-sided container or a medium clear bowl, mix water, active starter, red pepper flakes, and salt using a Danish dough whisk, your hands, or a large spoon. Add the flour and mix until fully incorporated, about 2 minutes. The dough will still be rough and shaggy at this point. Cover and let rest for 30 minutes in a warm spot.
To follow the suggested timing, keep the dough temperature at 75°F.

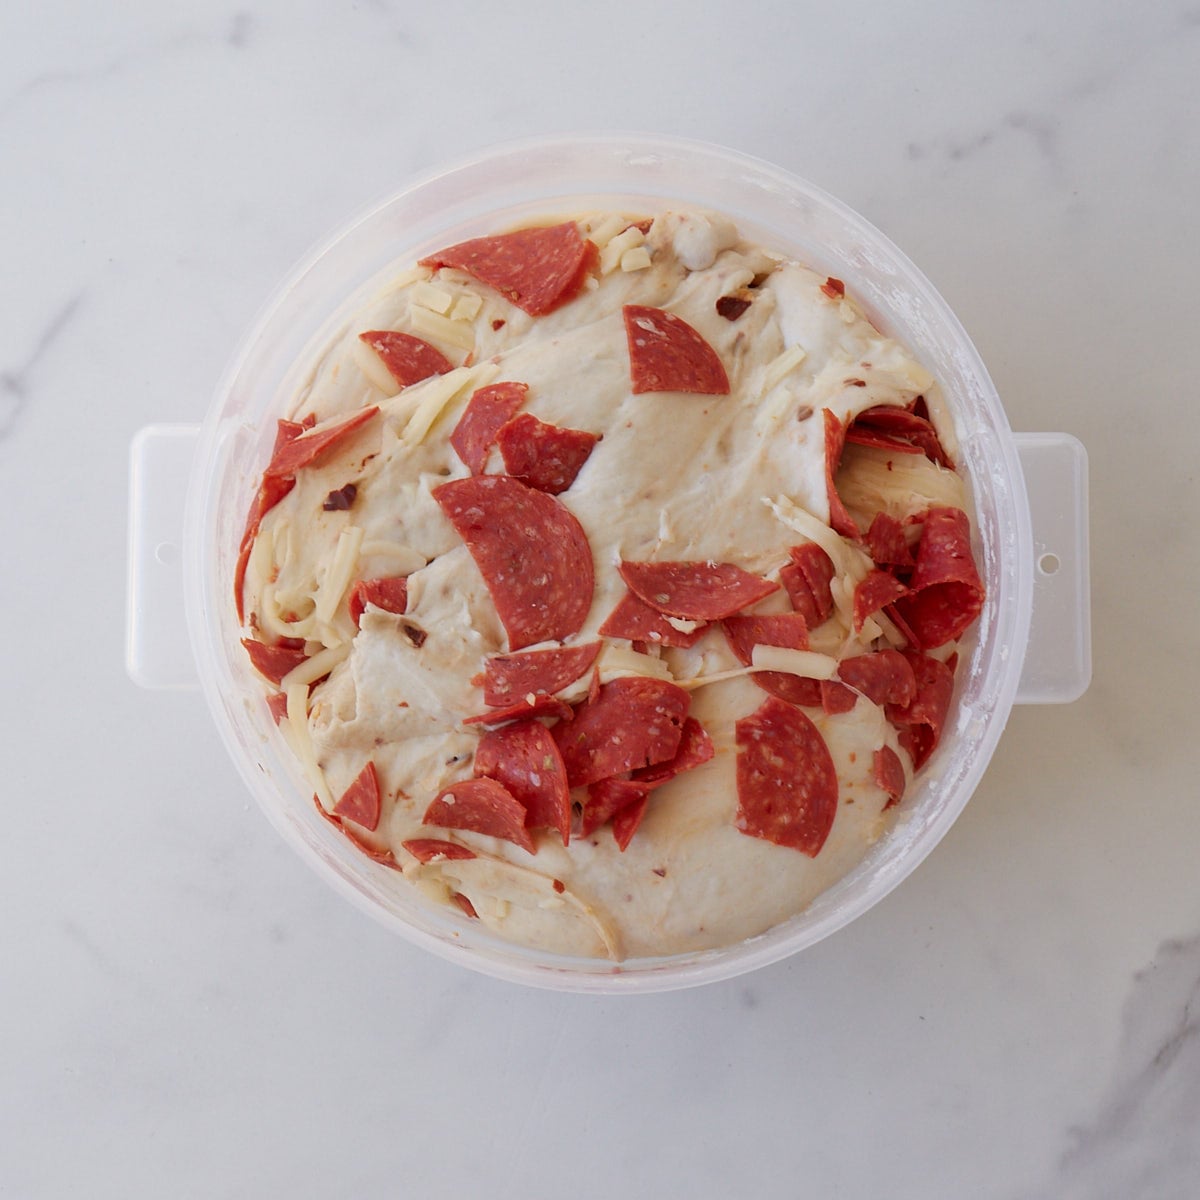
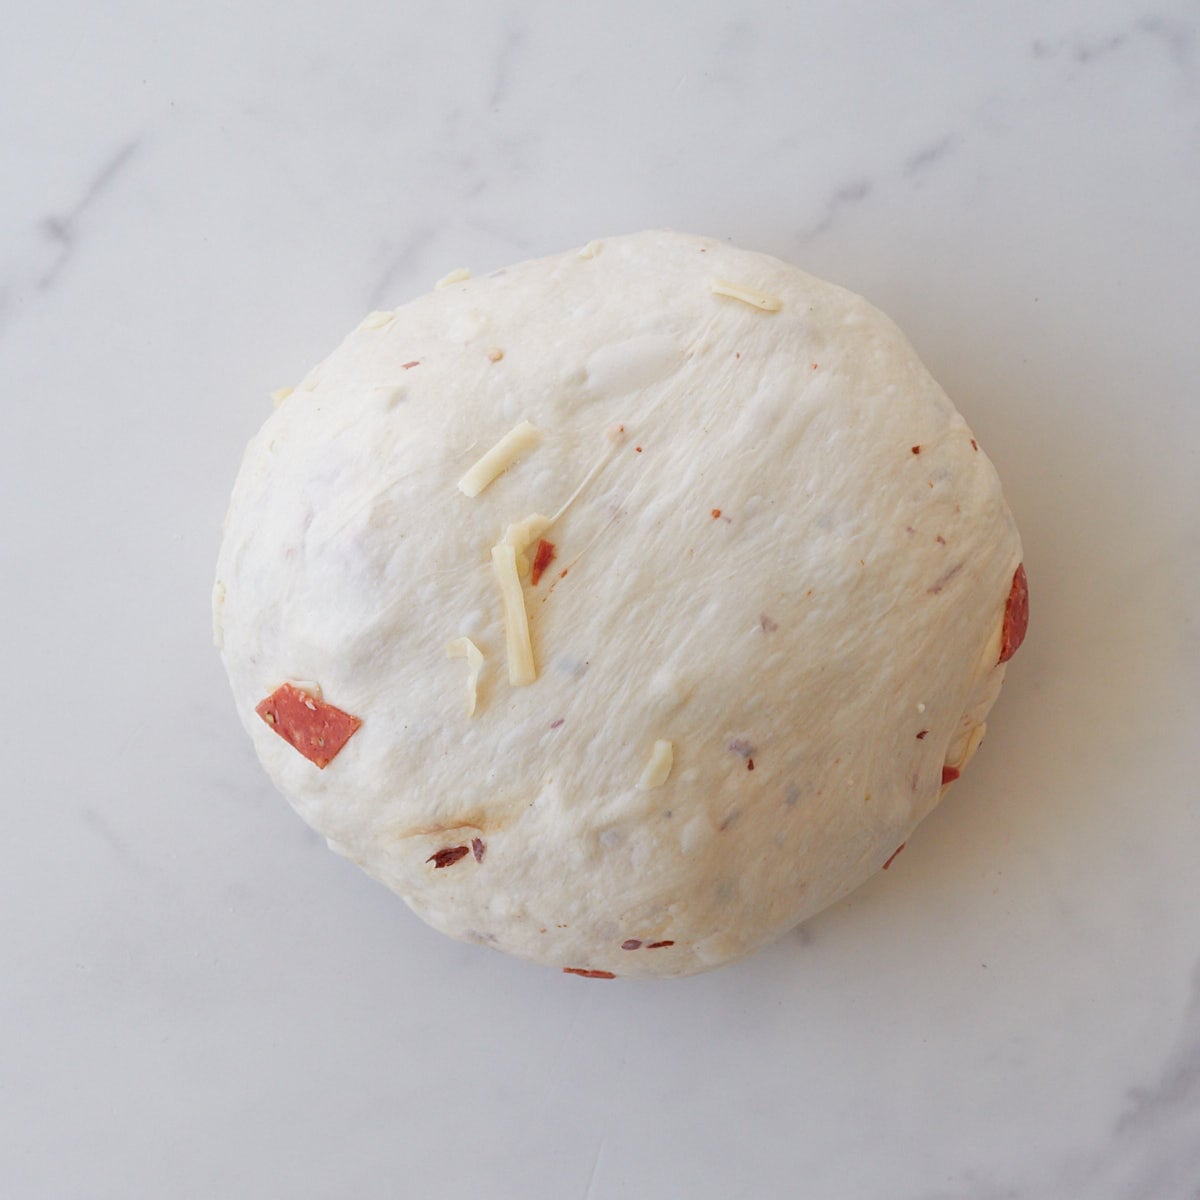
Step 2 – Stretch and folds
Perform 3 sets of stretch and folds with a 30-minute rest in between each set. To stretch and fold the dough, grab one side with a damp hand and gently shimmy the dough up, and then fold it on top of itself. Repeat this 3 more times, rotating the bowl 90 degrees each time. Cover and keep the dough warm between each set.
Prep the mix-ins by dicing the pepperonis and shredding the cheese. During the second set, incorporate the pepperoni and mozzarella cheese.
Step 3 – First rise
After the stretch and folds, let the dough continue to rise until the dough is jiggly, domed on top, bubbly on the sides, and risen 50%. If it does not show these signs, continue to let the dough rise until it does.
At a dough temperature of 75ºF, my dough is ready in about 4 – 4.5 hours from the time it is mixed.
Step 4 – Shape
Turn the dough out onto an unfloured surface and gently stretch it into a thick rectangle. Begin shaping by folding the top edge down toward the center like an envelope, pulling gently to build tension. Next, lift the top two corners and fold them toward the center, slightly overlapping, then repeat with the bottom two corners. Starting from one side, roll the dough over itself to form a ball, keeping the smooth side on top. Cup your hands around the dough and gently rotate it counter-clockwise toward you to tighten the surface and create a smooth, round shape.
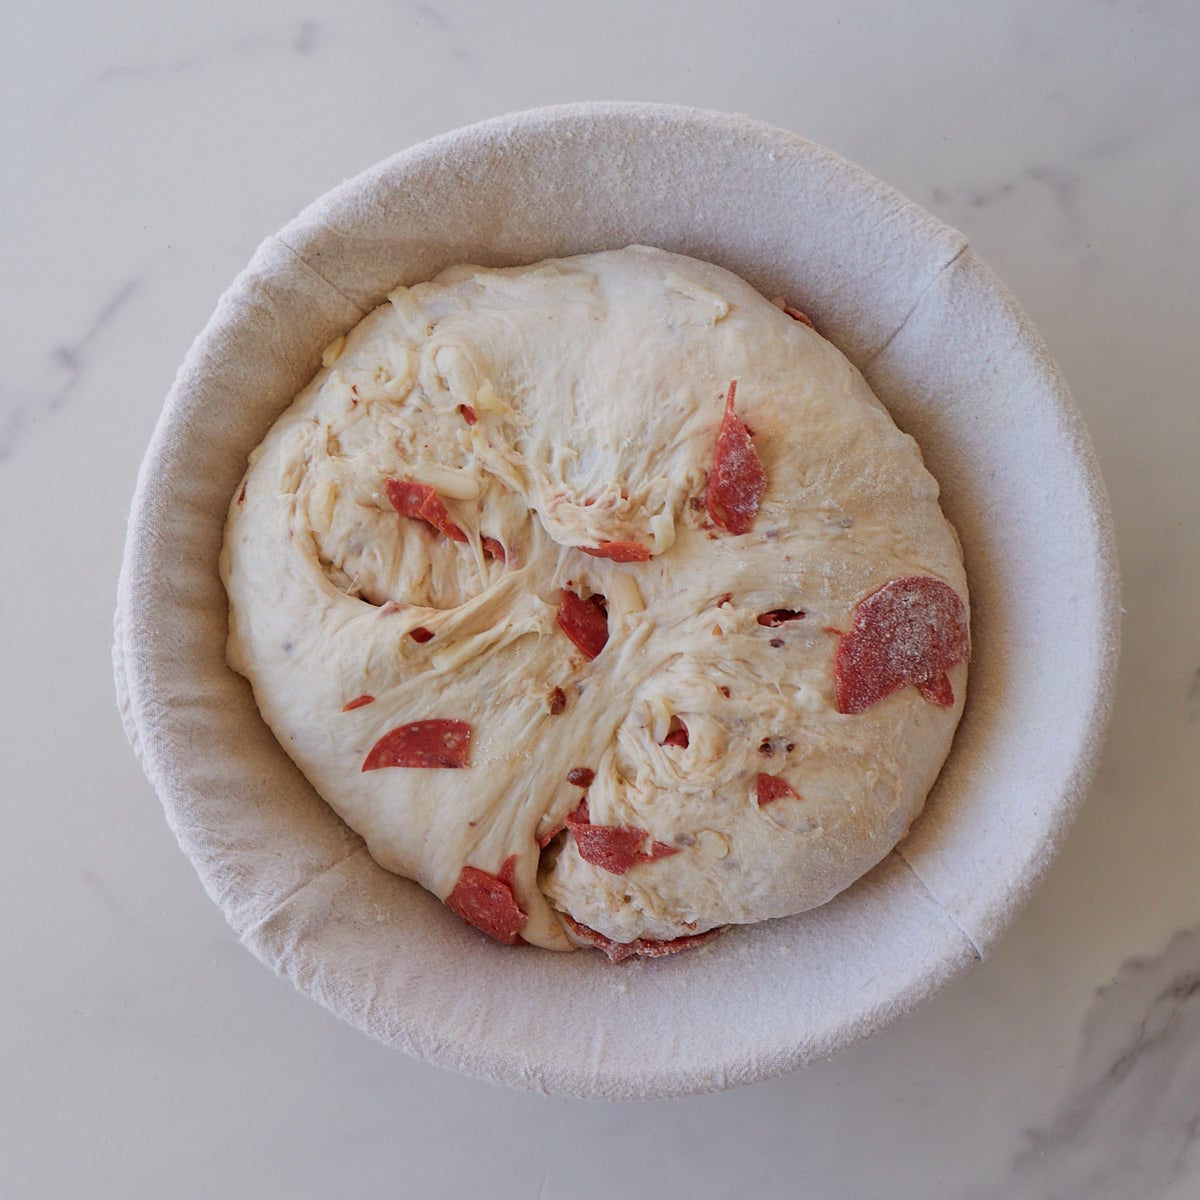
Step 5 – Prep proofing basket
Lightly flour an 8–10-inch proofing basket or tea-towel-lined bowl with all-purpose flour or rice flour. Place the dough seam-side up in the floured proofing basket and cover.

Step 6 – Second Rise
Option 1 same-day method: Let the dough rest on the counter for 1–2 hours covered at 75°F.
To check for readiness, perform the poke test: gently press the dough with a lightly floured finger. If the indentation slowly springs back, it’s properly proofed and ready to bake. If it bounces back right away, it needs more time. If the indentation doesn’t spring back at all, the dough is overproofed and should be baked right away.
Once the dough is ready, place it in the freezer for 20-30 minutes before baking.
Option 2 overnight method: Place the dough in the fridge covered overnight for 8-12 hours. Bake the dough directly from the fridge.
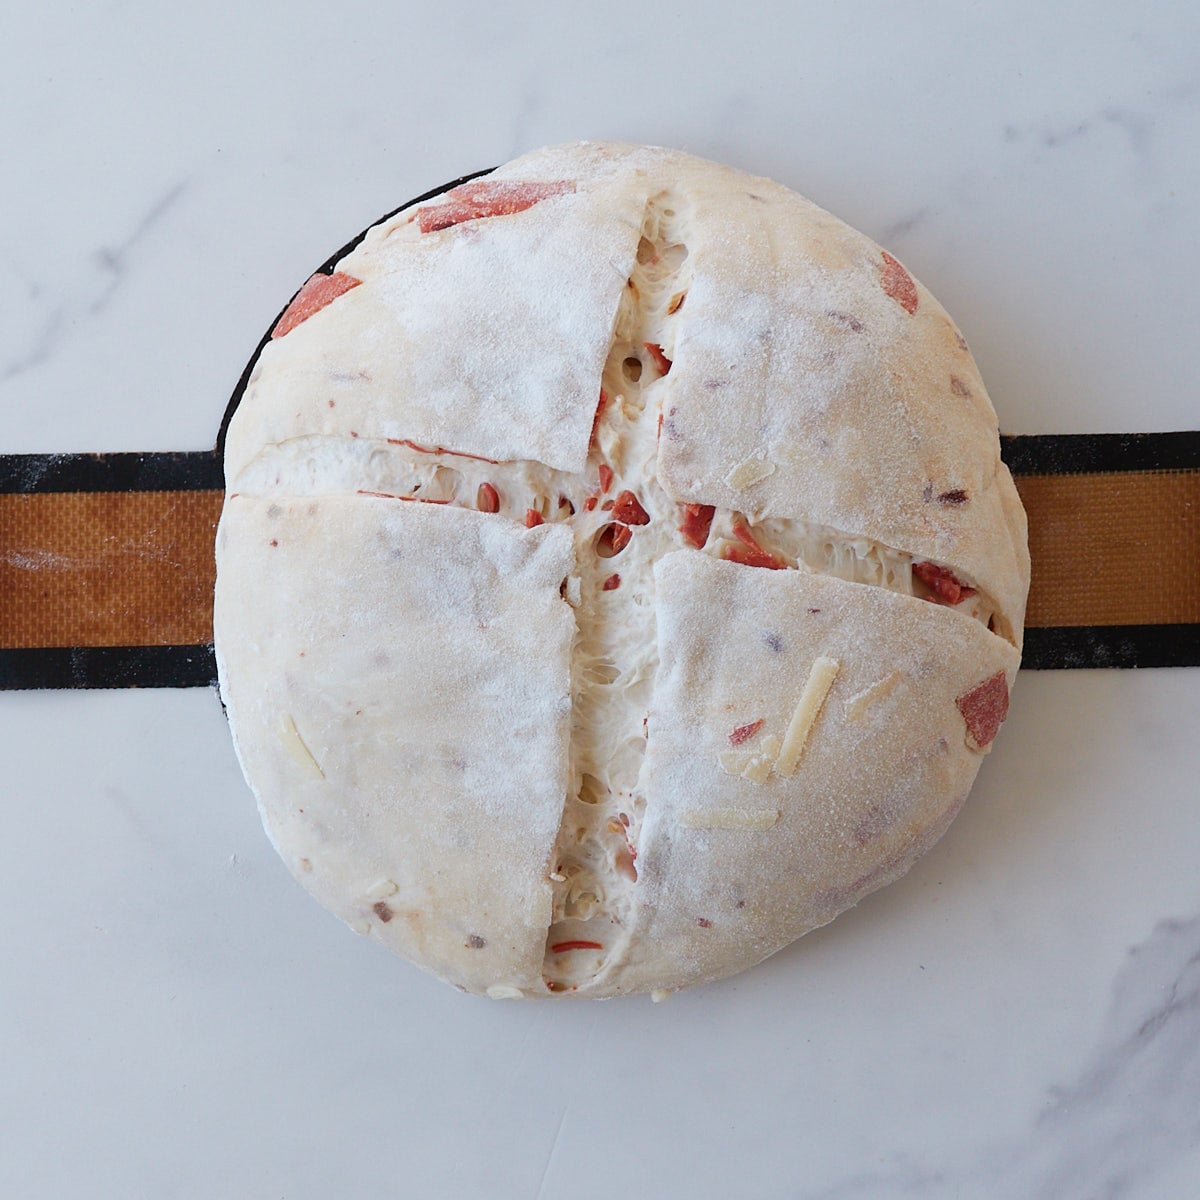
Step 7 – Preheat oven and score
Preheat the dutch oven in the oven at 450℉. To prevent the bottom of the loaf from burning, place a heavy-duty baking sheet on the rack below.
Flip the bread onto a silicone bread sling or parchment paper. With a bread lame or sharp knife, score an “X” on the top of the dough about ¼ inch deep.
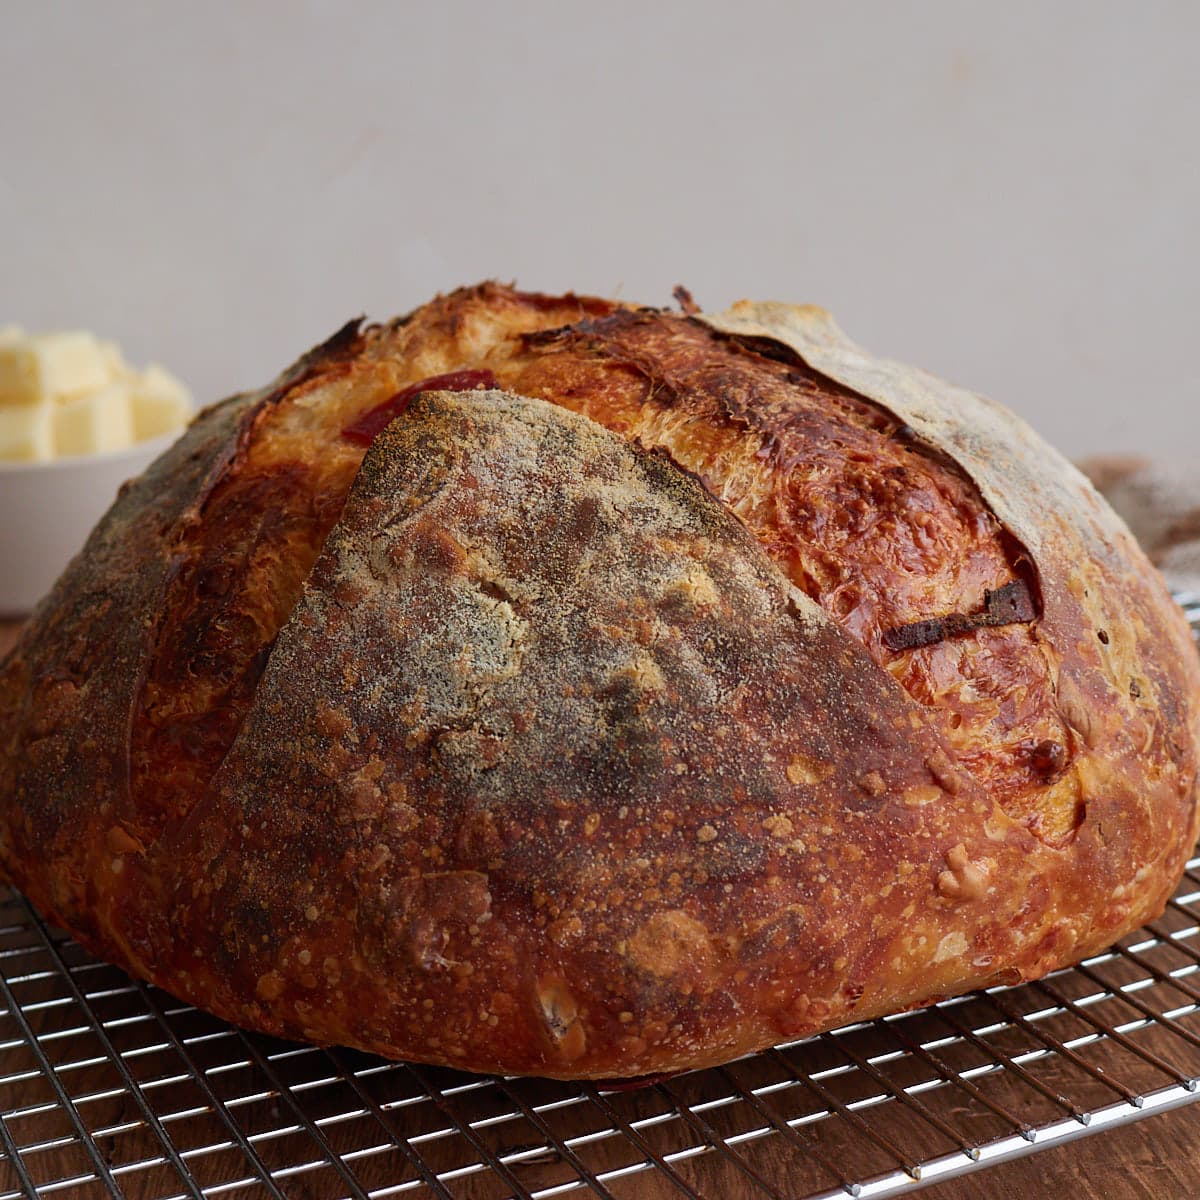
Step 8 – Bake
Transfer the dough to the hot Dutch oven. Bake covered for 25 minutes, then uncover and bake for an additional 20 minutes. The bread is done when the internal temperature reaches 205°F.
Sample Baking Schedules
Many different factors can affect your sourdough bread, such as the temperature of your dough, kitchen, humidity, and the strength of your starter, so this baking schedule is based on rough estimates. It is more important to look for the visual cues of the bread to know when it is ready.
Same-Day Method
This method is great to use to bake your sourdough bread within one day. Before scoring, add the dough to the freezer while the oven preheats so it is easier to make your cuts in the dough. This schedule is based on a dough temperature of 75°F.
Note: If you want to start the loaf in the morning, you can feed your starter a 1:5:5 ratio (15 grams active sourdough starter, 75 grams flour, 75 grams water) the night before and leave it for about 10 hours at 72℉.
| Steps | Time |
| Feed starter a 1:1:1 ratio and leave at 77°F (50 grams sourdough starter: 50 grams flour: 50 grams water) *If you do not have extra starter be sure to feed your starter a little more so you have leftover | 8 am |
| Mix dough | 12 pm |
| Stretch & folds | 12:30 pm – 1:30 pm |
| First Rise | 1:30 pm – 4 pm |
| Shape & Second Rise | 4 pm – 5:30 pm |
| Freeze dough while oven preheats | 5:30 pm |
| Bake | 6 pm |
Overnight Method
This is my favorite method! It has more time to ferment and develop flavor. Plus, you bake straight from the fridge cold. This schedule is based on a dough temperature of 75°F for the first rise.
| Steps | Time |
| Feed starter a 1:1:1 ratio and leave at 77°F (50 grams sourdough starter: 50 grams flour: 50 grams water) *If you do not have extra starter be sure to feed your starter a little more so you have leftover | Day One: 1:00 pm |
| Mix dough | 5:00 pm |
| Stretch & folds | 5:30 pm – 6:30 pm |
| First Rise | 6:30 – 9 pm |
| Shape & Second Rise (in fridge) | 9 pm |
| Bake | Day two: Between 6-10 am |

Recipe Tips
- Pepperoni grease: Depending on the brand, some pepperoni can be greasier than others. If your pepperoni looks oily, pat it dry with a paper towel before adding it to the dough to prevent excess grease in the loaf.
- Watch the dough, not the clock: Temperature and starter activity can affect how quickly the dough ferments. Use the suggested timeline as a guide, but rely on visual cues from the dough rather than strictly following the clock.
- Use a healthy starter: A strong, healthy starter is key to a successful loaf. Feeding your starter regularly with higher ratio feedings helps keep it active and healthy to leaven your dough.
- Use damp hands: When working with the dough, lightly dampen your hands with water. This helps prevent sticking and makes stretching and folding the dough much easier.
Storage & Reheating Instructions
Store a whole loaf, or a side that can be placed cut side down with only the crust exposed, on the counter 2-3 days with just a tea towel over it. If the inside of the loaf is exposed I store it in a bread box, bread bag or brown paper bags.
Sourdough will not hold its crunch for extended periods of time but can be revived in the oven or toaster. To refresh a loaf preheat the oven to 450°F. Run the loaf quickly under water and then place in the oven for 10-15 minutes until the crust is crispy again.
Sourdough bread also freezes really well. To freeze a loaf, either place the whole or half a loaf into a freezer safe bag. Alternatively, preslice the loaf and place parchment paper in between each slice before placing in a freezer bag.
To thaw, place the loaf on the counter for several hours in the ziplock bag. If you are in a time crunch I’ve used the defrost feature in the microwave to thaw my loaf. Once thawed, use the same refresh instructions as listed above. For individual slices, pulled from the freezer, pop it in the toaster.
Frequently Asked Questions
Yeah, this loaf would be delicious with diced ham! Just note ham will likely have extra moisture so pat dry the ham before adding it to the dough.
If your sourdough bread is dense and gummy after baking, it is likely underproofed. Try increasing your rise times or increasing the temperature of the dough when bulk fermenting. You can leave your dough in a warm place, or see tips on how to keep your dough warm.
At first, the dough will feel sticky and wet—but as you perform stretch and folds and the gluten develops, it should become stronger and easier to handle. Use damp hands when working with the dough to make it easier. If the dough is still sticky and difficult to shape or score, it’s likely overproofed (see section above) or your starter was weak/acidic. This can happen if the dough gets too warm or is left to proof for too long.
I recommend using bread flour because it absorbs more liquid than all-purpose. However, in a pinch, you can use all-purpose flour, but I recommend reducing the amount of water by 25 grams.
More Flavored sourdough Breads

Sourdough Bread Recipes
Hot Honey Parmesan & Asiago Sourdough Bread
Sourdough Bread Recipes
Honey Butter Sourdough Cinnamon Bread Recipe

Sourdough Bread Recipes
Cheddar Jalapeno Sourdough Recipe

Sourdough Bread Recipes
Lemon Blueberry Sourdough Bread
Tried this Sourdough Pepperoni and Cheese Sourdough Bread or another recipe from the site? I’d love to hear about it! Drop a star rating and share your thoughts in the comments. Can’t wait to see what you’re baking!

Pepperoni and Cheese Sourdough Bread
Ingredients
Feed Sourdough Starter
- 50 grams active sourdough starter, ¼ cup
- 50 grams all-purpose or bread flour, ⅓ cup
- 50 grams warm water, ¼ cup
Sourdough Bread
- 350 grams water, 1½ cups
- 150 grams sourdough starter, doubled in size and bubbly, ⅔ cup
- 4 grams red pepper flakes, 2 teaspoons
- 10 grams salt, ½ Tablespoon
- 500 grams bread flour, 3½ cups
- 150 grams mozzarella cheese, 1⅓ cup
- 160 grams pepperoni slices, 75-85 slices
Instructions
- Feed your sourdough starter: About 4 hours before making the loaf, build a levain or feed your sourdough starter at a 1:1:1 ratio (5o grams sourdough starter: 50 grams flour: 50 grams water). Cover and let it rest at 77–80°F until bubbly and doubled in size.50 grams active sourdough starter, 50 grams all-purpose or bread flour, 50 grams warm waterIf you don’t have extra starter, add an extra 5–10 grams to each portion (starter, flour, and water) so you have enough to bake with and still keep your starter going.Skip this step if your starter is already activated and ready to bake with.Note: If you want to start the loaf in the morning, you can feed your starter a 1:5:5 ratio (15 grams active sourdough starter, 75 grams flour, 75 grams water) the night before and leave it covered for about 10 hours at 70-72℉.
- Mix the dough: With a danish dough whisk, hands, or large spoon mix together active starter, water, red pepper flakes and salt in a 2-quart container with straight sides or a medium clear bowl. If you prefer a more mild flavor use italian seasoning in place of red pepper flakes. Add the flour and mix until the dough is shaggy and the flour is incorporated. Cover with a lid or dinner plate so the dough doesn't dry out and let sit for 30 minutes in a a warm spot.For a similar timeline as the sample schedule, keep the dough temperature at 75℉. 350 grams water, 150 grams sourdough starter, doubled in size and bubbly, 4 grams red pepper flakes, 10 grams salt, 500 grams bread flour
- Prep the mix-ins: Shred the mozzarella cheese and dice the pepperonis into quarters. If the pepperonis are greasy, pat them dry with a paper towel to remove excess grease. 150 grams mozzarella cheese, 160 grams pepperoni slices
- Stretch and folds: Perform 3 sets of stretch and folds with a 30-minute rest in between each set. To stretch and fold the dough, grab one side with a damp hand and gently shimmy the dough up, and then fold it on top of itself. Repeat this 3 more times, rotating the bowl 90 degrees each time. Cover and keep the dough warm between each set.During the second set, incorporate the pepperoni and mozzarella cheese.
- First rise: After the stretch and folds, let the dough continue to rise until the dough is jiggly, domed on top, bubbly on the sides, and risen 50%. If it does not show these signs, continue to let the dough rise until it does.At a dough temperature of 75ºF, my dough is ready in about 4 – 4.5 hours from the time it is mixed.
- Shape: Turn the dough out onto an unfloured surface and gently stretch it into a thick rectangle. Begin shaping by folding the top edge down toward the center like an envelope, pulling gently to build tension. Next, lift the top two corners and fold them toward the center, slightly overlapping, then repeat with the bottom two corners. Starting from one side, roll the dough over itself to form a ball, keeping the smooth side on top. Cup your hands around the dough and gently rotate it counter-clockwise toward you to tighten the surface and create a smooth, round shape.
- Second rise: Option 1 same-day method: Let the dough rest on the counter for 1–2 hours covered at 75°F.To check for readiness, perform the poke test: gently press the dough with a lightly floured finger. If the indentation slowly springs back, it’s properly proofed and ready to bake. If it bounces back right away, it needs more time. If the indentation doesn’t spring back at all, the dough is overproofed and should be baked right away.Once the dough is ready, place it in the freezer for 20-30 minutes before baking.Option 2 overnight method: Place the dough in the fridge covered overnight for 8-12 hours. Bake the dough directly from the fridge.
- Preheat oven: Place the dutch oven in the oven and preheat at 450℉. To prevent the bottom of the loaf from burning, place a heavy-duty baking sheet on the rack below.
- Score: Flip the bread onto a silicone bread sling or parchment paper. With a bread lame or sharp knife, score an “X” on the top of the dough about ¼ inch deep.
- Bake: Transfer the dough to the hot Dutch oven. Bake covered for 25 minutes, then uncover and bake for an additional 18-20 minutes. The bread is done when the internal temperature reaches 205°F.
- Let the bread cool on a cooling rack. To ensure the loaf is fully baked through, wait at least 2 hours before cutting. Or if you don't mind if the texture is slightly gummy, I love cutting my bread warm after about 30 minutes.
Notes
- For best results, use the gram measurements instead of cups, as it will be much more accurate.
- See the sample baking schedules in the post.
- Pepperoni grease: Depending on the brand, some pepperoni can be greasier than others. If your pepperoni looks oily, pat it dry with a paper towel before adding it to the dough to prevent excess grease in the loaf.
- Watch the dough, not the clock: Temperature and starter activity can affect how quickly the dough ferments. Use the suggested timeline as a guide, but rely on visual cues from the dough rather than strictly following the clock.
- Use a healthy starter: A strong, healthy starter is key to a successful loaf. Feeding your starter regularly with higher ratio feedings helps keep it active and healthy to leaven your dough.
- Use damp hands: When working with the dough, lightly dampen your hands with water. This helps prevent sticking and makes stretching and folding the dough much easier.
- When slicing the cooled loaf, you may notice some spots that look slightly gummy. This is often just cheese that has hardened as it cooled. Once the bread is warmed, those spots will turn back into melty cheese.
- The base recipe was updated from my overnight sourdough bread recipe to my same-day sourdough bread recipe, so the loaf can now be baked in one day. If you prefer an overnight schedule, you can still follow that base recipe instead.
- 1 teaspoon pizza seasoning and 2 teaspoons pizza flavor were removed from the dough since many readers had difficulty finding those ingredients. The recipe now uses 2 teaspoons of red pepper flakes for a little heat.
- The mozzarella cheese was increased from 118 grams to 150 grams for an extra cheesy loaf.
- The pepperoni and mozzarella are now added during the stretch and folds instead of right before shaping, making the process easier and helping distribute the fillings more evenly throughout the dough.
Nutrition
Nutrition information is automatically calculated, so should only be used as an approximation.


Can you use all purpose?
You can if you reduce the amount of water in the recipe by about 25 grams.
I have made this twice. The first time everyone liked it. The second time I made 3 loaves and they all turned out amazing. Everyone says this is the best inclusion loaf.
I followed the recipe exactly and the bread was a dense lump. I feel like steps were left out.
Hi Theresa I’m sorry to hear the recipe didn’t go well for you. If you have a cut picture of the inside you can email me at hello@countryroadssourdough.com and I would be happy to help troubleshoot if you are interested. Thanks.
Came out great!
I have made this several times and it is an absolute hit with friends and family. The downside for myself is that I can’t get it to rise. It is a flat loaf. Suggestions welcome
Could be a matter of proofing. It is rises quite a bit in the first rise and is baking flat it probably needs a little bit of a shorter rise time and vise versa for under proofing.
Does this need to be refrigerated if it’s not eaten same day?
I leave out the pizza dough flavor, as I don’t find it necessary, but the pizza seasoning is a must. Excellent, no need to search for another Sourdough Pepperoni Bread recipe. This is IT! Thank you for sharing. 5 STARS!
⭐️⭐️⭐️⭐️⭐️
Thank you so much!
How do you think this would work with using chopped up mozzarella from a mozzarella log instead of shredded cheese?
It will work it will just be cheesy bites versus being evenly dispersed throughout.
Hi!!! Careful using chopped up pieces of the mozzarella, it can be very hard to decipher if it cheese or uncooked bread!! I just did this, and I think the mozzarella adds to much moisture to the bread and it changes the texture and cooking of it. I am going to use a drier cheese …maybe parmesan and pepperoni?!
This was excellent! It’s an entree on its own but I did have it with a pasta bake. I didn’t have the seasonings in the recipe so I made my own concoction, I’d add some more salt next time. Thanks for the recipe!
Glad you enjoyed it!
This dough was very easy to work with. However, the bread did not rise like normal loaves. I even tried the ice cube trick but just made the bottom of bread soggy. If I do this again I would skip the cold proof and just let it rise as I normally would for sourdough loaves.
Thanks for the feedback! It’s hard to say without seeing a picture if it was under or overproofed. However if it was dense when you went to shape it, it most likely was under. If it was deflating and airy it was likely overproofed.
How do you store this with perishable ingredients?