This post may contain affiliate links . Read my full Disclosure Policy.


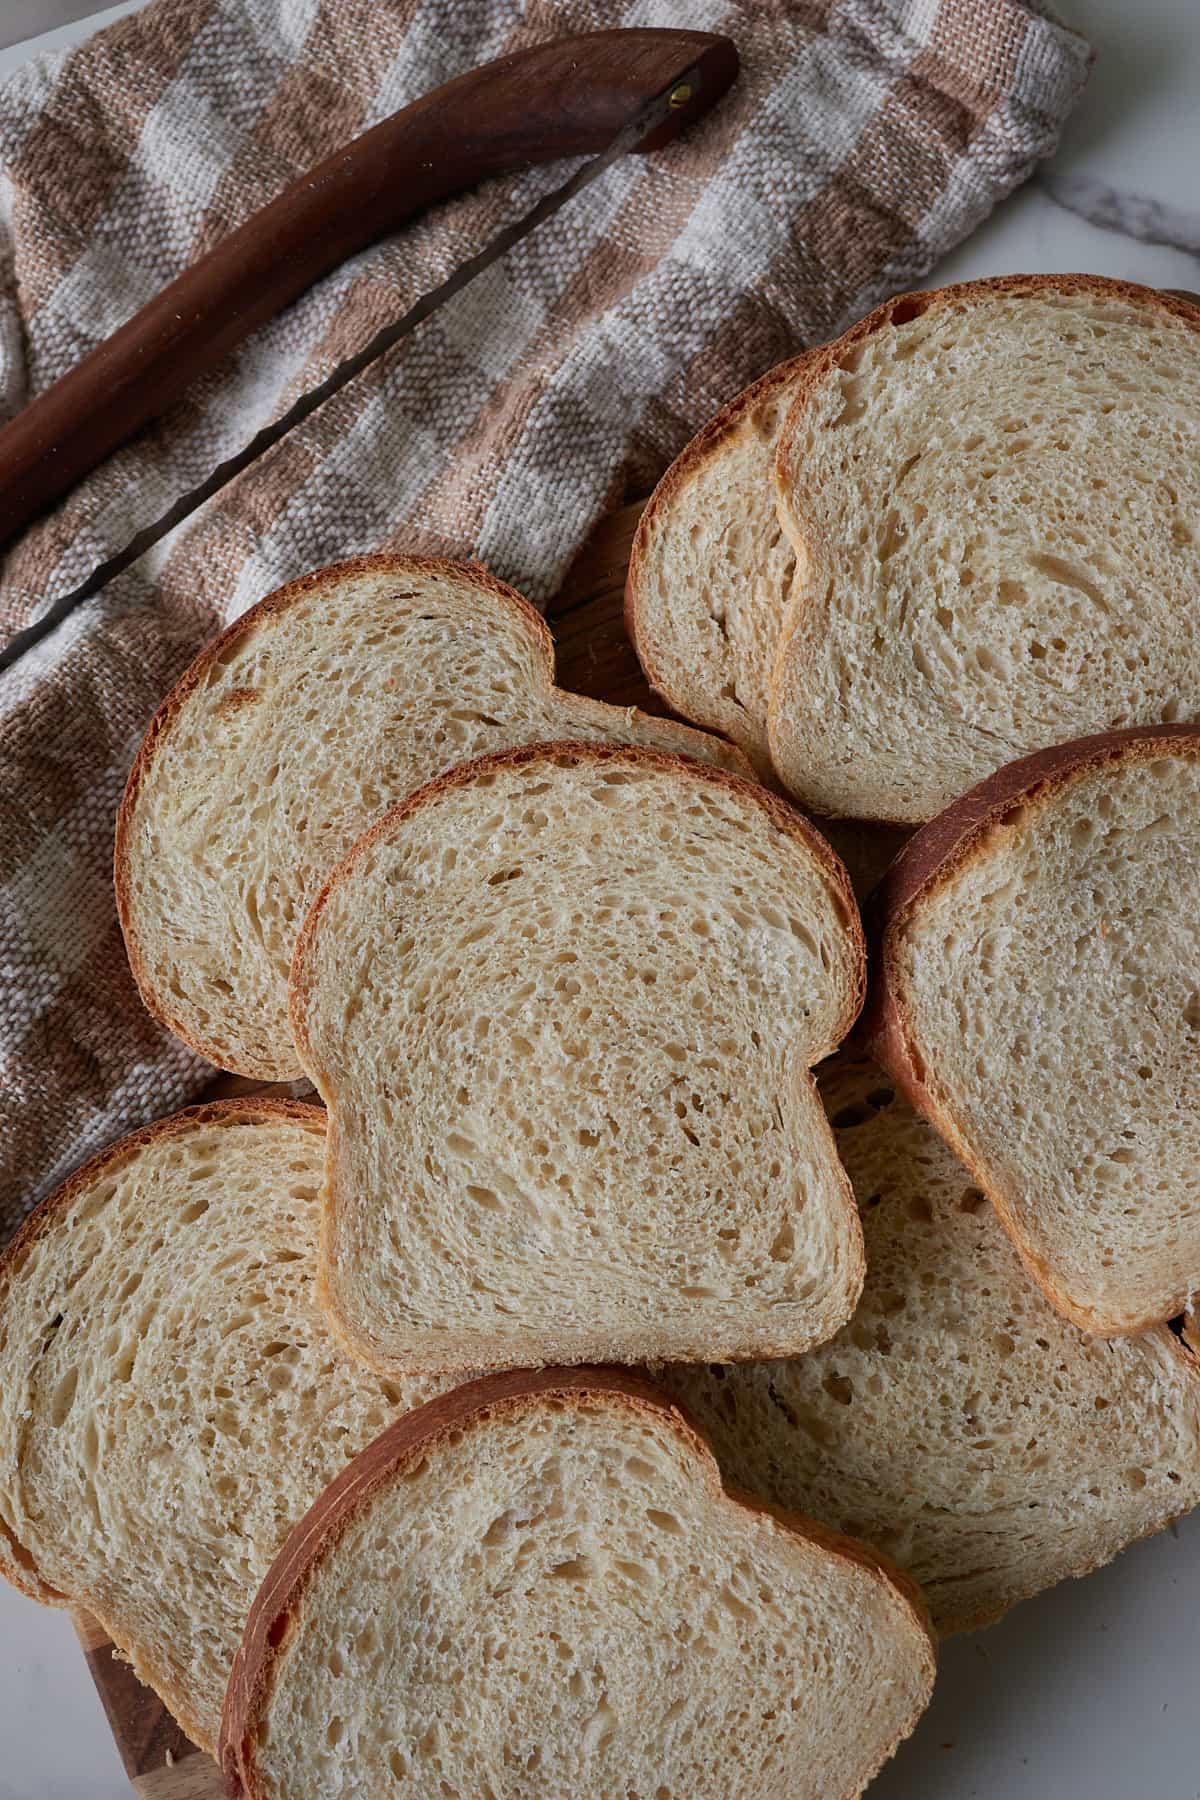
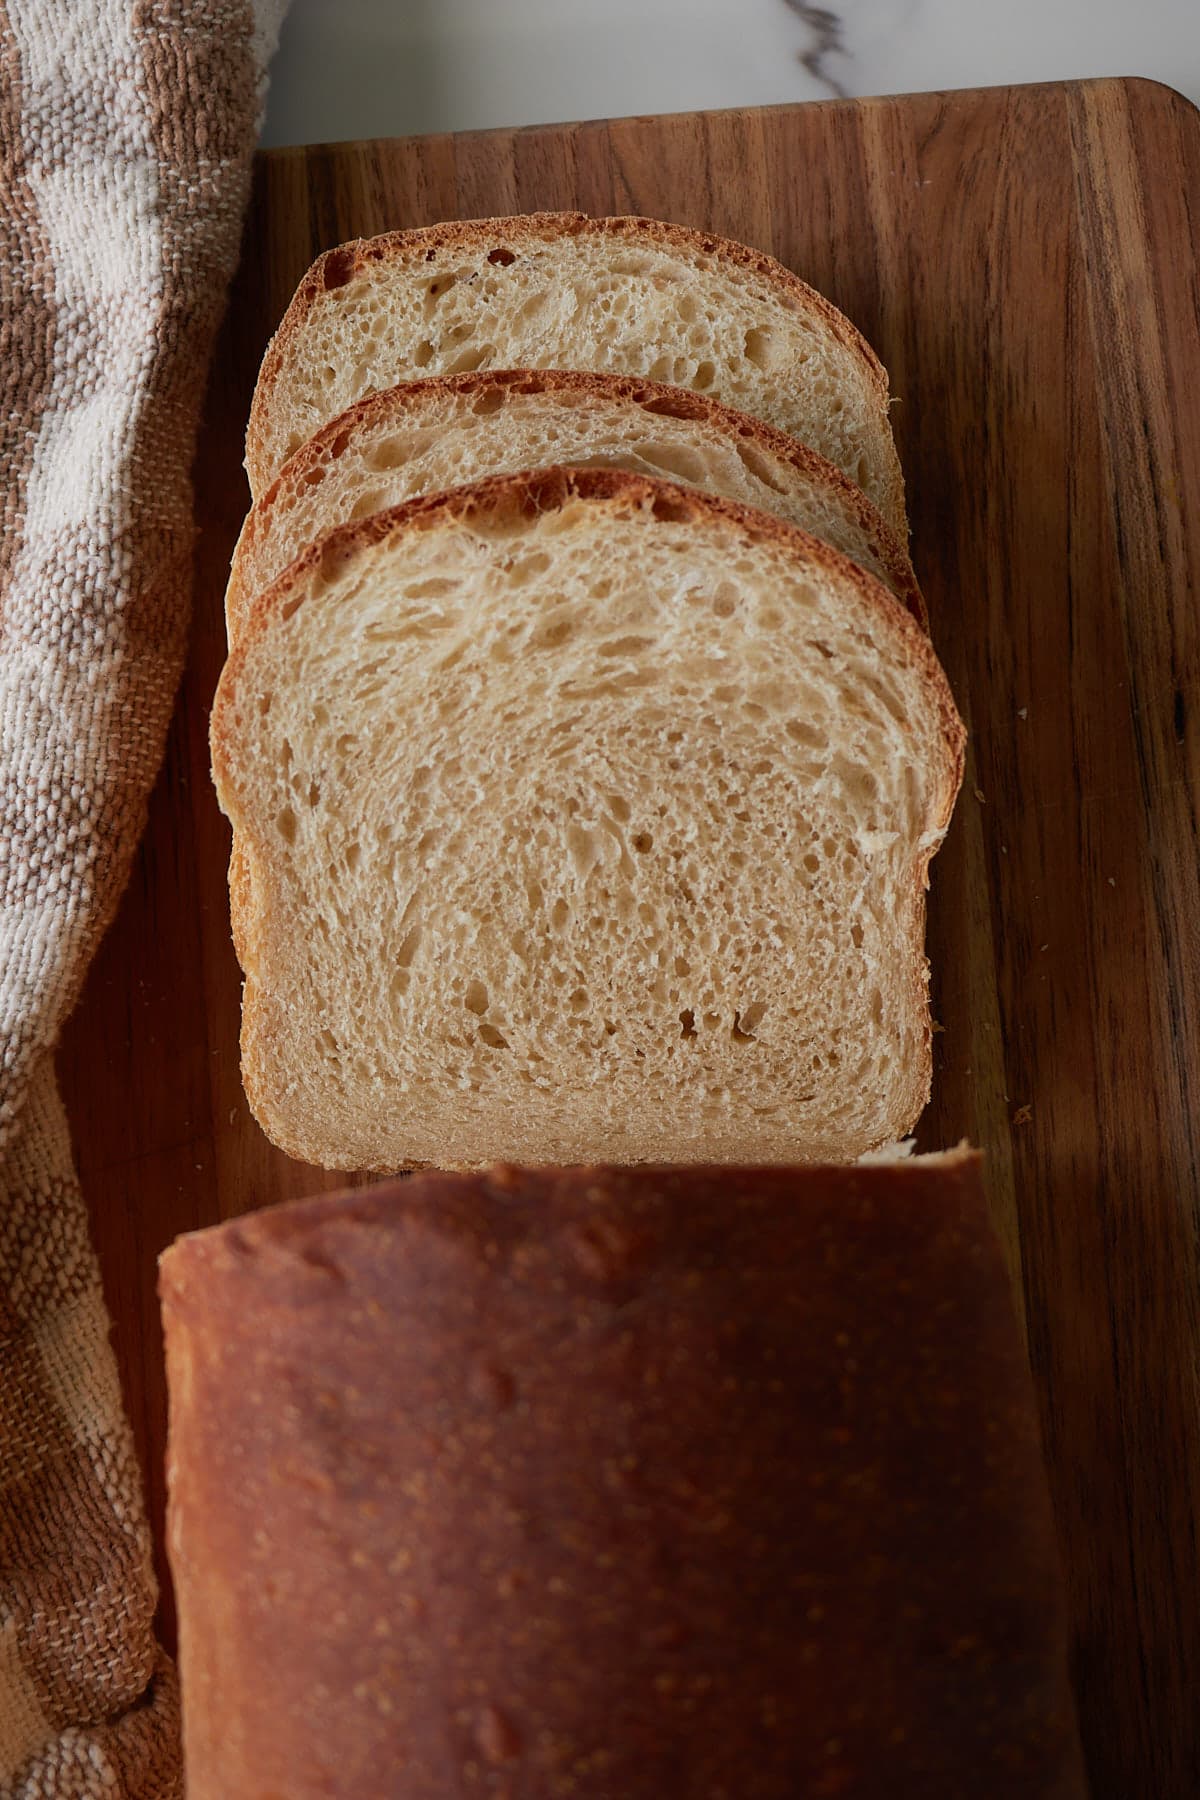
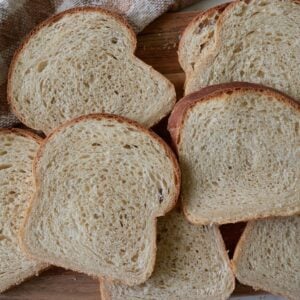
This Sourdough Sandwich Bread went through many rounds of testing to get the soft crumb, fluffy texture, and balanced flavor just right. It can be made with either a same-day or overnight rise to fit your schedule, and it uses simple ingredients with no commercial yeast, stretch-and-folds, or special equipment needed.
Save & Summarize
I’ve made this probably a dozen times at this point and it always turns out great! I double it then freeze a loaf and it thaws out great. Super easy! -Haley
Early versions were dry and crumbly or struggled to rise, but after troubleshooting the dough, this became a simple, reliable 100% sourdough loaf we use all the time for sandwiches, toast, PB&Js, and grilled cheese. So many readers have messaged me saying this is their go-to sandwich bread too! And if you’re craving bread now but only have discard on hand, check out my Sourdough Discard Sandwich Bread recipe.
Table of Contents
- Why You’ll Love This Sourdough Sandwich Bread Recipe
- Ingredients Needed for Sourdough Loaf Bread
- How to Make Sourdough Sandwich Bread
- Sample bakers schedule
- Sourdough Loaf Bread Recipe Variations
- How to Use Sourdough Sandwich Bread
- How to store Sourdough Sandwich Bread
- Tips for the Best Sourdough Loaf Bread
- Sourdough Sandwich Bread Recipe FAQs
- More sourdough Bread Recipes
- Sourdough Sandwich Bread Recipe
Why You’ll Love This Sourdough Sandwich Bread Recipe
- Taste- This homemade sourdough sandwich bread is soft, fluffy and flavorful. The sourdough starter gives the bread a slight tangy flavor, but not overbearing. Even my littles love it. For a sweet version, try my Sourdough Cinnamon Raisin Bread.
- Flexible schedule- Whether you’re looking for a same-day option or prefer an overnight rise, you can make this recipe work for you.
- Simple, real ingredients- This fluffy sourdough sandwich bread is made with just 8 simple ingredients that you probably already have on hand.
- Enhanced digestibility- Did you know that a lot of people that have gluten intolerances (to be clear this is different than celiacs) can still eat sourdough bread? That’s because sourdough bread ferments for a long period of time. During the fermentation process the gluten is broken down making it easier to digest.
Ingredients Needed for Sourdough Loaf Bread
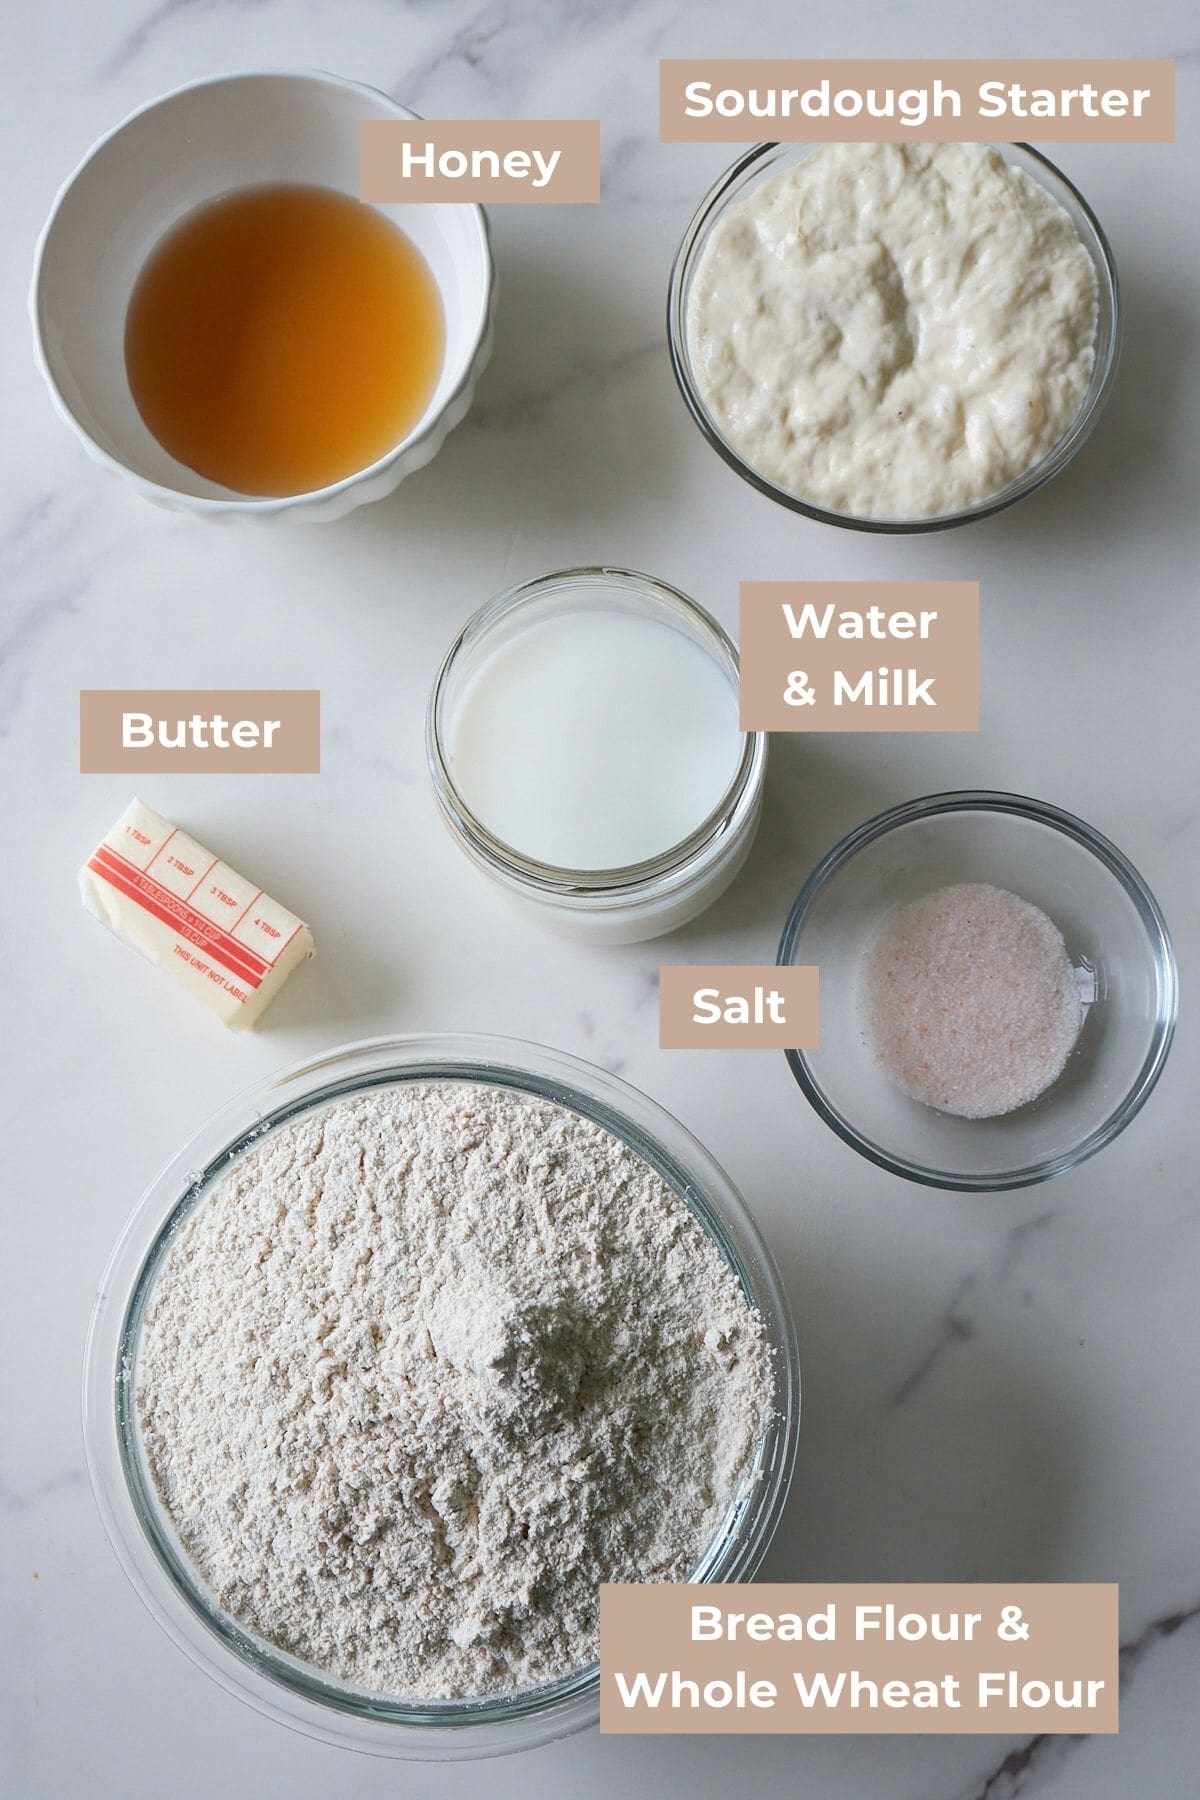
- Bubbly sourdough Starter- Use the starter when it is at peak meaning it is bubbly and doubled in size. This replaces commercial yeast and is what makes the bread rise.
- Milk- Preferably whole milk. The fat creates a more tender, softer, and sweeter crumb. For a dairy free option use full fat coconut milk.
- Sugar- This will sweeten the dough and help balance the tang from the sourdough starter. This can be swapped for honey or maple syrup.
- Melted Butter- The butter helps to tenderize the crumb and adds flavor.
- Flour- I use a combination of bread flour and whole wheat flour. You can always replace the whole wheat with more bread flour. You can also replace bread flour with more whole wheat but just note this will create a denser crumb.
See all the ingredients and amounts in the recipe card below.
How to Make Sourdough Sandwich Bread
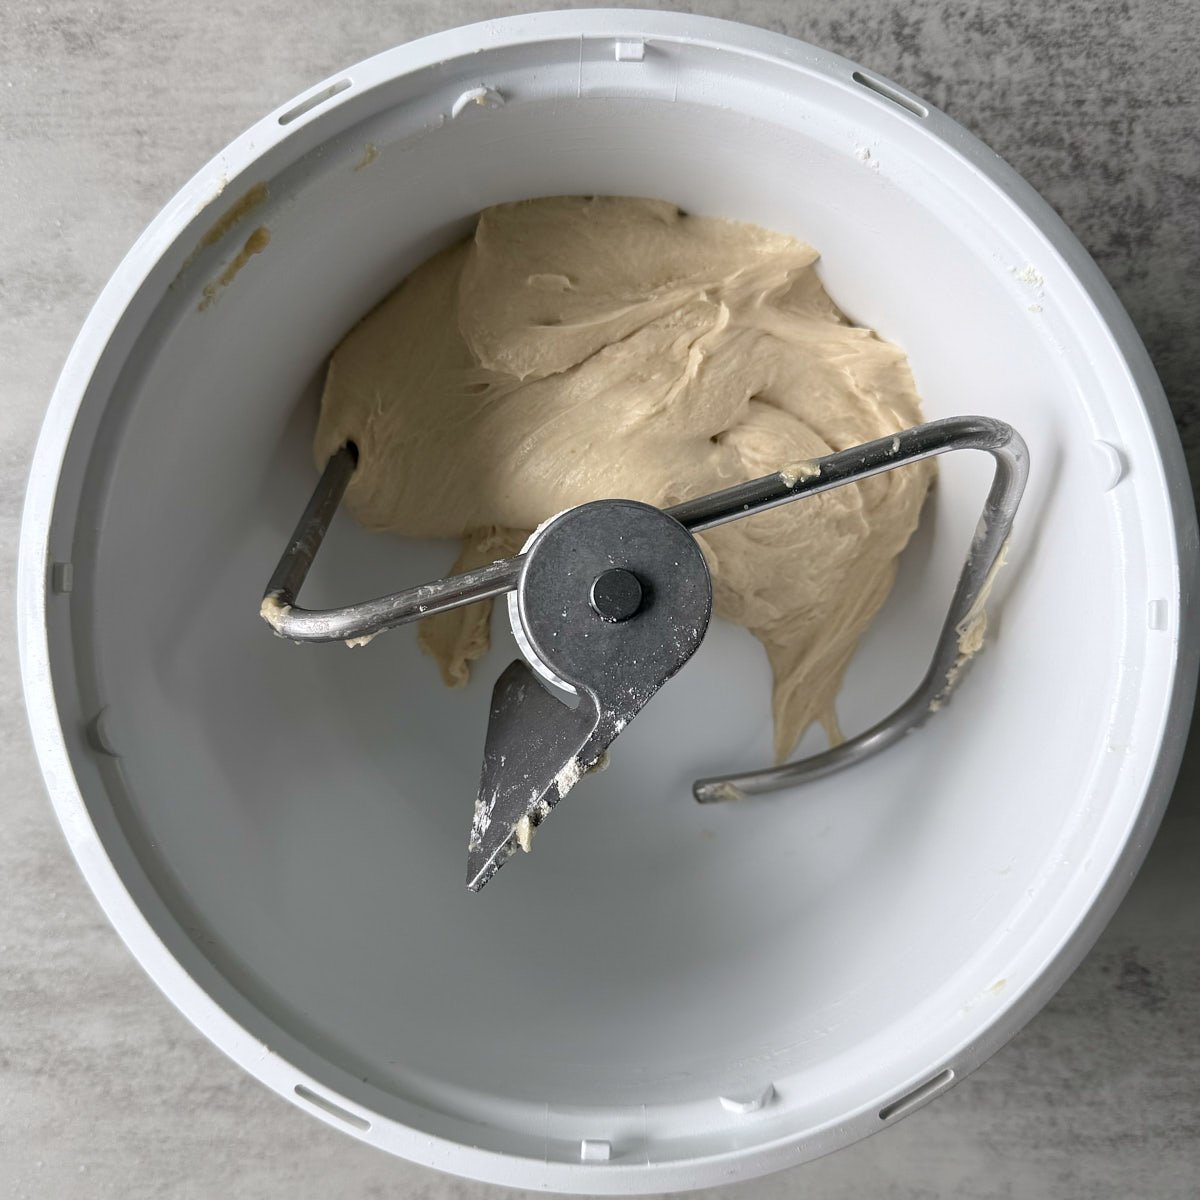
Step 1: Mix all the ingredients together in a stand mixer or by hand. After mixing, knead the dough for 10–15 minutes—either in a stand mixer with a dough hook on low speed or by hand on a lightly floured surface. It will feel sticky at first, but as the gluten develops the dough will strengthen and become just tacky and easier to handle. Try not to add extra flour unless it remains very sticky even after several minutes of kneading.
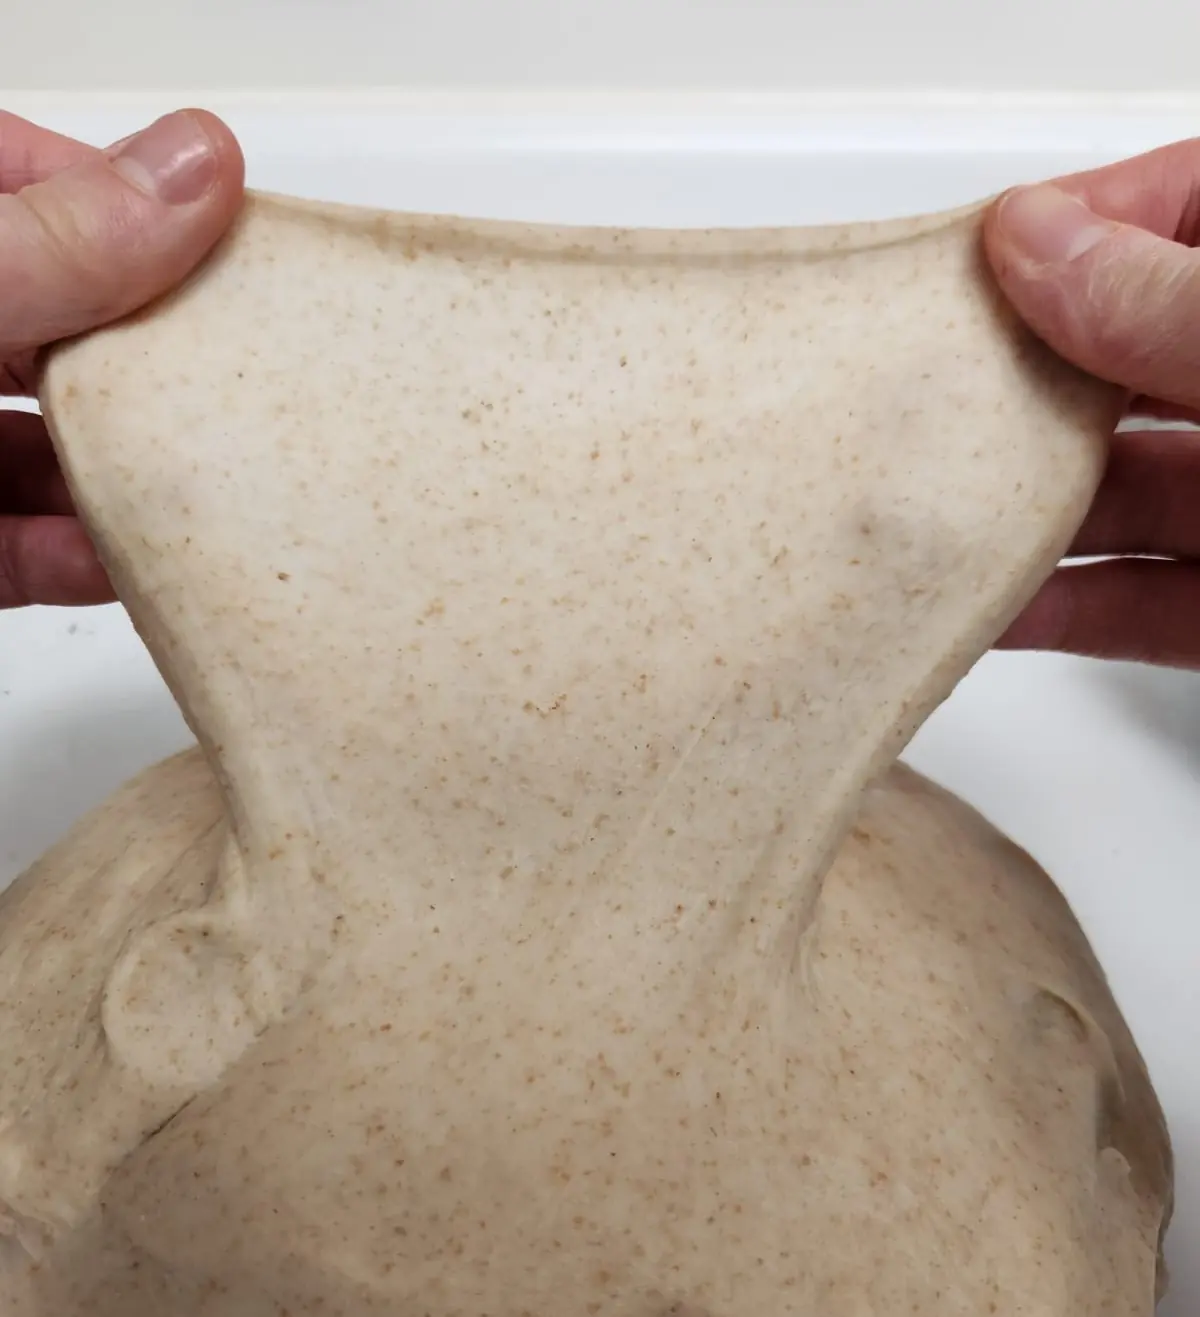
Step 2: To determine when the dough is done kneading, perform a windowpane test. This should be done on relaxed dough so let your dough rest for a minute or two before completing the test. Gently pull a section of the dough thin enough to see light through. If it doesn’t tear, then it is ready. If it tears, continue kneading for a few more minutes.
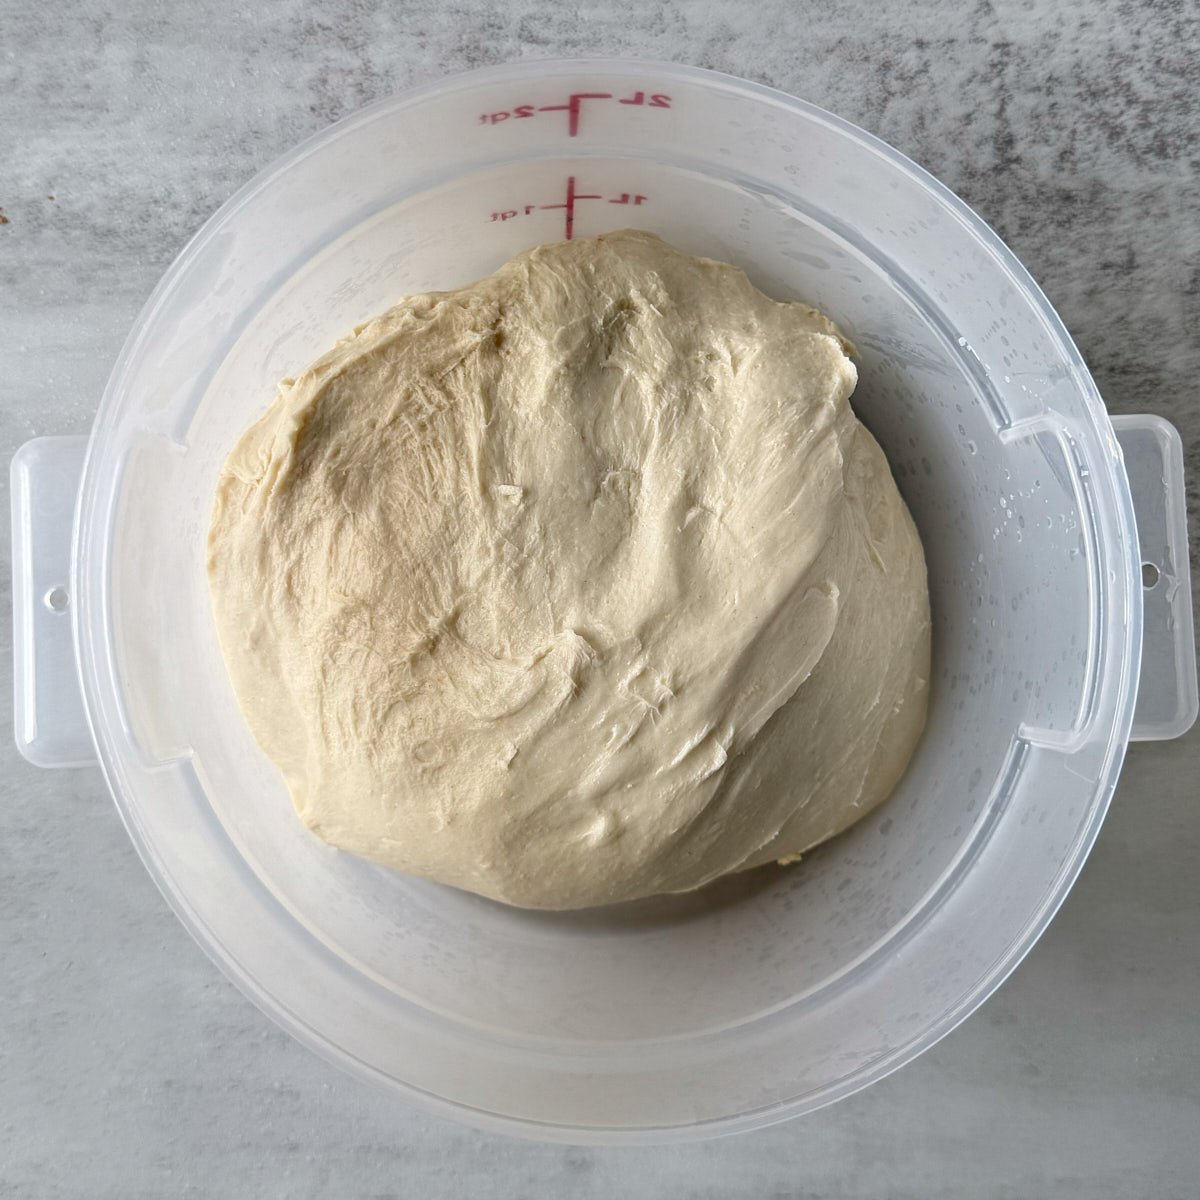
Step 3: Shape the dough into a ball and place it into a 2-quart straight-edge container or bowl. Cover the bowl and let it rise.
Opt 1- Same Day Rise: Leave the dough at 80℉ to rise for 3-4 hours or until doubled in size.
Opt 2- Overnight Rise: Leave the dough at 68-72℉ to rise for 8-12 hours or until doubled in size.
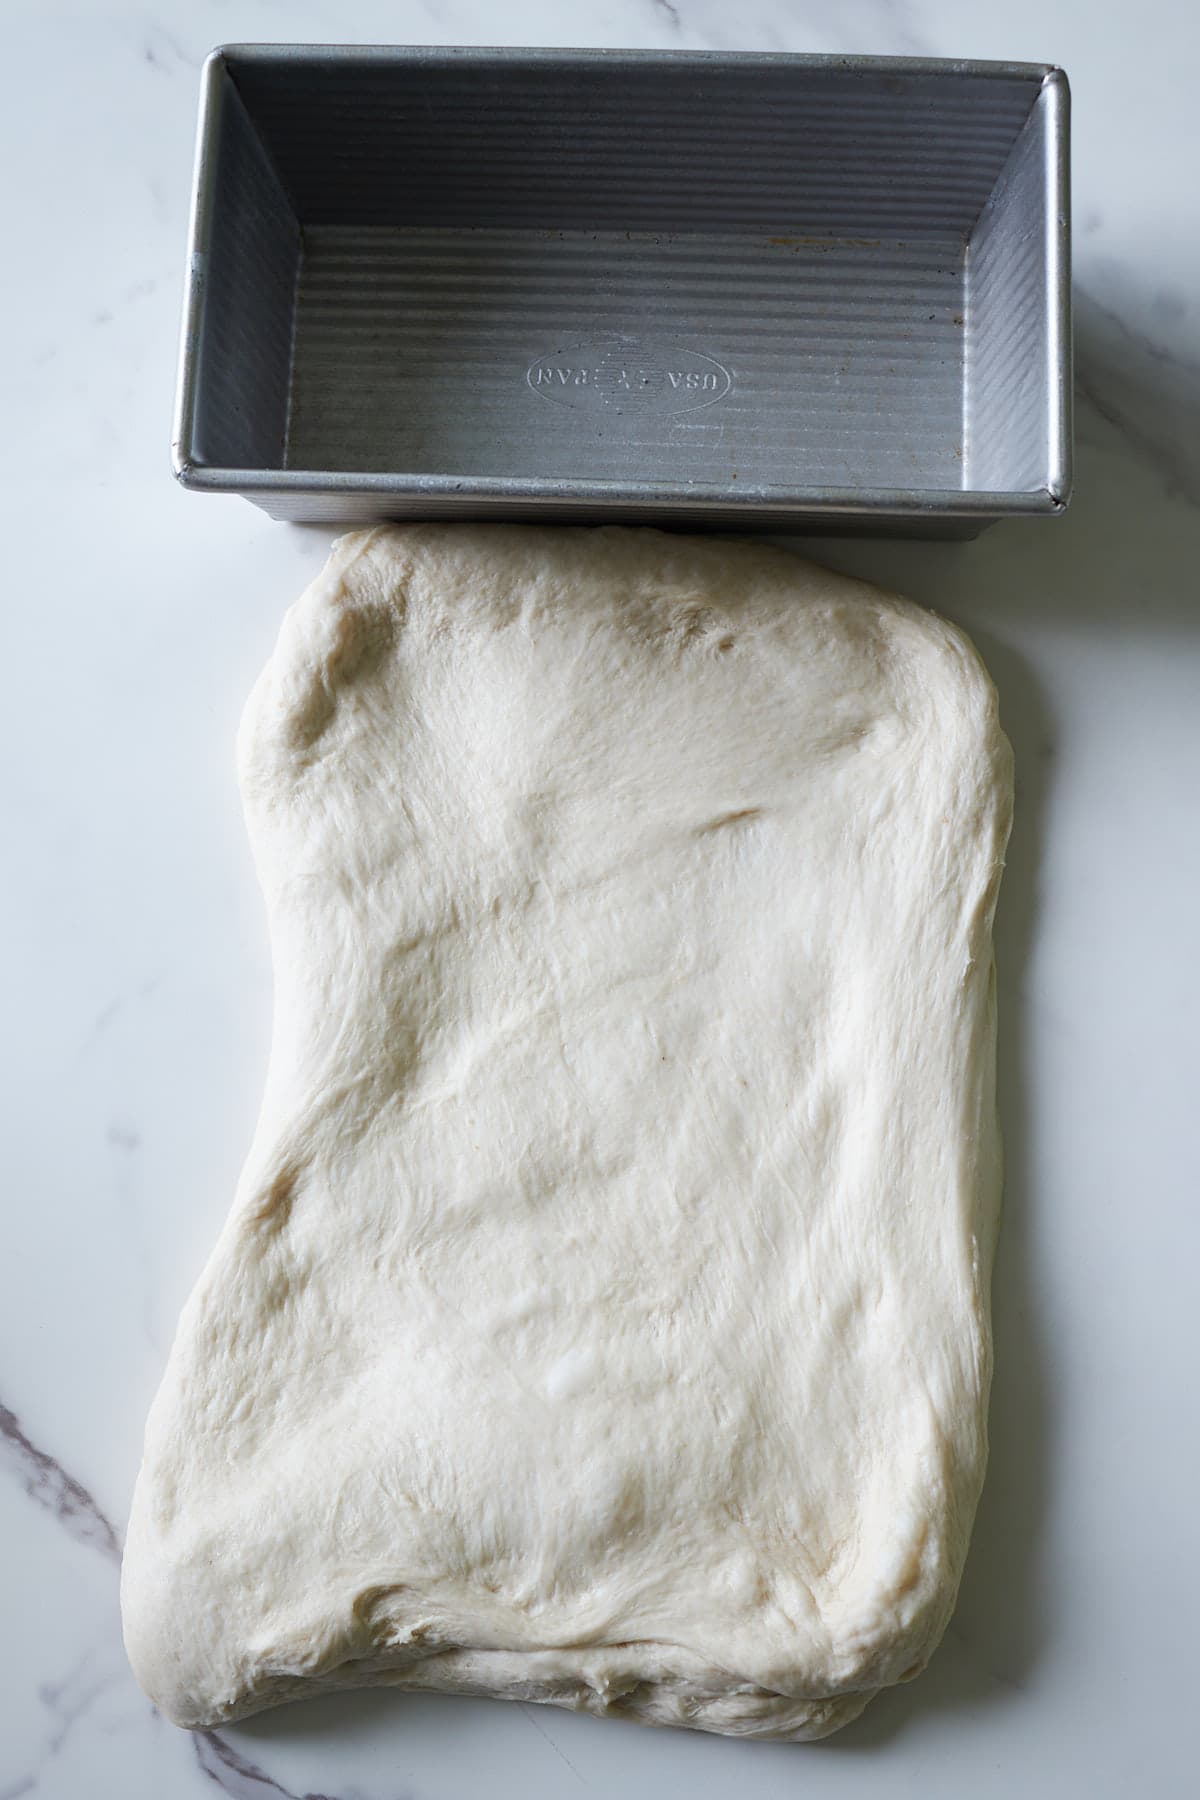
Step 4: Once the dough has doubled, punch it down and turn it out onto an unfloured surface. Grease an 8.5″ x 4.5″ (1-pound) loaf pan. Shape the dough into a rectangle, making the width about the same as the length of the pan.
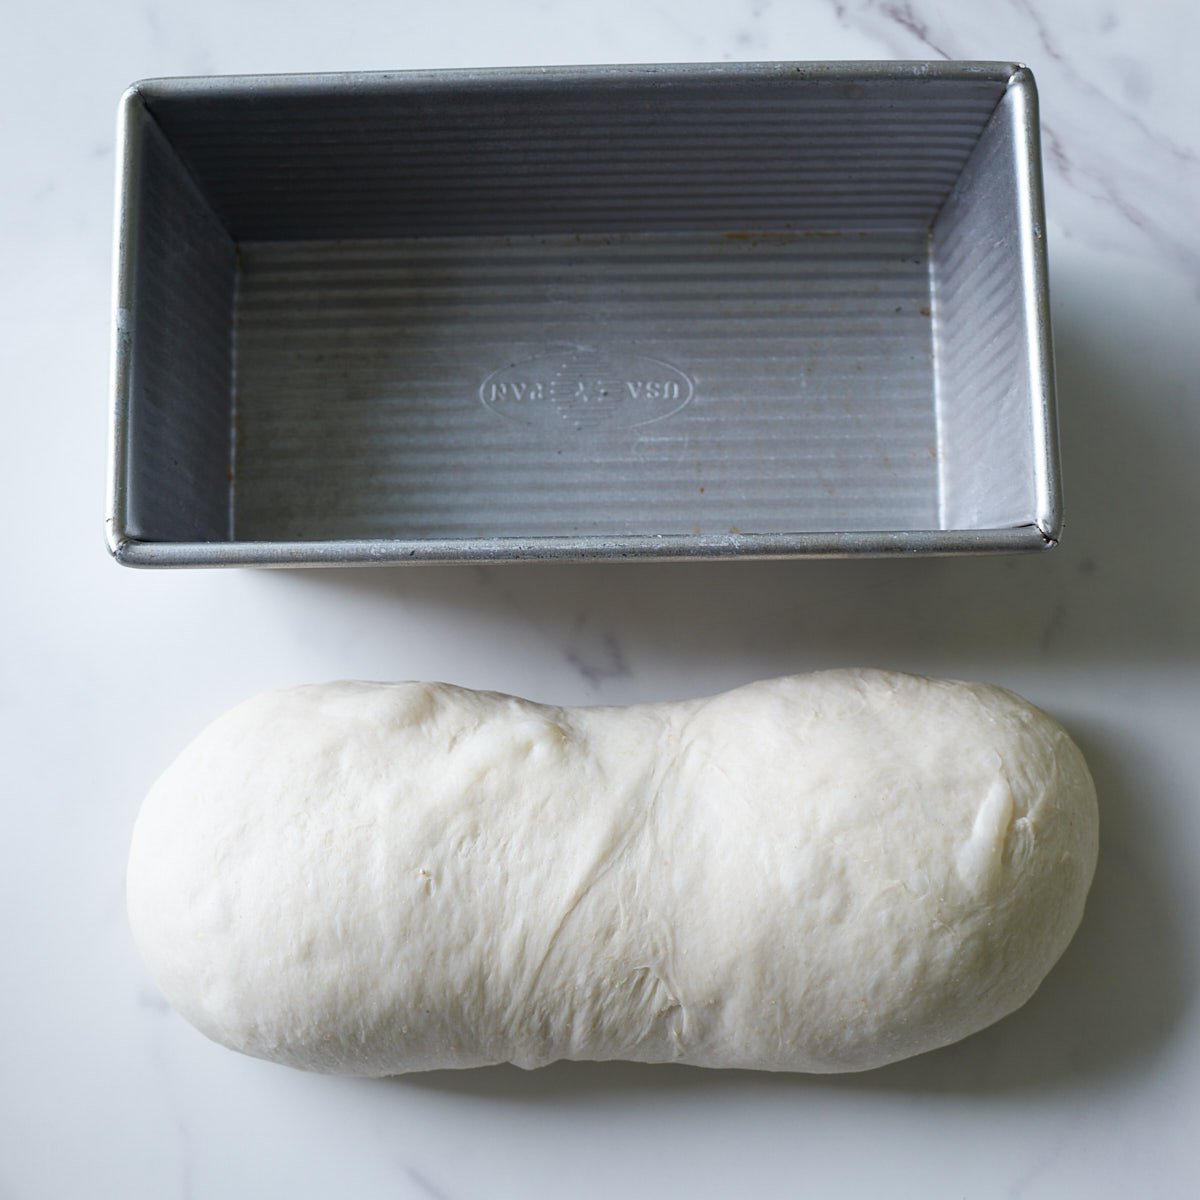
Step 5: Starting from one short end, roll the dough up tightly, pulling it slightly toward you as you go.
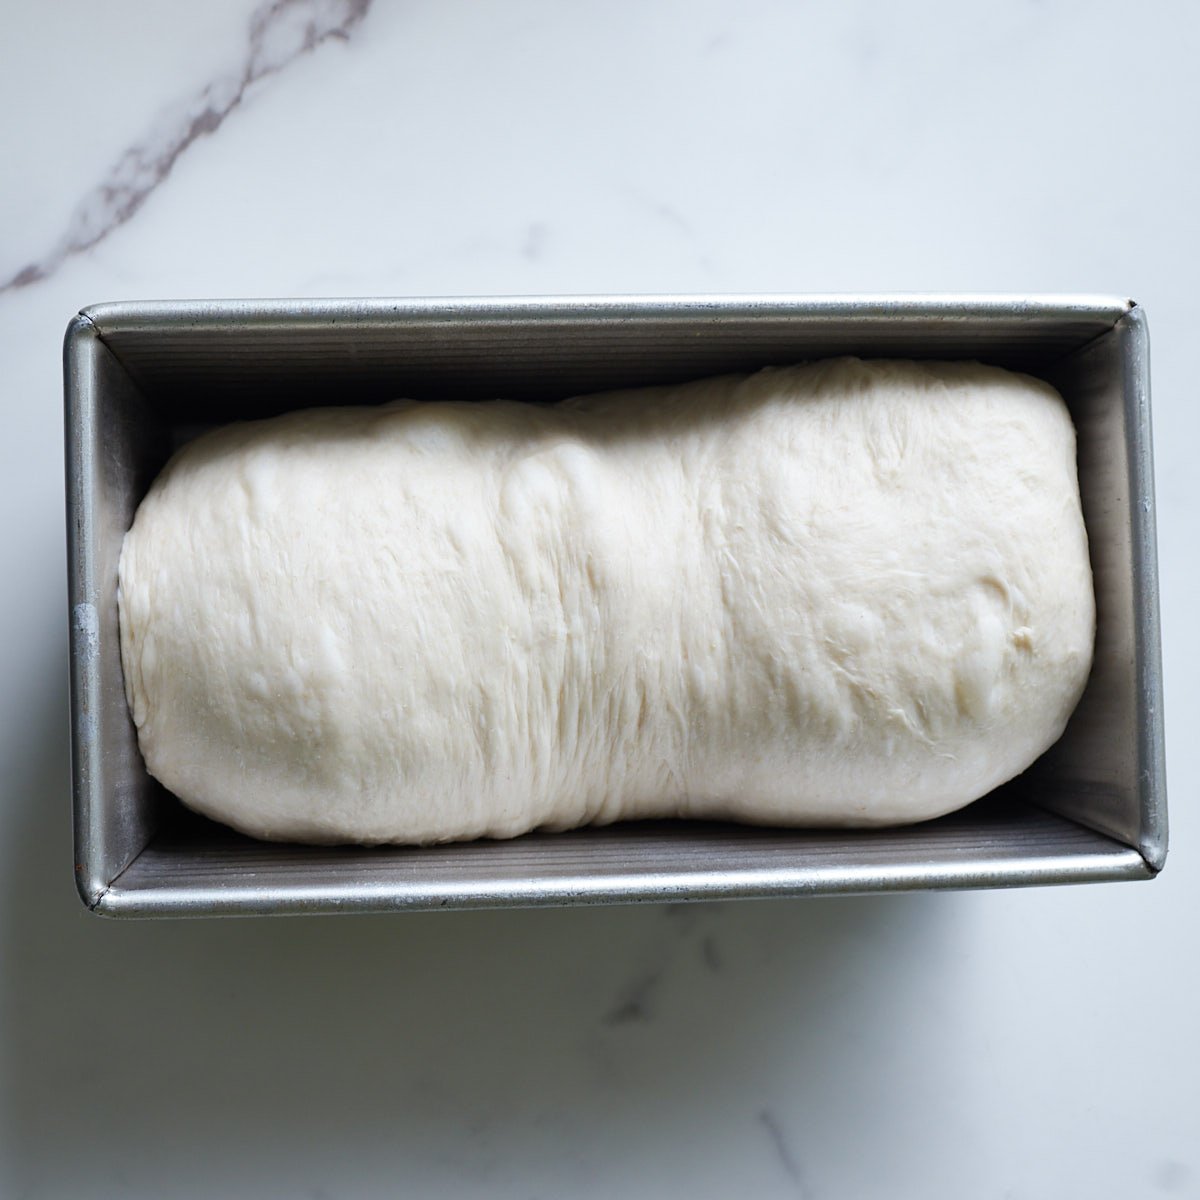
Step 6: Place the log seam-side down into the prepared pan.
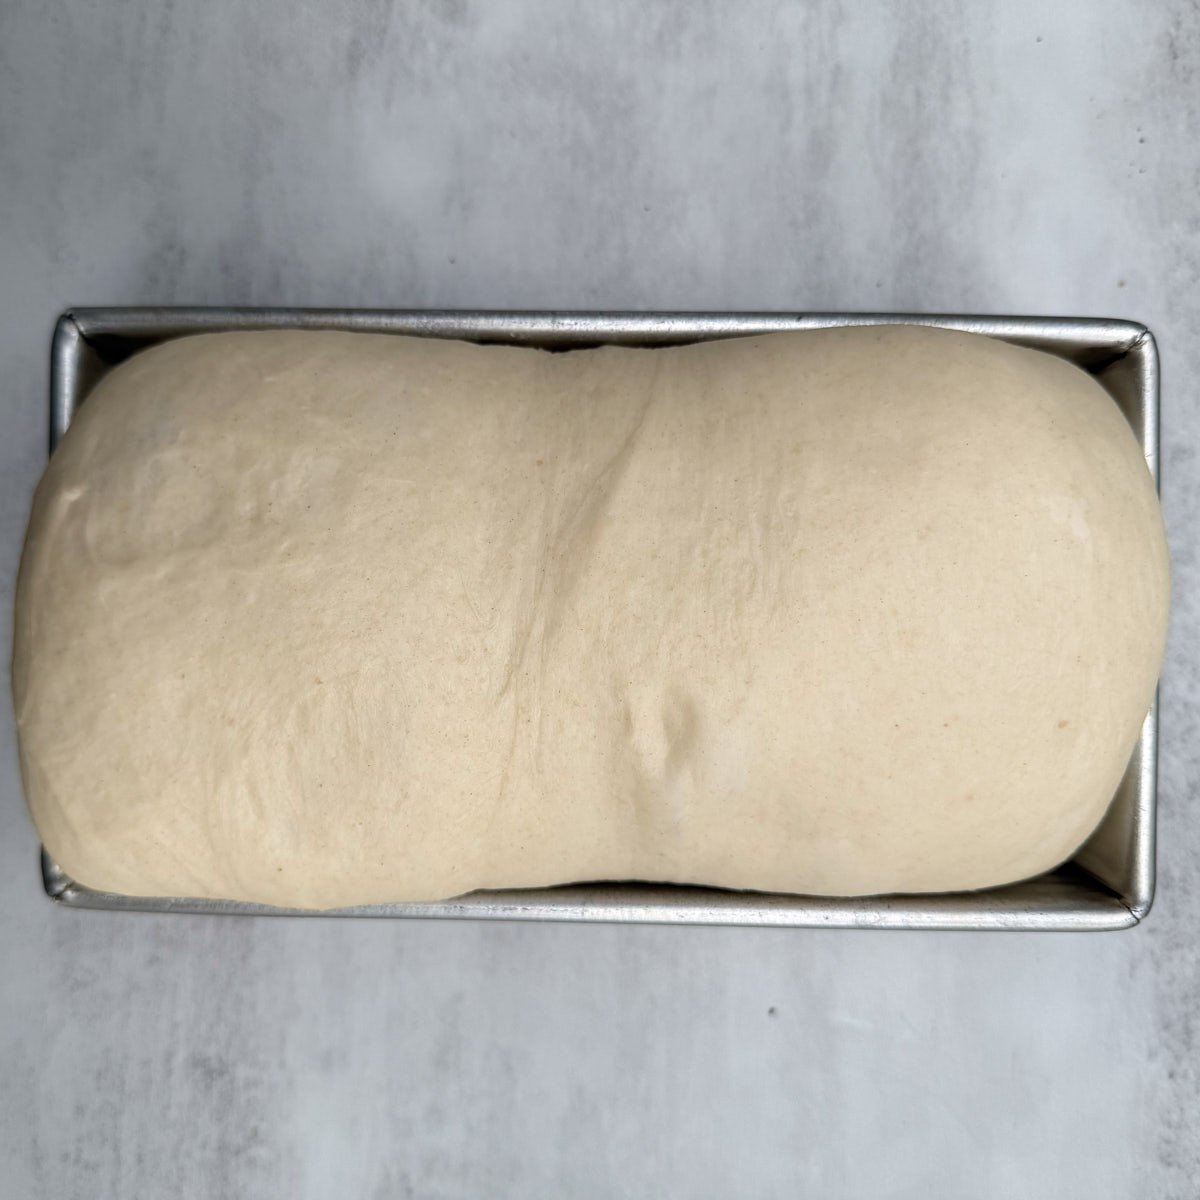
Step 7: Cover the pan and let the dough rise at 80℉ for about 2 hours or until the dough has risen about an inch above the loaf pan. The dough should feel light and if you poke the dough the indent should stay.
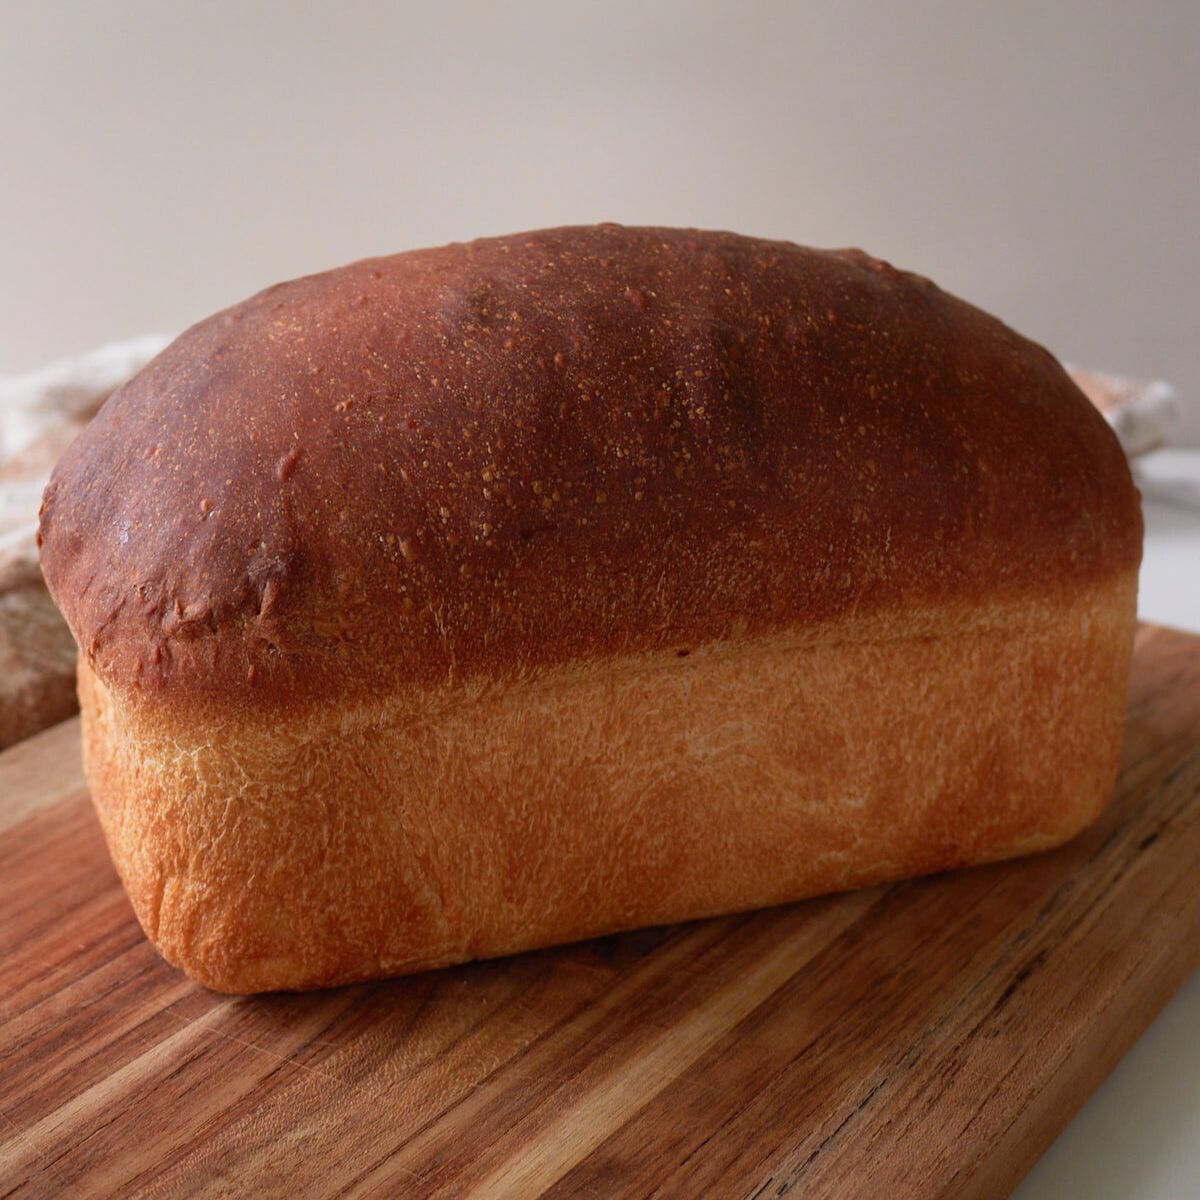
Step 8: Bake at 350℉ for 40-50 minutes (45 minutes is the sweet spot for me) until the internal temperature reaches 190℉ and the crust is browned.
Sample bakers schedule
This recipe can be made either the same day or you can let the dough rise overnight. Note the overnight rise will produce a tangier flavor.
Same Day Schedule- starter & dough temperature 80℉
| Step | Time |
| Feed sourdough starter a 1:1:1 ratio (55 grams starter: 55 grams flour: 55 grams water) | 8 am |
| Knead & First Rise | 12 pm |
| Shape & Second Rise | 4 pm |
| Bake | 6 pm |
Overnight Schedule- starter & dough temperature 70℉
| Step | Time |
| Feed sourdough starter a 1:5:5 ratio (15 grams starter: 75 grams flour: 75 grams water) | 10 am |
| Knead & First Rise | 10 pm |
| Shape & Second Rise | 8 am |
| Bake | 10 am |
Sourdough Loaf Bread Recipe Variations
For a sweet twist on sourdough sandwich bread, try my Soft Sourdough Cinnamon Raisin Bread. And if you’re short on time, my Sourdough Discard Sandwich Bread is made with discard and yeast for a quicker option. You can also switch up the flavor with savory mix-ins like jalapeño cheddar, sun-dried tomatoes, or Italian herbs and cheese.
How to Use Sourdough Sandwich Bread
I love using this Sourdough Sandwich Bread for quick school lunches or an easy lunch at home. It makes the best PB&J and grilled cheese sandwiches, and it’s just as delicious for breakfast toasted with butter and jam.
How to store Sourdough Sandwich Bread
Once the loaf cools completely, you can store it in an airtight container or bag. It usually will last about 5 days unless humidity is high, which can cause it to mold quicker.
This sourdough sandwich bread freezes well too. I like to double the recipe and keep one on my counter and one in the freezer. You can either freeze the entire loaf uncut or sliced. To freeze an uncut loaf simply wrap in foil or place in a freezer safe ziplock. Once you are ready to eat the loaf place it on your counter covered overnight to thaw. To pull slices out individually, cut the loaf and place pieces of parchment paper in between each slice. Place in a freezer safe ziplock and pull slices out as needed.
Tips for the Best Sourdough Loaf Bread
- Make sure your dough is kept at the recommended temperature. Cooler conditions will slow down fermentation, and if the dough sits in an environment that’s too cold (typically the mid to low 60s°F), it may not rise at all.
- In summer months if you are doing the overnight rise use cooler liquids and reduce the sourdough starter amount to 125 grams. If the dough is still rising too quickly you can reduce the starter amount to as low as 100 grams.
- Watch the dough, not the clock. The visual cues of the dough doubling in size and then filling the loaf pan will be the best indicators the dough is ready.
- When shaping the dough, pull the dough gently towards you as you roll it. This will help create a smooth, taut surface on the top of the loaf.
- If you notice air pockets forming at the top of your loaves, try poking a few holes in the dough with a fork before baking to help release the trapped air.
Sourdough Sandwich Bread Recipe FAQs
Yes, if you prefer to use dairy-free milk I would recommend using fall-fat coconut milk so you are still getting the fat that you would typically get from whole milk. For butter you can swap out the butter for a plant-based butter or a cooking oil such as olive oil or coconut oil.
I recommend using bread flour because it absorbs more liquid than all-purpose. However, in a pinch you can use all-purpose flour, but I recommend reducing the amount of liquid added by 25 grams.
Yes, if you would like to bake the loaf later, shape it and add it to the loaf pan and let it rise for about an hour on the counter before placing it in the fridge for up to 12 hours.
This usually points to a proofing issue. If the dough rose too high and became overly puffy, it likely overproofed, causing it to collapse and form a gummy line. On the other hand, if it didn’t rise enough, it may have been underproofed, resulting in a dense, gummy loaf.
The dough will feel sticky at first when you begin kneading. Allow time for the gluten to develop before deciding if it needs more flour—often the dough will naturally become less sticky and easier to handle. If it still feels overly sticky after kneading, add a small amount of flour. Keep in mind that extra stickiness can also be a sign of an acidic starter, so try to use your starter at its peak, before it begins to fall.
This is a sign the dough was left to rise too long and became overproofed. Next time, try shortening the rise time or baking a little earlier to prevent it from going too far.
This is a sign of underproofing, usually caused by too short of a rise time. To fix this, extend the rise and focus on how the dough looks rather than just the clock. If it’s taking a long time, your dough may need a warmer spot—see my tips to keep your dough warm.
More sourdough Bread Recipes

Soft Sourdough Bread Recipes
Same Day Sourdough Dinner Rolls
Sourdough Artisan Bread Recipes
Easy Sourdough Bread Recipe

Sourdough Discard Recipes
Sourdough Discard Sandwich Bread Recipe
Sourdough Bread Recipes
Chewy Sourdough Bagels (so easy!)
Tried this Sourdough Sandwich Bread or another recipe from the site? I’d love to hear about it! Drop a star rating and share your thoughts in the comments—can’t wait to see what you’re baking!
Sourdough Sandwich Bread Recipe
Ingredients
- 150 grams sourdough starter, active and bubbly , ⅔ cup (see note below for overnight)
- 100 grams milk, ⅓ cup + 2 Tablespoons
- 160 grams water, ⅔ cup
- 50 grams sugar or honey, ¼ cup
- 57 grams unsalted butter, melted, ¼ cup
- 10 grams salt, 1½ teaspoon
- 100 grams whole wheat flour, ¾ cup
- 400 grams bread flour, 2¾ cups
Instructions
- Mix all ingredients together in a stand mixer or by hand. If you are doing the same-day schedule, use 150 grams of starter and warm liquids. If you are doing the overnight schedule, use 125 grams of starter and room-temperature liquid. 150 grams sourdough starter, active and bubbly , 100 grams milk, 160 grams water, 50 grams sugar or honey, 57 grams unsalted butter, melted, 10 grams salt, 100 grams whole wheat flour, 400 grams bread flour
- After mixing, knead the dough for 10–15 minutes—either in a stand mixer with a dough hook on low speed or by hand on a lightly floured surface. It will feel sticky at first, but as the gluten develops the dough will strengthen and become just tacky and easier to handle. Try not to add extra flour unless it remains very sticky even after several minutes of kneading.To determine when the dough is done kneading, perform a windowpane test. This should be done on relaxed dough so let your dough rest for a minute or two before completing the test. Gently pull a section of the dough thin enough to see light through. If it doesn't tear, then it is ready. If it tears, continue kneading for a few more minutes.
- Shape the dough into a ball and place it into a 2-quart straight-edge container or bowl. Cover the bowl and let it rise. Opt 1- Same Day Rise: Leave the dough at 80℉ to rise for 3-4 hours or until doubled in size. Opt 2- Overnight Rise: Leave the dough at 68-72℉ to rise for 8-12 hours or until doubled in size.
- Once the dough has doubled, punch it down and turn it out onto an unfloured surface. Grease an 8.5" x 4.5" (1-pound) loaf pan. Shape the dough into a rectangle, making the width about the same as the length of the pan. Starting from one short end, roll the dough up tightly, pulling it slightly toward you as you go. Place the log seam-side down into the prepared pan.
- Cover the pan and let the dough rise at 80℉ for about 2 hours or until the dough has risen about an inch above the loaf pan and fills the pan. The dough should feel light and if you poke the dough the indent should stay.
- Bake at 350℉ for 40-50 minutes (45 minutes is the sweet spot for me) until the internal temperature reaches 190℉ and the crust is browned.
- Remove the loaf from the loaf pan and place the bread on a cooling rack to cool before slicing.
Notes
- Store the bread in an airtight container or bag to prevent the loaf from drying out and store on the counter for up to 5 days.
- Save time by doubling the recipe and freezing an extra loaf for later. You can freeze it whole or pre-sliced. For a full loaf, place it in a freezer-safe bag and thaw overnight on the counter (leave it in the bag while it thaws). For slices, layer parchment or wax paper between each piece and store them in a freezer-safe bag. Then simply pull out slices as needed and toast or microwave to defrost quickly.
- Cold dough will rise much more slowly. For best results, place it in a warm spot. If it needs an extra boost, set the loaf in the oven with just the light on for 1–2 hours.
- If you notice air pockets forming at the top of your loaves, try poking a few holes in the dough with a fork before baking to help release the trapped air.
- The shaped dough can rest in the fridge for up to 12 hours before baking. After placing it in the loaf pan, let it rise for about an hour on the counter before placing it in the fridge. Keep in mind that the longer it ferments, the tangier the flavor will be.
- If preferred, you can swap the whole wheat flour for additional bread flour.
Nutrition
Nutrition information is automatically calculated, so should only be used as an approximation.


curious if I can cold proof this overnight and bake in the morning…and if so, would it be after the 2nd rise?
I would recommend letting it partially rise on the counter for the 2nd rise but not all the way and then proof overnight to bake in the morning.
What if you don’t have while wheat flour? Can you use 100 grams AP flour or all bread flour?
Yes you can replace with white flour
My dough was very sticky, do you have any ideas?
This was an easy recipe and it is absolutely delicious. I am a beginner and it was a little crumbly so I will keep practicing!
In notes, you state ‘If your house runs cold bump up the amount of sourdough starter to 125 grams’. Did you mean up amount to 150g? Thanks!
Yes thank you I fixed that on my end.
If I halve the sugar in the recipe, would you recommend adjusting the recipe in any other way? I am trying to avoid as much added sugar as possible, but miss the soft sandwich bread vs my sourdough boule…
No I’d keep everything else the same.
This recipe is easy to follow and produces a perfect loaf of sandwich bread. I had no whole wheat flour, so I ground up some sprouted oats and used that instead. The bread turned out perfectly. This recipe is definitely a keeper!!
Can vegan butter be used instead?
I haven’t tried it but it should work. Thanks!
I just noticed the amount of time to let it raise. Would it be okay to cold proof some during the 1st rise?